
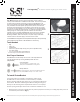
ProteaBracket-AL Installation

The Right Way
TM
to attach almost anything to metal roofs!
888-825-3432 www.S-5.com
ProteaBracket
TM
Install Instructions
Installation Instructions
S-5!
®
Warning! Please use these products responsibly! Visit our website or
contact your S-5! distributor for available load test results. The user is responsible
for all necessary engineering and design to ensure the ProteaBracket™ has
been properly spaced and configured. Notice to S-5! product users: Due to the
many variables involved with specific panel products, climates, environmental
phenomena and job particulars, the manufacturer cannot and does not express
any opinions as to the suitability of any S-5! assembly for any specific application
and assumes no liability with respect thereto. S-5! products are tested for ultimate
holding strength on various profile types and materials. This information is
available from the S-5! website: www.S-5.com. This document is an installation
guide only and the photographs and drawings herein are for the purpose of
illustrating installation, tools and techniques, not system designs. Information
contained herein is intended to apply to the document as a whole.
The ProteaBracket is designed to fit most trapezoidal sheet shapes. This product may
not be suitable for snow retention or PV installations in snow country.
These instructions are for use by those experienced in the trade. Always follow appropriate safety precautions and use appropriate tools.
Tools Needed
• Rag
• String Line
• Tape Measure
• Screw Gun*-(optional depth sensing nose piece or adjustable clutch)
• 5/16” Drive Socket
• 1/2” or 13 mm Open End or Socket Wrench
*For time saving tool recommendations contact S-5!
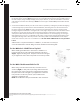
Use Proper Hardware
ProteaBracket is mounted directly onto the crown of the trapezoidal sheet
using the stainless steel cap screws (provided) or Bulb-Tite rivets
(not provided).
Provided
Not Provided
Screw Specications:
1/4” (6.3mm) Diameter - 1” (25mm) Length - 5/16”
(8mm) Hex head with EPDM rubber sealing washer
Rivet Specifications:
9/32” (7.7mm) Diameter - Alu/Alu Flat Head Bulb-Tite Rivet with
5/8” (16mm) EPDM Washer Grip: 0.032” / 0.8mm - 9.5mm
To Install ProteaBracket
To ensure brackets are installed in a straight line, install a single
ProteaBracket on each end of the roof at a measured, consistent
distance from the bottom edge of the roof. Use a string line between the
two brackets. Mount the remaining ProteaBracket along the string line,
directly into the sheeting of the trapezoidal rib of the roof. For upslope
bracket spacing techniques reference the S-5! website at www.S-5.com.
1. Determine the location of assembly. The only surface preparation necessary is to simply wipe away excess oil
and dirt from panel surface. (Fig 1)
1
2
3