
Specifications


Table Of Contents
- Owner’s Guide
- Trademarks
- TABLE OF CONTENTS
- CHAPTER 1. GETTING STARTED…………………………………………………..4
- CHAPTER 2. YOUR FIRST SCAN…………………………………………………..11
- CHAPTER 3. SCANNING BASICS…………………………………………………..14
- CHAPTER 4. PUSH BUTTON SCANNING…………………………………………35
- CHAPTER 5. SCANNING PROJECTS………………………………………………41
- CHAPTER 6. HOW TO GET HELP………………………………………………….50
- APPENDIX A. TECHNICAL SPECIFICATIONS…………………………………..56
- CHAPTER 1. GETTING STARTED
- Introduction
- Unpacking the Scanner
- Package Contents
- Getting to Know Your Scanner
- System Requirements
- Installing Adobe PhotoDeluxe on the PC
- Installing Adobe PhotoDeluxe on the Macintosh
- Installing the Hardware
- USB Connectors
- Checking Your Computer’s Connectors
- Connecting the USB Cable
- Connecting the UTC (Universal Transparency Cover) Cable on the AstraNET e5470 only
- Connecting the Power Adapter
- Scanning Your First Image With PhotoDeluxe
- Scanning an Image from the PC
- Scanning an Image from the Macintosh
- Turning the Scanner Lamp On and Off
- Setting VistaScan Preferences
- General
- Scan Destination
- Scanner Information
- VistaScan Beginner Window Features
- Selecting the Scan to Device or Application
- VistaScan Advanced Features
- Changing the Image Mode
- Changing the Resolution Setting
- Table 1. Resolution/File-Size Guidelines
- Changing the Descreen Feature
- Changing the Filter Setting
- Changing the Scale Factor
- Using the Auto Adjustment Feature
- Using the Scan Control Unit
- Using the Multiple Scan Mode
- Using the Color Adjustment Features
- Adjusting the Image Tones
- Adjusting the Color Balance
- Rotating/Inverting an Image
- Using VistaAccess – Direct Access
- Using VistaShuttle
- Using the UMAX Copy Utility
- Configuring the Push Buttons
- Using the Push Buttons
- Using VistaScan to Scan a Photo to E-mail
- Using VistaScan with PhotoDeluxe to Create Web-ready Images
- Creating a Calendar with PhotoDeluxe
- Converting Scanned Text to Editable Text with OmniPage
- Converting Scanned Text with OmniPage LE
- Using Online Manuals
- Troubleshooting
- Contacting Technical Support
- Maintenance
- Cleaning
- Scanner Specifications
- Trademarks
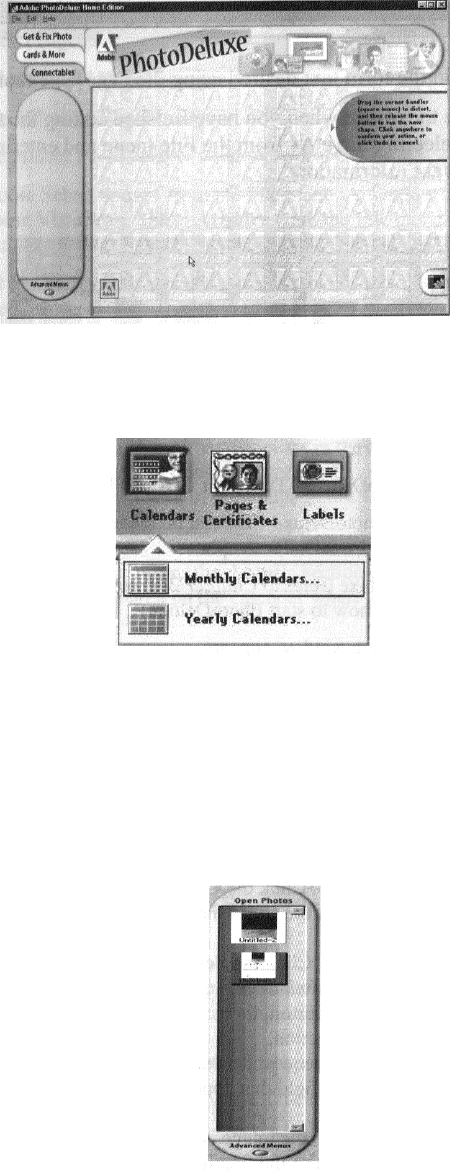
4. Click the Cards & More button.
5. Click the Calendars icon, and choose the Monthly Calendars option from the drop-down menu.
6. Follow the onscreen instructions through step 5, then click the Add tab and choose the scanner icon.
The VistaScan Beginner window opens automatically.
7. Click the Preview button to perform a low-resolution scan.
8. Click on the icon that most closely matches the item you are going to scan in the Click to Scan area.
9. The Open Photos dialog box displays a thumbnail version of the image you scanned.
10. Drag the thumbnail from the Acquire section of the My Photos dialog box to the desired location on
the calendar.
11. Click Save from the File menu to store the calendar page, or select Print to print the calendar page.
47