
Specifications


Table Of Contents
- Owner’s Guide
- Trademarks
- TABLE OF CONTENTS
- CHAPTER 1. GETTING STARTED…………………………………………………..4
- CHAPTER 2. YOUR FIRST SCAN…………………………………………………..11
- CHAPTER 3. SCANNING BASICS…………………………………………………..14
- CHAPTER 4. PUSH BUTTON SCANNING…………………………………………35
- CHAPTER 5. SCANNING PROJECTS………………………………………………41
- CHAPTER 6. HOW TO GET HELP………………………………………………….50
- APPENDIX A. TECHNICAL SPECIFICATIONS…………………………………..56
- CHAPTER 1. GETTING STARTED
- Introduction
- Unpacking the Scanner
- Package Contents
- Getting to Know Your Scanner
- System Requirements
- Installing Adobe PhotoDeluxe on the PC
- Installing Adobe PhotoDeluxe on the Macintosh
- Installing the Hardware
- USB Connectors
- Checking Your Computer’s Connectors
- Connecting the USB Cable
- Connecting the UTC (Universal Transparency Cover) Cable on the AstraNET e5470 only
- Connecting the Power Adapter
- Scanning Your First Image With PhotoDeluxe
- Scanning an Image from the PC
- Scanning an Image from the Macintosh
- Turning the Scanner Lamp On and Off
- Setting VistaScan Preferences
- General
- Scan Destination
- Scanner Information
- VistaScan Beginner Window Features
- Selecting the Scan to Device or Application
- VistaScan Advanced Features
- Changing the Image Mode
- Changing the Resolution Setting
- Table 1. Resolution/File-Size Guidelines
- Changing the Descreen Feature
- Changing the Filter Setting
- Changing the Scale Factor
- Using the Auto Adjustment Feature
- Using the Scan Control Unit
- Using the Multiple Scan Mode
- Using the Color Adjustment Features
- Adjusting the Image Tones
- Adjusting the Color Balance
- Rotating/Inverting an Image
- Using VistaAccess – Direct Access
- Using VistaShuttle
- Using the UMAX Copy Utility
- Configuring the Push Buttons
- Using the Push Buttons
- Using VistaScan to Scan a Photo to E-mail
- Using VistaScan with PhotoDeluxe to Create Web-ready Images
- Creating a Calendar with PhotoDeluxe
- Converting Scanned Text to Editable Text with OmniPage
- Converting Scanned Text with OmniPage LE
- Using Online Manuals
- Troubleshooting
- Contacting Technical Support
- Maintenance
- Cleaning
- Scanner Specifications
- Trademarks
The Descreen feature is unavailable when you have chosen the B/W Document, Fax, or OCR resolution
settings.
To change the Descreen feature:
1. Click the Descreen option to display the drop down menu.
2. Choose one of the descreen options:
No Descreen – No Descreening
Magazine – Specifies 133 lines per inch. This option smoothes the fine dot pattern found in glossy
magazines.
Newspaper – Specifies 85 lines per inch. Smoothes the coarse grain pattern commonly found in
newspaper images.
Art Print – Specifies 175 lines per inch. Smoothes the fine dot pattern found in high quality art prints.
Custom – Opens the Custom Descreen window, which allows you to specify a custom line screen
value. Refer to the Using Custom Descreen Settings section for information about how to set custom
descreen values.
Using the Descreen Settings
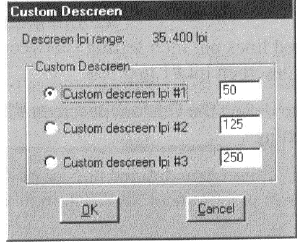
You can also specify custom descreen settings that you can use when you want to change the lines per inch
setting to eliminate patterns that are generated while scanning printed images. You can enter custom
settings that range from 35 to 400 lines per inch. To define the custom descreen settings:
1. Choose the Custom… option from the Descreen drop down menu. The Custom Descreen window
opens.
2. Enter the desired lines per inch setting (between 35 and 400 lpi) in the Custom descreen lpi #1 text
box.
3. Repeat step 2 to define the Custom descreen #2 and Custom descreen #3 settings.
4. Click OK. The settings you defined appear on the Descreen setting drop down menu, under the
Custom heading.
24