
Unit installation


9
more
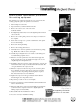
Over tightening can break the
quartz sleeves or create leaks.
Place end of quartz sleeve into threaded nipple
Remove socket covers
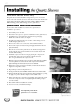
quartz sleeve replacement procedures
for existing equipment
The quartz sleeves designed for this unit are open on both ends. For
existing equipment, replace the quartz sleeves as follows:
1. Turn off all power to the unit.
2. Depressurize the system and drain the UV unit.
3. Remove the socket covers on the ends of the
treatment chamber.
4. For High-Temperature units, remove the alignment plate from both
ends of the unit.
5. Remove the existing lamp sockets and compression nuts from
the endplate.
6. Wear clean cotton gloves to prevent contamination of the quartz
sleeves and UV lamps.
7. Remove the existing UV lamps.
8. Remove the existing quartz sleeves.
9. Carefully remove each new quartz sleeve from the factory packag-
ing. Handle these with care as they are fragile.
10. Visually inspect all quartz sleeves for cracks or other damage. Do
not install damaged quartz sleeves.
11. Place the end of the quartz sleeve into the threaded nipple and
slowly push the sleeve into the chamber through to the second
endplate. Repeat for all quartz sleeves.
12. Install the compression nut and o-ring by placing the o-ring into the
internal relief of the compression nut below the threaded area. The
o-ring should fit into the compression nut.
13. Place the compression nut and o-ring onto the end of the quartz
sleeve until the end of the quartz sleeve touches the end of the
compression nut. Some pushing and twisting may be required.
Deionized water may be used as a lubricant.
14. Tighten the compression nut approximately 1/2 turn after the
threaded nipple and o-ring make contact.
15. Repeat this procedure for the second endplate.
16. Slowly repressurize the system and fill the treatment chamber with
water to check for leaks.
17. If there are leaks in any compression nut assembly, depressurize the
system and use the compression nut tool to slightly tighten the
leaking compression nut assembly.
18. Retest until a leak-free installation is verified.
19. You are now ready to install the UV lamps.
Rotate Compression Nut clockwise onto the
threaded stainless nippled end plate with
Compression Nut tool
Compression Nut assembled on the Quartz Sleeve