
Unit installation


11
single-ended lamp design for units
manufactured after January 1, 1999
Once it has been verified that there are no leaks in the system, the UV
lamps are ready for installation.
1. Remove all power to the UV unit.
2. Depressurize the system.
3. Wear clean cotton gloves to prevent contamination of the UV lamps.
4. Carefully remove each UV lamp from the factory packaging.
Handle these with care as they are fragile.
5. Visually inspect all lamps for cracks or damage.
Do not install damaged lamps.
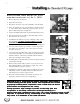
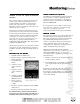
6. Using both hands, slowly insert the lamp into the quartz sleeve
by pushing one end of the lamp with one hand, while continu-
ing to support the lamp in a level, horizontal position with the
other hand. This is very important. If not installed properly, lamp or
quartz breakage will occur.
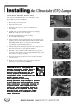
7. Twist the lamp into the locking mechanism of the compression nut.
This ensures the lamp is secure within the chamber.
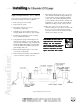
8. Each lamp socket is identified with a number that corresponds to
each lamp position marked on the end plate. Match the lamp socket
and connect to the appropriate lamp.
9. The two pins in the lamp must be pushed down to fit securely into
the pins with the connector.
10. Rotate and screw the lamp socket cap into place. Only hand
tightening is required. Do not overtighten!
11. Repeat the procedure above for the second endplate for the
non-pin lamp ends. Instead of securing the lamp socket lead
assembly to this end of the assembly you will twist on and firmly
secure the fixed Compression Nut Cap to the compression nut
assembled on the quartz sleeve.
CAUTION!CAUTION!
CAUTION!CAUTION!
CAUTION!
Prior to energizing thePrior to energizing the
Prior to energizing thePrior to energizing the
Prior to energizing the
ballasts and lamps, ensure there is noballasts and lamps, ensure there is no
ballasts and lamps, ensure there is noballasts and lamps, ensure there is no
ballasts and lamps, ensure there is no
ww
ww
w
aa
aa
a
ter leaking into the quarter leaking into the quar
ter leaking into the quarter leaking into the quar
ter leaking into the quar
tz sleetz slee
tz sleetz slee
tz slee
vv
vv
v
eses
eses
es
and compression nut cavities by properlyand compression nut cavities by properly
and compression nut cavities by properlyand compression nut cavities by properly
and compression nut cavities by properly
installing these components. Even ainstalling these components. Even a
installing these components. Even ainstalling these components. Even a
installing these components. Even a
small leak can fsmall leak can f
small leak can fsmall leak can f
small leak can f
lood a quarlood a quar
lood a quarlood a quar
lood a quar
tz sleetz slee
tz sleetz slee
tz slee
vv
vv
v
e ande and
e ande and
e and
comprcompr
comprcompr
compr
ession nession n
ession nession n
ession n
ut caut ca
ut caut ca
ut ca
vityvity
vityvity
vity
..
..
.
During operation, high voltage is present at theDuring operation, high voltage is present at the
During operation, high voltage is present at theDuring operation, high voltage is present at the
During operation, high voltage is present at the
lamp pins and receptacles of the lamp connectors.lamp pins and receptacles of the lamp connectors.
lamp pins and receptacles of the lamp connectors.lamp pins and receptacles of the lamp connectors.
lamp pins and receptacles of the lamp connectors.
PrPr
PrPr
Pr
olongolong
olongolong
olong
ed fed f
ed fed f
ed f
looding oflooding of
looding oflooding of
looding of
a quar a quar
a quar a quar
a quar
tz sleetz slee
tz sleetz slee
tz slee
vv
vv
v
e and com-e and com-
e and com-e and com-
e and com-
pression nut cavity can cause premature failure ofpression nut cavity can cause premature failure of
pression nut cavity can cause premature failure ofpression nut cavity can cause premature failure of
pression nut cavity can cause premature failure of
the lamp due to repeated arcing, overheating ofthe lamp due to repeated arcing, overheating of
the lamp due to repeated arcing, overheating ofthe lamp due to repeated arcing, overheating of
the lamp due to repeated arcing, overheating of
the lamp connector cable, and may result in athe lamp connector cable, and may result in a
the lamp connector cable, and may result in athe lamp connector cable, and may result in a
the lamp connector cable, and may result in a
meltdown of the cable insulation.meltdown of the cable insulation.
meltdown of the cable insulation.meltdown of the cable insulation.
meltdown of the cable insulation.
Screw the lamp socket cap on
Insert the
lamp into
quartz sleeve
Lamp locked into compression nut
Lamp socket ID number on end plate
Firmly connect the lamp pins with the connector