
Instruction manual

Upstream Instruction Manual
Released on 1-May-14 – R800001Q Page 38 UV Pure Technologies Inc. © 2014
*Do not replace the fuse in the unit if it blows. A blown fuse indicates major circuit
board fault. Replace entire circuit board. Inspect lamps-replace if discolored.
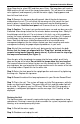
Step 4: Disconnect the top hose from the plumbing side (not the unit side but
other end).
Step 5: Add about 2 oz. (60cc) of cleaning solution to the top hose. The cleaning
solution can be a citric acid, vinegar or other non-hazardous solutions. Any
solution used should be thoroughly rinsed out afterwards. Fill the rest of the
quartz with water.
Step 6: Let the cleaning solution remain in the quartz for at least 10-20 minutes.
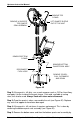
Step 7: Manually turning the wiper may greatly assist the cleaning process. To
do this, remove the motor assembly and turn the wiper shaft with a flat-bladed
screwdriver (counterclockwise while looking at the shaft).
Step 8: Drain the unit and inspect the quartz sleeve. If clean, flush the unit with
clean water. If fouling remains, repeat procedure.
Step 9: Once the unit is clean, reassemble the unit including the motor and top
hose connection.
Step 10: Slowly open the water supply and check for leaks.
Step 11: Replace all covers and plug in the Upstream unit.
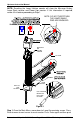
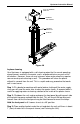
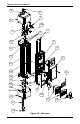
Disassembling the Unit
NOTE: This procedure is not recommended for individual household users
please contact your certified water specialist to assist should disassembly be
required.
Step 1: Fill a bucket or container with water before shutting off the water supply
since you will need the water later to clean the quartz sleeve (11). A squeeze
bottle is useful for applying water or cleaning solution to the inside of the quartz
sleeve.
Step 2: Place another bucket under the unit and drain the unit (see Draining the
Unit).
Step 3: Open the front panel. The lamps may be removed to prevent them from
getting dirty or damaged.
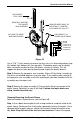
Step 4: Disconnect the Stainless flexible hose (8) from the top of the unit and
remove the top quartz seal assembly.
Caution: Do not damage the sealing surfaces of the end caps (5 and 19) or the
shaft of the wiper assembly (12). Handle these parts with care to prevent water
leaks.