
Instruction manual

Upstream Instruction Manual
Released on 1-May-14 – R800001Q Page 33 UV Pure Technologies Inc. © 2014
Up or Down key to select YES and then press Enter. The lamp hours will reset to
9000 and the unit will turn off the lamps automatically. This will close the solenoid
valve (optional) and temporarily shut off the water supply. Unplug power cord
from left hand side of unit.
Step 2: Remove the top cover by pulling each side of the plastic top cover
outward from the unit. This will reveal the two wing nuts that secure the front
panel in place. Loosen them so that the front panel may be tilted forward to
reveal the lamps. Hold the front panel until it comes to rest at a 45 position.
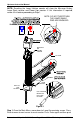
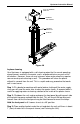
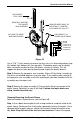
Step 3: Caution: The lamps heat up after continuous use and can burn your skin
if touched. Allow lamps to cool for five minutes before removing them. Slowly lift
the old lamps out of the unit. For assistance in this task, use a flat screwdriver
and pry the lamps up between lamp base and socket (see Figure 3). Dispose of
the old lamps in the same way as you would dispose of ordinary fluorescent
tubes. Note that old lamps should be disposed of at a household waste
management depot or transfer station; contact your local recycling and waste
management authority for proper disposal procedures in your area.
Step 4 Install the new lamps into the unit, being careful not to touch the bulb.
Ensure that the lamps are aligned with the “Stop Sign” printed on the top
ceramic facing inward (towards quartz sleeve). If you can see the stop sign,
the lamps are backward (See Figure 3).
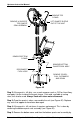
Once the pins of the lamp begin to engage into the lamp socket, push firmly
down on the top of the lamp. Do not twist the lamps when they are inserted.
The lamp will come to rest when the pins are fully seated into the socket. When
pressing down, be sure to position the lamp ceramic end in the center of the hole
in the lamp holders. Repeat this for the other side
Step 5: Return the front panel to the upright position and secure it by tightening
the wing nuts. Replace the top cover
Step 6: Record the date of the lamp replacement in your Service Record Sheet.
Step 7: Plug in the unit. The system will begin an Initial Set-up process while the
lamps are reaching full power. The green light will flash and the amber light will
be on solid. This process may last 24 hours. When the Initial Set-up process is
complete, a solid green light appears and the message “Unit Treating” will be
displayed.
Draining the Unit
The Upstream does not normally require draining for routine operation or lamp
replacement. Draining is necessary to disassemble the system, to protect against
freezing, or to remove poor-quality water.
Step 1: Shut off the water supply.
Step 2: Shutdown and unplug the unit.