USING YOUR SUPERCOM 4400 ™ 305–014000
Acknowledgement In 1963, Dr. Robert H.Weitbrecht, an American physicist who was deaf, developed an acoustic coupler that could send and receive teletypewriter signals over the telephone lines. His invention, the Weitbrecht Modem, enabled people who are deaf to use the telephone for the first time. While modern technology now makes it possible to build advanced microcomDr. Robert H.
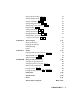
CONTENTS Important safety instructions p. 4 Introduction Overview of the Supercom 4400 p. 6 7 CHAPTER 1 Setup Plugging in power and a telephone line About the control key Ctrl About Auto ID™ Supercom 4400 function keys p. 9 10 12 12 14 CHAPTER 2 Calling Making a call in direct connect Ctrl + 1 Dialing tips Answering a call in direct connect Acoustic calling and answering Using Turbo Code® Turbo Code interrupt Ctrl + I Reading conversation memory Shift + Clearing conversations p.
CHAPTER 4 Auto-answer How auto-answer works About auto-answer memory Turning on auto-answer Ctrl + += Turning off auto-answer Esc Interrupting auto-answer Esc Reading auto-answer messages Esc Changing the contents of the preprogrammed auto-answer memo Ctrl + 6 Changing to a different auto-answer memo Ctrl + Auto-answer options Remote message retrieval p.
Saving relay information Ctrl + 9 Turning off Turbo Code Ctrl + 9 Turning on E-Turbo Ctrl + 9 Setting relay preferences Ctrl + 9 Setting relay carrier of choice Ctrl + 9 Relay User ID Ctrl + 9 Turning off Auto ID Ctrl + 9 Turning off interrupt Ctrl + 9 Changing ASCII seek time Ctrl + 9 Turning off the auto-answer relay voice announcer Ctrl + 9 65 66 66 67 68 68 68 69 69 69 CHAPTER 8 Care & repair About the batteries Replacing the batteries Troubleshooting Repair p.
Important safety instructions When using your Supercom 4400, basic safety precautions should always be followed to reduce the risk of fire, electric shock, and injury to persons. Save these instructions! 1. Read and understand all instructions. 2. Follow all warnings and instructions on the Supercom 4400. 3. Unplug the Supercom 4400 from the wall outlet before cleaning. Do not use liquid or aerosol cleaners. Use a damp cloth for cleaning. 4.
11. Unplug the Supercom 4400 from the wall outlet and refer servicing to qualified service personnel under the following conditions: a. When the power supply cord or plug is damaged or frayed. b. If liquid has been spilled into the Supercom 4400. c. If the Supercom 4400 has been exposed to rain or water. d. If the Supercom 4400 does not operate normally by following the operating instructions. Adjust only those controls that are covered by the operating instructions.
INTRODUCTION Welcome to the Supercom 4400™ TTY from Ultratec. Your new TTY has the following special features: A ring flasher that tells you that someone is calling. Turbo Code® communication protocol. This feature transmits signals to other Turbo Code TTYs as fast as you type. Turbo Code also lets you interrupt the other person’s typing. E-Turbo™ simplifies calling through relay services that support ETurbo, letting you directly dial the person you want to call.
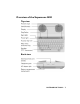
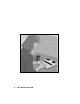
Overview of the Supercom 4400 Top view Back view INTRODUCTION • 7
8 • INTRODUCTION
CHAPTER 1 SETUP All you need to do to set up the Supercom 4400 is plug it in! You have to plug in the AC adapter for 24 hours to charge the batteries. The ring flasher will not work properly until the batteries are fully charged. After that, leave the AC adapter plugged in all the time unless you need to use the batteries during a power outage or while traveling. The best way to use the Supercom 4400 is to plug in a telephone line. This is called direct connect.
Plugging in power and a telephone line Be sure to pull the plastic tab out of the battery compartment on the bottom of the Supercom 4400 before you plug in the AC adapter. Caution! Do not plug the Supercom 4400 into any line other than a standard analog telephone line. If you do, you may damage your telephone system or Supercom 4400, and you will void your Plug the AC adapter into an electrical outlet. Plug the AC adapter cord into the jack on the back of the Supercom 4400.
You can also connect by putting a telephone handset in the acoustic cups if for some reason you cannot plug a telephone line into the Supercom 4400. See Acoustic calling and answering on page 22 for more information. Charging the batteries The AC adapter supplies electricity to the Supercom 4400 and charges the batteries. Leaving the AC adapter plugged in will not harm the Supercom 4400 or the batteries.
About the control key Ctrl The control key ( Ctrl ) gives instructions to the Supercom 4400 when you hold it down and press a function key. Most of the function keys are on the top row of the Supercom 4400. See Supercom 4400 function keys on pages 14–16 for a complete list. You must hold down the Ctrl key and then press the other key. For example, to dial you must hold down the Ctrl key while you press the 1 key.
Turning off Auto ID Ctrl + 9 Ctrl 1. Press the options key (hold down the key and press the key). 2. Press the Return key until you see the Auto ID option on the display. 3. Press the Spacebar to change the setting. 4. Press the Esc 9 key.
Supercom 4400 function keys This diagram shows the most important Supercom 4400 functions. Functions tell the Supercom 4400 to do something or change a setting. For example, the auto-answer function turns on autoanswer. Or use the options function to change a setting. All Ctrl + 2 automatically dials the relay service (page 33). Ctrl + 3 turns an external printer on (page 84). Ctrl + 4 sends the greeting memo (page 28). Ctrl + 5 sends a memo (page 54). Ctrl + 1 dials a telephone number (page 18).
functions begin by pressing and holding down the Ctrl key. The chart on the next page lists all of the Supercom 4400 functions. Use the page numbers to find more information about each function. Ctrl + 7 saves last conversation as a memo (page 56). Ctrl + 8 clears memory (page 26, 47, 55, 60, 75). Ctrl + 9 changes settings (page 61). Ctrl + 0 changes codes (page 77). Ctrl + += turns on auto-answer (page 41). Ctrl + Bksp saves telephone numbers (page 58).
Complete list of function keys Dial Ctrl + 1 Dials a telephone number p. 18 Relay Ctrl + 2 Automatically dials the relay service p. 33 Print Ctrl + 3 Turns an external printer on and off p. 84 Greeting Ctrl + 4 Sends the greeting memo p. 28 Send memo Ctrl + 5 Sends a memo p. 54 Memo Ctrl + 6 Saves, edits, or clears a memo p. 52 Saves a conversation as a memo p. 56 Save Ctrl + 7 conversation Clear Ctrl + 8 Clears all or part of memory p.
CHAPTER 2 CALLING This chapter covers the basics of making and receiving TTY calls and how to review a conversation after you finish a call. It also explains Turbo Code and how Turbo Code allows you to interrupt the other person while he or she is typing. Making a call in direct connect Ctrl + 1 p. 18 Dialing tips p. 19 Answering a call in direct connect p. 21 Acoustic calling and answering p. 22 ® Using Turbo Code p. 23 Turbo Code interrupt Ctrl + I p.
Making a call in direct connect 1. Turn on the Supercom 4400. 2. Press the dial key (hold down the Ctrl key and press the 1 key). 3. Type the telephone number you are calling. Use the Back Space key to correct mistakes. Press the Return key to dial the number. 4. When you see an answer on the display, type a greeting. Turn off the Supercom 4400 when you finish.
Signal light and display The signal light (and display in direct connect) show what is happening on the telephone line in the following ways: Signal light Display Telephone line Steadily on Dial tone Flashing slowly RINGING Flashing quickly BUSY Flickering Telephone ringing Telephone busy Person picking up telephone or speaking Dialing tips You may need to type a 9 or other number to reach an outside line if you are using the Supercom 4400 in an office.
Dialing from the directory Ctrl +1 You can dial from the directory if you have numbers saved. Follow these steps to dial from the directory: 1. Press the dial key (hold down the Ctrl key and press the 1 key). You will see TYPE NAME, NUM, OR CR on the display. 2. Type a name or press the Spacebar to review the list of directory names. 3. Press the Return key when you find the name you want.
Answering a call in direct connect 1. The ring flasher flashes when the telephone rings. 2. Turn on the Supercom 4400. The display says RING. 3. Type a greeting and wait for an answer. 4. Turn off the Supercom 4400 when you finish.
Acoustic calling and answering 1. Put the telephone handset in the acoustic cups on the Supercom 4400. Make sure the telephone cord is on the left side. 2. Turn on the Supercom 4400. If you are answering a call, type a greeting. If you are making a call, go on to Step 3. 3. Dial the number on the telephone. 4. When you see an answer on the display, type a greeting. Hang up the telephone and turn off the Supercom 4400 when you finish.
Using Turbo Code® About Turbo Code Turbo Code is an enhanced TTY protocol. It sends signals to other Turbo Code TTYs as fast as you type and allows you to interrupt the other person at any time during a conversation. The Supercom 4400 takes care of connecting in Turbo Code or Baudot code, depending on which code the other TTY is using. It only uses Turbo Code when you connect with another Turbo Code TTY. You can also “lock” Turbo Code to be always on during a call. See Tubro Code lock on page 81.
Turbo Code interrupt Ctrl + I Using Turbo Code interrupt You can interrupt the other person when he or she is typing by following these steps: 1. Be sure you see the Turbo Code dot in the lower left corner of your display. 2. Press the interrupt key ( Ctrl + I ) while the other person is typing.You will see INTERRUPT REQUESTED on the display. 3. The other person will see “Interrupt” on the display. He or she can choose to stop typing and let you go ahead or ignore your interruption and continue.
Reading conversation memory Shift + A conversation is everything you and the other person type during a call. Conversations are saved one after another in the conversation memory until the memory fills up. When the memory is full, the Supercom 4400 starts clearing the oldest conversations to make room for new ones. 1. Press the left arrow key (hold down Shift and press the key) to move back in memory. To move faster, hold down Shift and let go of the key. 2.
Clearing conversations If for some reason you do not want to leave a conversation in memory, you can clear the conversation memory yourself. This erases all conversations, but does not clear memos, directory entries, or auto-answer messages. Follow these steps to clear all conversations: 1. Press the clear key ( Ctrl + 8 ). You will see CLEAR (CONVERSATION) on the display. 2. Press the Return key. 3. Press the Y key when you see CLR CONVERSATION Y/N. Press the N key if you decide not to clear.
CHAPTER 3 ADVANCED CALLING This chapter describes Supercom 4400 features that can make your calling easier and more enjoyable. Several of these features enable you to take advantage of your telephone’s advanced calling features. For the basics of making and answering calls, see Chapter 2. Using the greeting memo Ctrl + 4 Using the TTY Announcer™ Ctrl + Spacebar p. 28 p. 29 Wait for response Ctrl + Shift + W p. 30 Using the relay voice announcer Ctrl + V p. 30 Saving relay information Ctrl + 9 p.
Using the greeting memo Ctrl + 4 Your Supercom 4400 comes with a greeting memo already saved in the list of memos. The memo is called “Greeting.” It says, “Hello ga.” Follow these steps to answer a call with the greeting memo: 1. Turn on the Supercom 4400. 2. Press the greeting key (hold down the Ctrl key and press the 4 key). You will see HELLO GA on your display while the memo is sent over the telephone line.
Using the TTY Announcer™ Ctrl + Spacebar The TTY Announcer message is a recording of a woman’s voice that says, “TTY call, please use text telephone.” Each time the voice speaks, the message is also displayed. Use the TTY Announcer when you think the person you are calling is expecting a voice call and may hang up if no one responds after they say hello. 1. Dial a number (see pages 18-20, and 22 for more information on dialing).
Wait for response Ctrl + Shift +W Use the wait for response feature when the other person tells you to hold. The Supercom 4400 will flash the ring flasher when the other person starts typing again. Follow these steps to turn on wait for response: 1. When the other person types, “Hold please,” or something similar, hold down the Ctrl and Shift keys and press the W key ( Ctrl + Shift + W ). The display says WAITING. 2. When you see the ring flasher flashing, the other person is typing.
Saving relay information 1. Press the options key (hold down the Ctrl key and press the 9 key). 2. Press the Return key until you see EDIT RELAY INFO (NO) on the display. Press the Spacebar to change the setting to YES. Press Return . 3. Type the voice relay service telephone number. This is the number the relay voice announcer will tell people to use. (See Using the relay voice announcer on page 30.) 4. Press the Return key to save the number. RELAY VOICE SAVED is briefly displayed.
5. Type the telephone number of your preferred relay service. Your TTY is preprogrammed with 711, which will reach your state relay service. This number is automatically dialed when you press Ctrl + 2 , saving time whenever you place a relay call. For more information about dialing relay, see page 33. Note: If you are in an office, remember to include the appropriate dialing prefix to dial out, such as 9. 6.
Relay dialing Ctrl + 2 Relay dialing lets you quickly dial your Telecommunications Relay Service (TRS) with the relay key ( Ctrl + 2 ). You can program your Superprint 4425 with the telephone number of your relay service (see Saving relay information on page 31). Placing a call using relay dial 1. 2. 3. 4. 5. 6. 7. Ctrl + 2 Make sure the Supercom 4400 is on and directly connected to your phone line. The Power light should be lit. Press the relay key (hold Ctrl key and press the 2 key).
About E-Turbo™ E-Turbo™ stands for “Enhanced Turbo Code,” an Ultratec technology that simplifies calling through relay services. E-Turbo eliminates most of the interaction between the caller and the Communications Assistant (CA) by automatically passing on the details of the call to the relay service. What are the benefits of E-Turbo? • • • • • Allows the TTY user to dial the phone number of the person they are calling directly, instead of first dialing the relay service.
Programming E-Turbo relay preferences Ctrl + 9 Note: You must turn E-Turbo on before you can program your user preferences. When E-Turbo is enabled, your Supercom 4400 will automatically use your relay preferences to set up the call with the CA. 1. Press the options key (hold down the Ctrl key and press the 9 key). 2. Press the Return key until you see RELAY PREFS displayed, plus the letter(s) of any preferences that have been programmed. 3.
4. 5. Press the Return key to move to the next menu option. CARRIER is displayed. If you wish to specify a long distance provider, you may fill in the carrier-of-choice option. To do this, contact your TRS for the code for your preferred long distance provider. Type this code and press Return . If you do not wish to specify a long distance provider, press the Return key. USER ID is displayed.
Relay dialing with E-Turbo Ctrl + 2 You can benefit from E-Turbo if your state or national Telecommunications Relay Service (TRS) provider offers E-Turbo technology. Please refer to page 33, Relay dialing, if E-Turbo is not available in your area. Placing a call using relay dial with E-Turbo on Ctrl + 2 1. 2. 3. 4. 5. Make sure the Supercom 4400 is on and directly connected to your phone line. The Power light should be lit. Press the relay key (hold Ctrl key and press the 2 key).
Auto busy redial Ctrl + Shift + Return When a number is busy, the Supercom 4400 can redial the number by itself up to 30 times. It will let you know when it makes a connection by flashing the ring flasher. You must be using direct connect to use this feature. Follow these steps to turn on auto busy redial: 1. Dial a number. If the number is busy, the display says BUSY. 2. Hold down the Ctrl key and the Shift key and press the Return key ( Ctrl + Shift + Return ). The display says AUTO REDIAL 01.
Three-way calling Ctrl + Shift + F If your telephone service includes three-way calling, the Supercom 4400 three-way calling feature lets you put one call on hold, call another number, and carry on a conversation among three people. Follow these steps to use the three-way calling feature: 1. Call the first number and begin your conversation. 2. Place the first person on hold by pressing the Ctrl key, the Shift key and the F key ( Ctrl + Shift + F ).
Transferring a call Ctrl + 1 Office telephone systems vary widely and specifics of how to transfer a call will be different for each system. Most telephone systems require a hook flash to transfer a call. On the Supercom 4400, typing an ! when you are dialing sends a hook flash. Here is an example of typical steps required to transfer a call while you are on the line with another person: 1. Press the dial key ( Ctrl + 1 ). You will see TYPE NAME, NUM, OR CR on the display. 2.
CHAPTER 4 AUTO-ANSWER Use auto-answer when you want the Supercom 4400 to automatically answer TTY calls and take messages. One way to use auto-answer is to turn it on when you are working around your home or office to make sure you do not miss calls. You must be using direct connect to turn on auto-answer. How auto-answer works p. 42 About auto-answer memory Turning on auto-answer Ctrl + p. 42 + = p. 43 Turning off auto-answer Esc p. 43 Interrupting auto-answer Esc p.
How auto-answer works The Supercom 4400 answers a call by sending the relay voice announcer message and the out-going auto-answer memo. The relay voice announcer message says, “Please use text telephone or dial relay.” It also adds a relay number if you have one saved. See Using the relay voice announcer on page 30 for more information about the relay voice announcer message. The out-going auto-answer memo is a short text message which says, “You have reached an answering machine, please leave a message GA.
Turning on auto-answer 1. Ctrl + + = Press the auto-answer key (hold down Ctrl and press the key). If you see REVIEW MESSAGES Y/N on the display, press the Y key to read messages or press the N key if you decide not to read them. + = 2. Press the Return key. Auto-answer is on. Be sure to leave the Supercom 4400 on. Turning off auto-answer Esc Press the Esc key or turn off the Supercom 4400 to turn off autoanswer.
Reading auto-answer messages The auto-answer display shows how many messages you have. 1. Press the Esc key to turn off auto-answer. 2. Press the Y key to read your messages. Each message begins with 5 dashes. Press the Spacebar to pause. Press the Spacebar again to continue. 3. To stop reading messages, press the Esc key.
4. Press the Y key to clear your auto-answer messages. Hold down the Shift key and press the key to read messages at normal speed. Keep holding down the Shift key but let go of the key to go faster. Hold down the key again to return to normal speed. Hold down the Shift key and the key to read back through messages. If you do not want to read messages when you turn off auto-answer, you can do so later. Messages stay in memory until you clear them.
Changing to a different auto-answer memo Ctrl + += You can change to a different auto-answer memo by typing a new memo name (and contents if necessary) when you turn on autoanswer. Follow these steps to change your auto-answer memo: 1. Press the auto-answer key ( Ctrl + ). You will see ANSWER MEMO and the name of your answer memo on the display. 2. Type a new name and press the Return key. 3. If the new memo does not already exist, type the contents of the memo and press the Esc key. Auto-answer is on. 4.
Turning off the auto-answer relay voice announcer Ctrl + 9 When the Supercom 4400 answers the telephone, it sends out the relay voice announcer message, “Please use text telephone or dial relay,” before it sends your auto-answer memo. If you do not want the Supercom 4400 to send this message, follow these steps to turn it off: 1. Press the options key ( Ctrl + 9 ). 2. Press the Return key until you see AUTO ANSW VOICE (ON) on the display. 3. Press the Spacebar to change the setting to OFF. 4.
Remote message retrieval Remote message retrieval allows you to use another TTY when you are away from home or work to call your Supercom 4400 and read auto-answer messages. You must enter and save a password before you can use remote message retrieval. The password prevents others from reading your messages. You can only have one password per household or office. Saving a password Ctrl + 9 Follow these steps to save a password: 1. Press the options key ( Ctrl + 9 ). 2.
4. 5. 6. Type / and your password, like this: /PASSWORD Press the Return key again. Your Supercom 4400 sends the number of messages you have and the number of free characters in auto-answer memory. After a pause, the Supercom 4400 sends the first message. It pauses briefly after each message. It sends (END OF MESSAGES) at the end. When your Supercom 4400 asks, “Clear messages Y/N?” press the Y key to clear them. Your Supercom 4400 sends “Messages cleared,” and hangs up to wait for the next call.
50 • MEMOS
CHAPTER 5 MEMOS A memo is a short message that you can save in the Supercom 4400 memory and later send to someone during a conversation. Examples of memos are: • The auto-answer memo that the Supercom 4400 sends out when you are away. • The greeting memo that you can send when you answer the telephone. • The memo that you create when you save a conversation. • A memo that contains a message, perhaps about an upcoming meeting, that you want to send to several people.
Saving a memo Ctrl + 1. Press the memo key (hold down the Ctrl key and press the 6 key). The display asks for a memo name. 2. Type a name and press the Return key. Names can be up to 8 letters, numbers, or spaces. The display shows the memo name with space to type the memo. 3. Type the memo. 4. Press the Esc key when you finish.
Use these function keys when you type your memo: • The left arrow key ( Shift + ) and the right arrow key ( Shift + ) move the memo back and forth across the display. • The Back Space key erases characters. • The Return key starts a new line when the memo is printed. • The remain key ( Ctrl + R ) shows the amount of free space in memory. • The clear key ( Ctrl + 8 ) erases the memo contents.
Sending a memo Ctrl 1. Press the send memo key (hold down the Ctrl key and press the 5 key). 2. Press the Spacebar until you see the name of the memo you want to send. You can type the name instead of pressing the Spacebar if you wish. 3. Press the Return key. The Supercom 4400 sends the memo. Press the Esc key if you want to stop sending the memo before it ends.
Editing a memo 1. 2. 3. 4. Ctrl 2. 3. 4. 5. 6 Press the memo key ( Ctrl + 6 ). You will see EDIT MEMO on the display. Press the Spacebar until you see the memo name on the display. Press the Return key. Use the following function keys to edit the memo: • The left arrow key ( Shift + ) and the right arrow key ( Shift + ) move the memo back and forth across the display. • The Back Space key erases characters. • The Return key starts a new line when the memo is printed.
Clearing all memos 1. 2. 3. 4. Ctrl + 8 Press the clear key ( Ctrl + 8 ). You will see CLEAR (CONVERSATION) on the display. Press the Spacebar to change the setting to MEMOS. Press the Return key. You will see CLEAR MEMOS Y/N on the display. Press the Y key to clear all memos. Press the N key if you decide not to clear all memos.
CHAPTER 6 DIRECTORY The directory lets you dial a number by typing the name of an entry. This makes dialing the number much faster and easier. There is no limit to the number of telephone numbers you can save as long as the total number of characters in all directory entries and memos is less than 9,400. Saving a telephone number Ctrl + Back Space p. 58 Dialing from the directory Ctrl + 1 p. 59 Editing a number Ctrl + Back Space p. 60 Clearing a number Ctrl + Back Space p.
Saving a telephone number Ctrl + Back Space You can save as many telephone numbers as memory will allow—up to 9,400 total characters for telephone numbers and memos. 1. Press the directory key (hold down the Ctrl key and press the Back Space key). 2. Type a name and press Return . Names can be up to 8 letters, numbers, or spaces, but must start with a letter. The name is displayed with space for a number. 3. Type the number. 4. Press the Esc key when you are finished.
Use these function keys when you type the number: • The left arrow key ( Shift + ) and the right arrow key ( Shift + ) move the number back and forth across the display. • The Back Space key erases characters. • The remain key ( Ctrl + R ) shows the amount of free space in memory. • The clear key ( Ctrl + 8 ) erases the whole number. Dialing tips: • • • • • • • In an office, you may need a 9 or other number at the beginning to reach an outside line. Use a comma to add a one-second pause.
Editing a number 1. 2. 3. 4. Ctrl Press the directory key ( Ctrl + Back Space ). You will see DIR NAME on the display. Press the Spacebar until you see the number on the display. Press the Return key. Use these function keys to make changes: • The left arrow key ( Shift + ) and the right arrow key ( Shift + ) move the number back and forth across the display. • The Back Space key erases characters. • The remain key ( Ctrl + R ) shows the amount of free space in memory.
CHAPTER 7 OPTIONS This chapter describes all of the settings you can change with the options key. They are listed in the order they appear on the display when you press the options key ( Ctrl + 9 ) and then the Return key. Use the Spacebar to show the different settings for each option. Use the Return key to select a setting. Setting the print case Ctrl + 9 p. 62 Setting the display mode Ctrl + 9 p. 62 Setting pulse dialing Ctrl + 9 p. 63 Setting the number of auto-answer rings Ctrl + 9 p.
Setting the print case Ctrl + 9 If you have an external printer connected to your Supercom 4400, follow these steps to print in all uppercase letters: 1. Press the options key ( Ctrl + 9 ). You will see PRINT (UP/LOW) CASE on the display. 2. Press the Spacebar to change the setting to UPPER. 3. Press the Esc key to save the setting and leave options or press the Return key to save the setting and go to the next option.
Setting pulse dialing Ctrl + 9 The Supercom 4400 is set for tone dialing, which is correct for almost all telephone lines. You can, however, change the setting to pulse dialing if your line does not accept tone dialing. This setting remains changed until you change it again or reset the Supercom 4400 or lose power. Follow these steps to set pulse dialing: 1. Press the options key ( Ctrl + 9 ). You will see PRINT (UP/LOW) CASE on the display. 2.
Setting the auto-answer memo Ctrl + 9 Follow these steps to choose any memo as your answer memo: 1. Press the options key ( Ctrl + 9 ). You will see PRINT (UP/LOW) CASE on the display. 2. Press the Return key until you see ANSWER MEMO on the display. 3. Type a memo name or press the spacebar to read through the list of memos. Use the Back Space key to move back through the list. 4. Press the Return key when the display shows the name of the memo you want to use. 5.
Changing the greeting memo Ctrl + 9 Follow these steps to change the memo that the Supercom 4400 sends when you press the greeting key ( Ctrl + 4 ). 1. Press the options key ( Ctrl + 9 ). You will see PRINT (UP/LOW) CASE on the display. 2. Press the Return key until you see GREET MEMO>GREETING on the display. 3. Either type in a new name or press the Spacebar to find the name of a different memo in the list of memos. 4. Press the Return key to save the setting. 5. Press the Esc key to leave options.
8. 9. Press the Return key. You will see RELAY VOICE SAVED briefly displayed. Press the Esc key to leave options. Turning off Turbo Code Ctrl + 9 Follow these steps to turn off Turbo Code: 1. Press the options key ( Ctrl + 9 ). You will see PRINT (UP/LOW) CASE on the display. 2. Press the Return key until you see TURBO CODE (ON) on the display. 3. Press the Spacebar to change the setting to OFF. 4.
Setting relay preferences Ctrl + 9 Note: You must turn E-Turbo on before you can program your user preferences. 1. Press the options key (hold down the Ctrl key and press the 9 key). 2. Press the Return key until you see RELAY PREFS displayed, plus the letter(s) of any preferences that have been programmed. 3. Type the letter(s) of the relevant setting from the following chart. You can select as many preferences as you want.
Setting relay carrier of choice Ctrl + 9 Note: You must turn E-Turbo on before you can set your relay carrier of choice. Follow these steps to select the long-distance carrier of choice for your E-Turbo relay calls: 1. Press the options key ( Ctrl + 9 ). You will see PRINT (UP/LOW) CASE on the display. 2. Press the Return key until you see CARRIER displayed. 3. Enter the code of your preferred long distance carrier.
Turning off interrupt Ctrl + 9 Follow these steps to turn off incoming interrupts: 1. Press the options key ( Ctrl + 9 ). You will see PRINT (UP/LOW) CASE on the display. 2. Press the Return key until you see INTERRUPT (ON) displayed. 3. Press the Spacebar to change the setting to OFF. 4. Press the Esc key to save the setting and leave options or press the Return key to save the setting and go to the next option.
7 0 • C A R E & R E PA I R
CHAPTER 8 CARE & REPAIR Ordinary care of your Supercom 4400 requires replacing the batteries when they no longer hold a full charge. If you have any other problems, you may be able to solve them by reading the troubleshooting section. Besides the battery compartment, the Supercom 4400 has no other user-serviceable parts. Any repair work should be done by a qualified service person. If you try to repair the unit yourself, you may damage the Supercom 4400 and you will void your warranty.
About the batteries The Supercom 4400 runs on batteries when you unplug the AC adapter or the power fails. Fully-charged, the six AA rechargeable NiCad batteries will provide 45 to 60 minutes of normal use. When the power light blinks, you have about 5 minutes of battery power left. Checking the batteries The batteries lose their ability to hold a full charge if you keep the Supercom 4400 plugged in all the time. If you want to be sure the batteries stay fully-charged, check them once a month.
Replacing the batteries Replace the batteries every two or three years, or when they run down in less than 30 minutes and exercising them does not help. Use only AA NiCad rechargeable batteries. Turn over the Supercom 4400 and follow these steps to change batteries: Take off the battery cover by pushing in on the latch and lifting up. Put the battery cover back on. Take out the old batteries and put in new ones. Be sure the + and – ends match the symbols on the holder.
Troubleshooting Direct connect Dialing does not work. Make sure you have the right tone or pulse setting for your telephone system. The display says NO DIRECT CONNECT. The Supercom 4400 is not properly connected to the telephone line. Be sure the cord is firmly plugged into the Supercom 4400 and the telephone wall jack. You can also try using a different telephone cord or wall jack. Reception The display shows all numbers, symbols, or unreadable characters instead of words. Press the Spacebar .
Power The flasher does not work. Be sure the plastic tab has been pulled out of the battery compartment and that the Supercom 4400 has been plugged in for at least 24 hours. The batteries run down too soon. You may not be regularly using your Supercom 4400 on battery power, or the batteries are old. See About the batteries on page 72. The Supercom 4400 does not turn on when the On/Off switch is pressed, or the power light blinks, even when the AC adapter is plugged in.
Resetting the Supercom 4400 Resetting the Supercom 4400 returns all options to their original settings and clears all conversations, auto-answer messages, memos, and directory entries. Follow these steps to reset the Supercom 4400: 1. Press the left Shift key, the right Shift key, and the Ctrl key all at the same time. You will see a version number and RESET Y/N on the display. Important! After the next step, everything in all memories will be cleared.
CHAPTER 9 CODES ASCII code is an optional part of the Supercom 4400. To find out if your Supercom 4400 has ASCII code, press the code key ( Ctrl + 0 ), then press the Spacebar . If the display says CODE (ASCII), you have ASCII code. Press the Esc key. Setting the Baudot code baud rate Ctrl + 0 p. 78 Optional ASCII code Ctrl + 0 p. 78 Turbo Code lock Ctrl + 0 p.
Setting the Baudot code baud rate Ctrl + 0 The Supercom 4400 is set to use whichever code it needs to answer a call, but you can set the unit so that it will only use Baudot code. When you do, the Supercom 4400 will not try to use other codes. Follow these steps to change the Baudot code setting: 1. Press the code key ( Ctrl + 0 ). You will see CODE (AUTOMATIC) on the display. 2. Press the Spacebar to change the setting to BAUDOT. 3. Press the Return key. You will see BAUDOT (AUTO) BAUD on the display.
Baud rate is how fast characters travel. You can choose 110 or 300 baud, but 110 is rarely used. The default is 300. Duplex controls how characters are displayed. If you get double characters (lliikkee tthhiiss) or none at all, change the option between half duplex and full duplex. The default is half. Parity controls error-checking. You can choose 7N1, 8N1, 7E1, or 7O1. The first number is data bits. The middle letter means (N)o parity, (E)ven parity, or (O)dd parity. The last number is stop bits.
Changing ASCII seek time This option sets the length of time during which the Supercom 4400 sends out an ASCII seek tone. The normal TTY seek time is three seconds. You may need more time if you often connect to computers. Six seconds is recommended. Follow these steps to change the setting: 1. Press the options key ( Ctrl + 9 ). You will see PRINT (UP/LOW) CASE on the display. 2. Press the Return key until you see ASCII SEEK TIME (3) on the display. 3.
During an ASCII call If you do not receive a clear message during an ASCII call, try: • Changing the parity setting. • Changing the duplex option. • Using the other baud rate (110 or 300). If the code option is set to automatic and your Supercom 4400 loses the ASCII connection, the Supercom 4400 will display NO ASCII CONNECTION! and change to Baudot code. To return to ASCII code, you must turn on ASCII yourself. See Turning on ASCII code and changing options on page 79.
82 • USING ANN EXTERNAL PRINTER
APPENDIX A USING AN EXTERNAL PRINTER You can connect a parallel (Centronics-type) printer to your Supercom 4400 if you want to print out your conversations, autoanswer messages, and memo and directory listings. Setting up an external printer p. 84 Turning the printer on and off Ctrl + 3 p. 84 Other printer information p. 85 Printing memos Ctrl + 6 p. 85 Printing directory numbers Ctrl + Back Space p.
Setting up an external printer You will need a special cable to connect your external printer. Contact Ultratec for more information about printer cables. Follow these steps to connect your printer to the Supercom 4400: 1. Take off the printer port cover on the Supercom 4400. 2. Plug the printer cable into the Supercom 4400 printer port. 3. Plug the other end of the printer cable into the printer. 4. Plug the printer’s electrical plug into an electrical outlet. 5. Turn the printer on.
Other printer information You can start a new printed line by pressing the Return key. Press the Return key to print the last line of a conversation before you turn the Supercom 4400 off. The printer will print everything you type in lowercase (small) letters and everything the other person types in uppercase (CAPITAL) letters. You can set the Supercom 4400 so that everything is printed in uppercase letters. Follow these steps: 1. Press the options key ( Ctrl + 9 ).
3. 4. 5. Press the print key ( Ctrl + 3 ). Press the print key ( Ctrl + 3 ) again if you want to stop printing before the end of the list. Press the Esc key to leave the list of memos. Printing directory numbers Ctrl + Back Space Printing one number 1. 2. 3. 4. Press the directory key ( Ctrl + Back Space ). You will see DIR NAME on the display. Press the Spacebar until you see the number you want to print on the display. Press the Return key. Press the print key ( Ctrl + 3 ) to print the entry.
STICKY KEYS Ordinarily, when you use the Ctrl or Shift keys, you must hold down either key while you press another key. If you have trouble pressing two keys at one time, the sticky keys feature lets you use the Ctrl and Shift keys by pressing one key at a time. Press either Shift key five times to turn on sticky keys. You will see STICKY KEYS ON on the display. Now you can dial by pressing the Ctrl key and then pressing the 1 key. You do not need to hold down the Ctrl key.
SPECIFICATIONS Physical Dimensions Size: 10" x 9.5" x 3" (25.4 cm x 24.1 cm x 7.6 cm) Weight: 3.6 lbs (1.7 Kg) with batteries Power AC adapter: 9VDC, 650 ma (barrel is positive) Adapter is UL/CSA listed Rechargeable batteries: six, user-replaceable, NiCad Batteries will power the unit for 45 to 60 minutes. Keyboard 50 ergonomic keys in 5 rows Control key plus 23 function keys Sticky Keys for single-handed typists Character set: A-Z, 0-9, Back Space, Return/LF, Space, +=-$’()”/:;?,.
FCC information The Supercom 4400 has been tested and found to comply with the specifications for a Class B digital device pursuant to Part 15 of the FCC Rules. These limits are designed to provide reasonable protection against harmful interference in a residential installation. This equipment generates and uses radio frequency energy and if not installed and used in accordance with the instructions, may cause harmful interference to radio communications.
Industry Canada information NOTICE: This equipment meets the applicable NOTICE: The Ringer Equivalence Number Industry Canada Terminal Equipment Technical Specifications. This is confirmed by the registration number. The abbreviation, IC, before the registration number signifies that registration was performed based on a Declaration of Conformity indicating that Industry Canada technical specifications were met. It does not imply that Industry Canada approved the equipment.
INDEX A AC adapter, 9, 10, 11, 72, 75 jack, 7, 10 Acoustic cups, 7 using, 9, 22 Adapter, see AC adapter Address, Ultratec, inside front cover Announcer, see TTY Announcer Announcer key, 15, 16, 29 Answer setting, for ASCII code, 78 Answering calls, 21 automatically, see Auto-answer with acoustic cups, 22 with ASCII code, 80 ASCII code option, 78-81 answering a call using, 80 making a call using, 80 options for, 78-79 seek time, 69, 80 turning on, 79 Auto-answer, 41-49 direct connect and, 41 interrupting, 43
Password, see Auto-answer, I Interrupt key, 16, 24 L Lightning danger, 5 Light, power, 7, 72, 75 Light, signal, 7, 19 M Memo key, 14, 16, 52, 55 Memory auto-answer, 42, 75, 88 clearing, 26, 47, 55-56, 60, 75 conversation, 25, 28,75, 88 directory, 57, 75, 88 memo, 51, 56, 75, 88 running out of, 42, 52 showing free space in, 53, 55, 59, 60 Memos, 51–56 auto-answer and, see password Phone line, see Telephone line Phone numbers, see Dialing or Directory entries Power connecting, 10 jack, see AC adapter ja
Conversation etiquette GA When you talk with another person by TTY, you type while the other person reads. When you want the other person to respond, type GA for “Go ahead.” GA OR SK To say goodbye, type GA OR SK. This gives the other person a chance to say any last words before ending the conversation. SKSK Type SKSK to end the conversation. Q Some people prefer to type Q instead of a question mark because it saves time and is easier to type.