
Product Manual


Page 8 of 13
Assembly Instructions
Insert the quick attach handle until it clicks into place. Fast speed for quick pull in, low speed for
increased mechanical advantage. The quick attach handle easily transitions from high speed to low
gear for heavier loads.
Before Each Use
⚠WARNING
CHECK BEFORE USE
Check the safety devices and the safe condition of the product.
Check whether there are any visible defects.
Check whether all parts of the product are firmly attached.
Check that the safety devices are in faultless condition.
Operating Instructions
⚠WARNING
The handle and nut must be tightened against the drive shaft before operating the winch.
The wire rope must be properly wrapped on the drum to be able to support a load without
damaging the wire rope.
Winding/unwinding the cable without load
1) Place the ratchet lever in the center position.
2) The cable reel now moves freely in both directions.
3) Pull the steel cable at the fixed hook until the hook can be attached to the load to be moved.
4) Wind back the excessive cable by turning the crank clockwise.
Winding up the cable under load (towing, loading)
1. Hold the crank firmly and push gently to relieve the ratchet lever.
2. Place the ratchet lever at position.
3. Turn the crank clockwise to evenly wind up the steel cable.
Unwinding the cable under load (lowering &unloading)
1. Hold the crank firmly and push gently to relieve the ratchet lever.
2. Place the ratchet lever at position.
3. The steel cable should be fully retracted again after use.
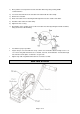
Ratchet switch
1. There are 3 positions for this ratchet switch: The higher position is forpulling, the lower position is
for releasing, the middle position is for both pulling and releasing,but can only be used when the
winch is loaded. Hold the crank handle tightly if you want tochange the switch position.
2. Before using, install the winch on a firm and flat surface. To install it, put the ratchet switch on the
middle position and pull the cable out until the holes on the bottom of the base are visible. Then
use at least 3 sets of 3/8in. bolts and locking nuts, in a triangular pattern, to attach the base to the
surface. Use an extra metal or hardwood board when necessary.
3. Install the crank handle to the axis bolt with nut.