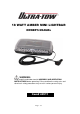
8 WATT AMBER MINI LIGHTBAR OWNER’S MANUAL WARNING: Read carefully and understand all ASSEMBLY AND OPERATION INSTRUCTIONS before operating. Failure to follow the safety rules and other basic safety precautions may result in serious personal injury.
Thank you very much for choosing an Ultra-Tow product! For future reference, please complete the owner’s record below: Model: _______________ Purchase Date: _______________ Save the receipt, warranty and these instructions. It is important that you read the entire manual to become familiar with this product before you begin using it. This lightbar is designed for certain applications only. The distributor cannot be responsible for issues arising from modification.
manual cannot cover all possible conditions or situations that could occur. It must be understood by the operator that common sense and caution are factors that cannot be built into this product, but must be supplied by the operator. SAVE THESE INSTRUCTIONS IMPORTANT SAFETY CONSIDERATIONS • If mounting this product requires drilling holes, the installer MUST be sure that no vehicle components or other vital parts could be damaged by the drilling process.
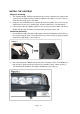
INSTALL THE LIGHTBAR Magnetic mounting 1. The magnetic lightbar should be positioned on the vehicle’s roof where the magnets will safely secure the lightbar. Before mount the lightbar to the roof, be sure the surface is clean and clear of dirt, grease and debris. 2. Locate the desired location where you wish to mount the lightbar. For best results you should make sure the lens is unobstructed, so that the light can be seen 360 degrees. 3.
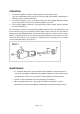
OPERATION 1. To turn on the lightbar, insert the 12V plug into the vehicles power outlet. Press the on/off button on the back on the 12V plug. When the lightbar is operating, the LED on the plug’s switch will illuminate. 2. To change the pattern, press the button beside to the on/off button. Memory function keeps same pattern selected, even when the lightbar is turned off. 3. To turn off the lightbar, remove the 12V plug from the vehicle’s power socket or position the on/off switch to off.
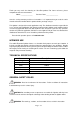
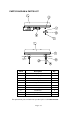
PARTS DIAGRAM & PARTS LIST mounting surface Part# Description Qty. 1 Light Body 1 2 12V plug 1 3 Spring 4 4 Sleeve gasket 4 5 Magnetic base 4 6 M6 x 20 screw 4 7 Rubber gasket 4 8 Flat washer 4 9 Spring washer 4 10 M6x45 Hex bolt 4 For replacement parts and technical questions please call 1-800-222-5381.
Page 7 of 8
WARRANTY 3-year limited warranty Distributed by: Northern Tool + Equipment Co., Inc. Burnsville, Minnesota 55306 NorthernTool.