
Product Manual


Installation Instructions
3
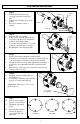
Step 1
Remove the existing dust cap,
cotter pin, castle nut, washer and
hub.
Remove any remaining grease from
spindle.
Inspect for spindle for wear or
damage.
Step 2
Slide new hub onto spindle.
Using a torque wrench, tighten the new
castle nut to 30-40 foot-lbs. Turn hub to
ensure proper bearing seating
Loosen the castle nut until loose enough
to turn the castle nut with you fingers.
Re-tighten the castle nut finger tight.
Step 3
Install cotter pin through the hole in the spindle.
If the hole is covered by the castle nut, loosen the castle nut
to the nearest hole so that the cotter pin can be installed.
The hub should rotate freely when spun by hand, and there
should be no movement when the hub is pulled back and
forth.
Bend the legs of the cotter pin to ensure the cotter pin and
castle nut will not loosen.
Step 4
Install the dust cap with the dust cap
installation tool.
Use a mallet or hammer, only strike the
dust cap tool and not the dust cap
(Helpful hint): Place piece of wood over
the dust cap tool.
Step 5
Start all nuts by hand to
prevent cross threading.
Tighten the lug nuts in
stages.
Following the sequence
and torque stages per
your specific hub and
wheel size.
Wood block
(not supplied)
4 Bolt Hub
5 Bolt Hub
6 Bolt Hub
Dust cap
Spindle
Hub
Cotter
pin
Washer
Castle nut
Castle
nut
slot