
Product Manual

Page 6 of 11
operating.
DO NOT exceed the rated load capacity.
Distribute the load evenly. Uneven loads may cause the dolly to tip, resulting in personal injury to
the operator or others.
Always be aware of dynamic loading. An excess load may be created for a brief instant by a
sudden tug or weight gain, which can result in damage to the product or personal injury.
Always keep arms, feet and legs out from under the trailer tongue while hitching, unhitching or
moving the trailer.
Wear ANSI Z87.1 safety goggles during use.
Always make sure the loaded trailer is chocked properly before moving the dolly into place.
Maintain proper tire pressure at all times. DO NOT over inflate tire. Over inflation may cause the
tire to burst or the rim to separate, causing serious personal injury.
Be sure the trailer tongue is securely connected to the trailer dolly coupler ball before unlocking
and moving the trailer. Use best judgment to prevent sudden uncontrolled movement of the trailer
once it is connected.
NEVER LEAVE a dolly under load unattended.
Always check for damaged or worn parts before using the dolly. Replace or repair damaged or
worn parts before using the dolly.
Use the dolly on flat and level surfaces capable of supporting the dolly and its maximum load.
Pulling or pushing a load on a slanted or uneven surface can result in loss of control.
Do not modify the dolly in any way. Unauthorized modification may impair the function and/or
safety and could affect the life of the equipment. There are specific applications for which the dolly
was designed.
Store an idle dolly. When the dolly is not in use, store it in a secure place out of the reach of
children. Inspect it for good working condition prior to storage and before re-use.
Not for use by or around children.
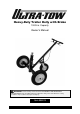
Assembly Instructions
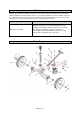
• Attach Handle Tube (#8) to the Axle Assembly (#1) using a Bolt (#9) and Nut (#10).
• Attach 10” Brake Caster (#12) to the Wheel Mount Plate (#11) with a Nut (#10) and Bolt (#13).
Then connect to the Handle Tube (#8) using a Bolt (#9) and Nut (#10).
• Insert 2” Ball Mount Bracket (#6) into the Axle Assembly (#1) and secure with a Safety Pin (#4)
and Pin Shaft (#5).
• Install the 2” Trailer Hitch Ball (#7) onto the 2” Ball Mount Bracket (#6).
• Install two 16” Wheels (#2) with Axle Assembly (#1) by using Plate Washer (#3) and Safety Pin
(#4).
• Connect two Wire Brakes (#15) through Axle Assembly (#1) and Handle Tube (#8) with the top of
Handle (#14),
• Test and adjust the Wire Brake (#15) until it’s at a comfortable place in the Axle Assembly (#1).
• Check and tighten all hardware as needed.