
Product Manual


Ball Coupler, and 1/2in. longer that the width of the Ball Coupler. Also acquire two flat washers, and
two hex lock nuts. (Hardware not supplied.)
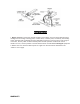
4. Place the Bolts through the Ball Coupler holes (shown below), and secure from the other side
first with the flat washer, then the hex lock nut. Securely tighten with a wrench (not supplied).
5. To reduce friction between the tongue ball and Ball Coupler, apply a layer of heavy weight
grease over the Tongue ball. Refer to the illustration on the next page.
6. Pull up on the Trigger and lift up on the Handle.
7. With assistance, place the Ball Coupler over the vehicle’s Tongue ball and pull back on the
Trigger and push down on the Handle until the Trigger locks in the slot. Pull up and down on the
Ball Coupler to make sure the Tongue ball is fitting snugly in the Ball Coupler. There should be no
play between the Tongue ball and the Ball Coupler.
8. Attach a Safety Pin and retaining clip (both not included).
9. Attach each side of the Safety Chain (not supplied) equally to the tow vehicle’s designated safety
chain location.
CAUTION: If there is play, tighten the Adjustment Nut until no play is present. If
the Adjustment Nut is too tight, the Handle will not lock. Failure to properly adjust can result
in uncoupling.
After the Adjustment Nut is properly adjusted, pull back on the Trigger and push down
on the Handle until the Trigger locks in the slot. Pull up on Handle firmly to make sure the
Trigger is locked in place and the Handle cannot move.