
Product Manual


Page 8 of 12
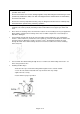
Unwinding the cable under load (lowering & unloading)
1. Hold the crank firmly and push gently to relieve the ratchet lever.
2. Place the ratchet lever at position.
3. The steel cable should be fully retracted again after use.
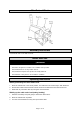
Ratchet switch
1. There are 3 positions for this ratchet switch: The higher position is for pulling, the lower position is
for releasing, the middle position is for both pulling and releasing, but can only be used when the
winch is loaded. Hold the crank handle tightly if you want to change the switch position.
2. Before using, install the winch on a firm and flat surface. To install it, put the ratchet switch on the
middle position and pull the cable out until the holes on the bottom of the base are visible. Then
use at least 3 sets of 3/8in. bolts and locking nuts, in a triangular pattern, to attach the base to the
surface. Use an extra metal or hardwood board when necessary.
3. Install the crank handle to the axis bolt with nut.
4. Put the ratchet switch on the higher position and turn the crank handle clockwise to pull. Place the
ratchet switch on the lower position and turn the crank handle counterclockwise to release.
5. When finished, attach the hook to the paw bushing.
Maintenance
⚠WARNING
This winch has been fully lubricated at the factory; but, for continued smooth performance and
increased life, occasional greasing of gears and reel shaft and an occasional drop of oil on drive
shaft bearings are recommended.
Inspect periodically all parts, steel cable, accessories and replace them if damaged or used.
Have damaged parts replaced by an authorized service center.
Check the nuts periodically and tighten them if they are loose.
Keep winch in good working order. Damaged or severely-worn parts create unnecessary dangers
and could result in personal injury or property damage.
Always lock up product and keep out of children.
Maintain the winch by adopting a program of conscientious repair and maintenance in accordance
with the following recommended procedures. It is recommended that the general condition of any tool
be examined before it is used. Keep your tool in good repair. Keep all cutting tools sharp and clean.
Properly maintained cutting tools with sharp cutting edges are less likely to bind and are easier to
control. Keep handles dry, clean, and free from oil and grease. Also refer to the engine manufacturer’s
instruction manual for additional information about engine maintenance. The following chart is based
on a normal operation schedule.
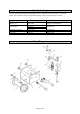
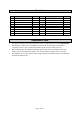
Maintenance Interval
Maintenance Point
Daily before operating
Periodically inspect all parts, steel cable, accessories and
replace them if damaged. Have damaged parts replaced by an
authorized service center. Check the nuts periodically and
tighten if loose.
After the first 20 operating hours
Follow the instructions for lubricating periodically
Lubricate the cable and hook regularly with slight grease.
Grease the gears every 6 months. Use any good quality
waterproof grease.