
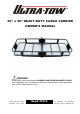
Product Manual

3
• Stay alert, watch what you are doing and use common sense when using the cargo carrier.
Secure all cargo with tie-down straps and /or bungee cords(not included).
• Never exceed recommended load capacity of 500 lbs.
CARGO CARRIER USE AND CARE
• Do not modify the cargo carrier in any way. Unauthorized modification may impair the function and /or
safety and could affect the life of the equipment. There are specific applications for which the cargo carrier
was designed.
• Always check for damaged or worn parts before using the cargo carrier. Broken parts will
affect the cargo carrier operation. Replace or repair damaged or worn parts immediately.
• Distribute the load evenly. Uneven loads may cause the cargo carrier to tip, resulting in
damage to personal property or to the vehicle.
• Use the cargo carrier only with 2in. Class III and Class IV hitches. Always position loads
evenly and secure with tie-down straps.
• Never block or impede vehicle exhaust. Loading items that block exhaust can cause fire or
damage to personal property and vehicle.
Assembly Recommended Tools:
Assembly Instructions
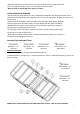
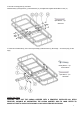
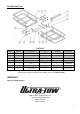
1. Unpack all parts and identify according to the DIAGRAM AND PART LIST.
2. Install two M12 bolts (11) through frame (1), 2” tube body assembly (2), and frame (1). Install flat washers M12 (10), and lock nuts
M12 (9) on the bolts.
REMARK: DON’T TIGHTEN THEM UNTIL THE CONNECTING PLATE (PART NO. 3) INSTALLATION IS FINISHED.
Open Wrench(1pc)
Size=17mm
Open Wrench(1pc)
Size=19mm
Open Wrench(1pc)
Size=24mm
Monkey Wrench(1pc)
Size=0-300mm
Monkey Wrench(1pc)
Size=0-300mm
Open Wrench(1pc)
Size=19mm