
Install guide


REMOTE VEHICLE STARTER INSTALL MANUAL
PAGE 21
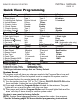
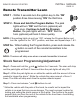
Remote Transmitter Learn
STEP 1 - Within 3 seconds turn the ignition key to the “ON”
position three times leaving “ON” the third time.
NOTE:
STEP 3a - While holding the Program Button, press and release the
button on each of the remote transmitters to be
programmed.
NOTE: The siren will chirp once when a remote transmitter is learned.
If the parking lights do not turn “ON”, release the Program Button and
turn the ignition to the “OFF” position, wait 5sec and repeat steps 1 & 2.
STEP 2 - Press and hold the Program Button. The park
lights will turn “ON” and the horn (optional) will
honk once. Continue to hold the Program
Button, the park lights will turn “OFF” and the
horn (optional) will honk 5 times quickly.
Shock Sensor Programming/Adjustment
Step1 - Press and hold the and buttons for 3 seconds. The siren will chirp
and the park lights will flash 3 times and then the park lights will stay ON.
Step 2 - While the park lights are on strike the vehicle with the amount of force
wanted to trigger the alarm*. Strike the vehicle the same amount of force 3
times. The siren will chirp each time the system detects impact.
Step 3 - Press and release and buttons to exit.
* Strike the vehicle with the palm of the hand, be careful not to impact the
vehicle in an area that may cause damage. The most common location for
testing and setting the shock sensor is the A-pillar. The A-pillar is the metal
support that runs from the roof of the vehicle to the hood area. Avoid hitting
the windshield when programming.