
Install guide


Setting 2 Over-Crank Adjustment.**
1) Enter Program Mode.
2) Press and release the button on the remote.
3) Press and release the Program Button twice. (LEDs will flash 2 times consecutively)
4) Press and hold the Program Button.
NOTE: The park lights will flash and the horn will honk one time each time the park lights
flash and the horn honks the setting is increased.
5) Release the Program Button. (Exit Program Mode and test remote starter)
Setting 3 Under-Crank Adjustment.**
1)Enter Program Mode.
2)Press and release the button on the remote.
3)Press and release the Program Button three times. (LEDs will flash 3 times consecutively)
4) Press and hold the Program Button.
NOTE: The park lights will flash and the horn will honk one time each time the park lights
flash and the horn honks the setting is increased.
5) Release the Program Button. (Exit Program Mode and test remote starter)
**Repeat steps 1-5 if necessary.
INSTALL MANUAL REMOTE VEHICLE STARTER
PAGE 20
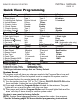
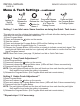
Menu 4- Tach Settings - continued
Ignition 3x
On/Off
On/Off On
Press and
Release the
Program
Button
Press and
Release the
button for
Menu 4
Press and Release
the Program Button
# of Times for
Setting Chosen
Press and Hold
the Program Button
to Change Option
Setting 1 Low Idle Learn- Same function as doing the Quick Tach Learn.
This option is used for vehicles that maintain a High or Erratic idle after starting and need
more than 30 seconds to establish a stable idle.
1) Enter Program Mode.
2) Press and release the button on the remote.
3) Start the vehicle.
4) Press and release the Program Button (LEDs will be flashing one time)
5) Press and hold the Program Button for 3 seconds.
6) Release the Program Button. LEDs will be on steady to indicate correct tach signal. The
park lights will flash twice and the horn (optional) will honk twice to confirm that the tach
signal has been learned.
NOTE: Must Tach Learn (see page 12) before Low Idle or Quick Tach learn.