
Full Product Manual
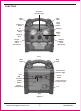

USING THE WORK LIGHTS
1. To turn the Work Lights on, push the Work Lights Switch to the “I” (ON) position.
2. To turn the Work Lights off, push the Work Lights Switch to the “O” (OFF) position.
USING THE AIR COMPRESSOR
1. Press the Battery Test Button to verify that the Power Pack is fully charged.
Recharge as needed, following the instructions in the Setup section under
“Charging the Power Pack” on page 6.
2. Open the Air Hose Compartment on the back of the unit and pull out the air hose.
3. Check the proper inflation level for the object that is being inflated.
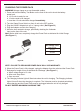
TIRE INFLATION
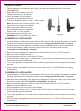
1. Position the Tire Inflator over the valve stem and
push down firmly, making sure it is fully seated.
2. Press down the lever.
(See Figure F.)
3. Push the Compressor Switch to the “I” (ON) position.
Note: Monitor the Air Pressure Gauge on
the front of the unit to avoid over-inflation.
4. When the proper inflation level has
been reached, push the Compressor
Switch to the “O” (OFF) position.
5. Lift the lever and remove the hose.
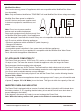
JUMP STARTING A VEHICLE
Note: Read the vehicle owner’s manual pertaining to jump starting prior to using the Power Pack.
1. Press the Battery Test Button to verify that the Power Pack is fully charged. Recharge as
needed, following the instructions in the Setup section under
“Charging the Power Pack” on page 6.
2. Turn off the vehicle ignition switch and all accessories (lights, radio, climate control, etc.).
3. Turn all switches on the Power Pack to their OFF positions.
WARNING! DO NOT TOUCH POSITIVE AND NEGATIVE BATTERY CLAMPS TOGETHER.
3. Connect the red Positive Battery Cable to vehicle’s positive battery terminal. Connect the
black Negative Battery Cable to a nonmoving metal part of the vehicle.
WARNING! DO NOT CONNECT TO THE NEGATIVE TERMINAL OF THE BATTERY.
4. The Connection Indicator Light will illuminate green if a correct connection has been made.
If the Connection Indicator Light illuminates red, review and change the connections.
5. When the correct connection has been made, turn the Clamp Power Switch to the ON position.
6. WAIT FIVE MINUTES, then start the vehicle. If the vehicle does not start, wait an additional
3 minutes before trying again.
WARNING! THE VEHICLE WILL NOT START IF YOU DO NOT WAIT AT LEAST 5 MINUTES.
7. After the vehicle is started, turn the Clamp Power Switch to the OFF position. Remove the black
Negative Battery Cable first, and then the red Positive Battery Cable.
customerservice@focus-ontools.com
9
1-800-348-5004
Adapter
installed
Air Hose
Lever
pressed
down
Tire Inflator
Figure F