
Quick Start Guide


Overview
Installation
Before you start:
1. Please make sure that the camera is in good condition and all of the assembly parts are
included.
2. Make sure that all related equipment is powered-off during the installation.
3. Check that the camera specification agrees with the installation environment.
4. To avoid damage, ensure the power supply voltage matches your camera requirements.
5. Please make sure the installation surface is strong enough to withstand three times the
weight of the camera and the mounting.
6. If the installation surface is concrete, you need to insert expansion screws before you install
the camera. If the installation surface is wood, you can use self-tapping screws to secure the
camera.
7. If the product does not function properly, please contact your dealer or the nearest service
center. Do not disassemble the camera for repair or maintenance by yourself.
Note: The pictures shown in this manual is for reference only, different models may vary its shape
and structures. Please take actual product as standard.
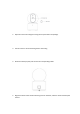
Installation
Smart Camera C0221100
1. Tap on 'Privacy Cover' when the camera is connected. The camera will tilt upward then
insert the SD Card into the camera.