
User guide
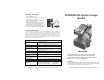

Shining Technology CitiDISK HD Quick Usage Guide v9.0 Shining Technology CitiDISK HD Quick Usage Guide v9.0
Camcorder Controlled HD Recording
Recording Video Manually
Archiving HD P2 Card Content
*** Avid DV Xpress use proprietary OMF video file format, user need to
import video files prior to editing. Either AVI2 or MOV is importable.
*** P2-MXF & Canopus AVI2 share the same light indications, user must
use firmware uploader v1.7 or newer to exclusively select them.
Updating the CitiDISK HD Firmware
Proceed by following these steps with caution and do not
un-plug the CitiDISK DV’s power while in operation;
otherwise the firmware could be damaged.
1). Uninstall the previous version of Uploader and install the latest
“Firmware Uploader”. The firmware uploader can be found in
the CD included or downloaded from http://www.shining.com
,
“Download & Support” page.
2). Connect the CitiDISK HD to your computer (Windows System
only) with the FireWire cable.
3). Turn on the CitiDISK HD. Wait for about 20 seconds.
4). Click on the “Plug-n-Play” icon at the bottom right corner of
the tool bar. Select the disk drive that you wish to eject.
The message illustrated below will appear; click on “OK” to
continue.
5). Do NOT disconnect the FireWire cable from the system. Leave
the CitiDISK HD power on. Wait for another 20 seconds until
the CitiDISK HD re-synchronizes itself to the system.
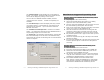
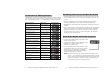
6). Double-click the “CitiDISK HD firmware uploader” icon on the
desktop to launch the program. You’ll see the following
window. On the top is the uploader version number, i.e. “v1.7”.
Current installed firmware date code will be shown at the very
bottom. Make sure the HW Rev. is “Fw1256HD(HVX200)”.
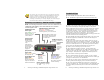
• Connect the FireWire cable (4-pin end)
to the camcorder’s iLink portt.
• Connect the FireWire cable (6-pin end) to the CitiDISK HD.
Set the camcorder to “Camera” mode.
• Press the “REC” button on the CitiDISK HD to start
recording. The “REC” light will start to flash to solid RED
indicating video recording is in progress.
• Press the “REC” button of the CitiDISK HD again to stop
recording. The RED light will go off.
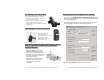
• Set HVX200 camera 1394 “Command” to “BOTH”
mode. Connect the FireWire cable (4-pin end) to
the camcorder. Insert a P2 card.
• Connect the FireWire cable (6-pin end) to
CitiDISK HD. Power on the camera
first, the CitiDISK HD second.
• Press “REC” button on the camcorder to start
recording. The RED button of the CitiDISK HD will
start blinking to solid RED.
• Press the “REC” button off the camcorder again to
stop recording. The RED light will go off.
• Connect the FireWire cable (4-pin end)
to the camcorder’s iLink port.
• Connect the FireWire cable (6-pin end) to the CitiDISK HD.
• Set the camcorder to “MCR” mode. Insert a P2 Card.
• Press the “REC” button on the CitiDISK HD. “REC” light
blinks and waits to be fed.
• Select the P2 Card scene on the camcorder to start
archiving. RED light will change to solid RED indicating
recording is in progress.
• Stop DV recording by pressing the “REC” button of the
CitiDISK HD and then stop P2 card playing. RED light will
go off automatically.
P6
P11