
Instructions / Assembly

ASSEMBLY INSTRUCTIONS (INSTALLATION)
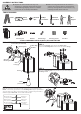
STEP 5
Install bulbs (not included).
STEP 6
Turn on the power and check operation.
Attach the fixture to the mounting unit through screw holes
as shown, and secure it with rubber rings and ball nuts.
STEP 4
NOTICE: After the installation, caulk upper and two sides of
the mounting surface. Leave bottom uncaulked for drainage
of any water that might have seeped into the canopy.
*junction box
(not included)
WARNING
In order to avoid water accumulation in
GFCI box on rainy days, always keep the
GFCI box closed.
OPERATING INSTRUCTIONS
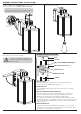
GFCI
OUTLET
TEST
RED LIGHT-LIFE-END ALARM
AMPOULE ROUGR-FIN D'ALARME
SEE INSTRUCTIONS-TEST MONTHLY
SUIVEZINSTRUCTIONS-TEST MENSUEL
RESET
RESET
TEST
Press the TEST button to test the device, which will stop the flow
of electricity, and the RESET button will pop out.
Press the RESET button fully to restore the power, the green indicator
LED will be on.
The GFCI includes an end-of-life monitoring function, Once the GFCI
been correctly wired and powered, the red Led will flash one time
within 5 Secs, and the internal self-testing circuit will operate
every 1~10 minutes. When the GFCI display an alarm during its operation,
the Red light will turn on immediately, and it will no longer provide a ground
fault circuit protection, reminding the user that the GFCI is end of life and
must be replaced.
Press the TEST button (then RESET button) monthly to ensure a proper
operation, if the Green LED goes o when tripped, it means that the GFCI
can still oer a ground fault circuit protection.
RED LIGHT-LIFEEND ALARM (Red)
INDICATOR LIGHT (Green)
TEST BUTTON
TEST BUTTON
RESET BUTTON
END-OF-LIFE MONITORING FUNCTION
ADDITIONAL NOTE
RESET BUTTON
OUTLET