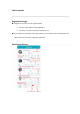
User's manual Registration & Login ● Register an account to use the ugoho.me APP. a. Use your email address during registration. b. Tap "Get" to receive a verification code & enter it. ● If you forgot your password, tap ‘forgot password’ on the logon screen. A verification code will be sent to your email to change your password.
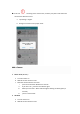
● If this icon is showing on the camera view, it means your phone and camera are connected to different servers. a. Tap Settings > Logout. b. Re-login to connect to the proper server. Add a Camera 1. Smart mode (Wireless) a. Turn the camera on. b. Wait 30s for the camera to start. c. Reset the camera with the reset tool i. press the reset button & hold for 2 seconds ii. If you hear ‘du~’, press the reset button again iii.
c. Reset the camera with the reset tool i. Press & hold the reset button for 2 seconds. ii. If you hear ‘di-di’, press & hold again. iii. When you hear ‘du~’ & iv. the indicator light is flashing red quickly (2x / second) v. you’re in AP mode. 3. Wired mode a. b. c. d. e. Plug network cable into the camera's network port. Press & hold the reset button for 2 seconds. When you hear di-di~’ & the indicator light is flashing red slowly (every 2 seconds) you’re in Wired mode Figure 3 3.1.
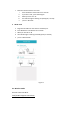
1) Please turn up the volume of your mobile phone and approach the camera, then tap "Next" to move on. It will take a few seconds after you have entered the password for Wi-Fi connection. 2) When the camera makes a "Ding-dong" sound, please tap "Next" and wait for connection to the network; 3) When you hear "Camera Ready", please wait until the APP displays the page for you to name your camera. Then you can name the camera or skip to the next step to view the camera video. 3.2.
Figure 4 When the camera is online, you can tap on the name of the camera on the page of "My Camera" to enter the video play page. 4.1. Live video Multiple kinds of gestures could be used to adjust the video image, such as touch, tap, swipe and pinch.
Figure 5 Icon shows up when playing panoramic camera video. Tap on it to switch between different modes of image display. 4.2. Video recording If a Micro SD card is installed in the camera or the cloud storage service is subscribed (Please refer to term 7 to have detailed knowledge of cloud storage), video recordings will be stored in the card or cloud in a loop way. Drag your finger on the timeline to replay the recordings that are saved on the Micro SD card or cloud.
Please unplug the camera before inserting /removing the Micro SD card. If blue color does not show up on the time period section, please check if the card is still in normal status. 4.3. Save recording onto mobile phone When you are playing live or recorded video, it is easy to save MP4 video file or JPEG image file on your mobile phone by tapping or icon. You can find the files on the album page and simply share them on social media. 5.Alert function——message page 5.1.
b.Micro SD card should be ONLY inserted/removed when the camera is unplugged. Incorrect operation may cause failure of downloading. c.Please return and try again if the network connection causes failure of downloading. Once the alert image is downloaded, tap on it to replay the alert video accordingly. Figure 6Figure 7 5.3.
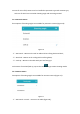
Figure 8 Select your preferred alert time and sensitivity then tap "OK". 6.APP setting——"setting" page Figure 9 7.
In terms of vision field, cameras can be classified as panoramic type and common type, each one of which has its suitable shooting angle and mounting method. 7.1. Panoramic camera Three options of shooting angles are available for panoramic camera (Figure 16) Figure 16 (1)Horizontal:Mount on the wall or table with lens facing horizontal level; (2)Overlook:Mount on the ceiling with lens facing down; (3)Look up:Mount on the table with your lens facing up.
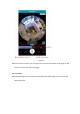
(2)Horizontal—reverse:mount on the ceiling (Figure 19). Figure 18Figure 19 8. Panoramic navigation Panoramic navigation is a kind of unique operation mode for Pan & Tilt Camera, with which you can simply rotate the camera exactly to the direction you want just by a "tap". 8.1. Creating panoramic navigation picture When a Pan & Tilt camera is added, you can tap on the icon to create a panoramic navigation picture (Figure 1). 8.2.
Figure 20Figure 21 8.3. Set shooting angle via panoramic navigation picture You can set maximum 3 sets of shooting angels via panoramic navigation picture. Once set, the camera will turn to the location at preset time. Setup steps: 1.Tap on a target point of panoramic navigation picture to rotate the camera to the location. 2.Tap on the icon , then a new setting interface will pop up as shown in figure 22. 3.Set preset time then repeat step 1 and 2 for each shooting angle.
Figure 22Figure 23
FCC Warning This device complies with part 15 of the FCC rules. Operation is subject to the following two conditions: (1) this device may not cause harmful interference, and (2) this device must accept any inte rference received, including interference that may cause undesired operation. Changes or modifications not expressly approved by the party responsible for compliance could void the user's authority to operate the equipment.