
Instructions / Assembly

1. Use a stud finder to locate and mark all stud locations from the floor
to the ceiling
2. Draw a level reference lines to ensure boards are installed level, this
will be determined based on the pattern you choose to install.
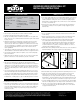
3. The first course of planks will need to be nailed along both edges.
Succeeding tiles will interlock and only require a nail along the
tongue side. Begin by nailing the first plank in place by nailing into
studs whenever possible. If nails cannot be nailed into studs it is
recommended to use a quality construction adhesive to ensure a
solid long term installation. (Figure 1)
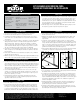
4. Nail the first row by driving nails into the bottom face of the board and
by blind nailing into the tongue along the top edge. (Figure 2)
5. Nails should be long enough to penetrate wood framing at least 1-1 ½”
6. Planks are tongue and groove and are end matched so that each
plank locks in on all four sides. Position planks, one at a time,
ensuring they are securely seated into the grooves of the previously
installed piece. Tap each plank into place with a rubber mallet to help
ensure a snug fit. Be careful not to break the tongue or groove ends.
7. Continue installing planks from one end of the wall to the other working
from floor to ceiling. Cut pieces can only be used to start or finish a course.
8. The last course may need to be ripped to width. As with the first
course, the last will need to be nailed through the face of the board
to support the finished end.
UNFINISHED WOOD ACCENT WALL KIT
INSTALLATION INSTRUCTIONS
1. Do not expose this product to moisture or direct sunlight.
2. Product is designed for interior walls and ceilings.
3. Wood is a natural product and will have variations in color, grain and
knots. These are not considered defects but rather a part of the natural
beauty of wood.
4. Natural wood products expand and contract based on the environ-
ment they are installed. As humidity and temperature changes so
does the wood. Allow the wood planks to acclimate in the room they
are to be installed in for a minimum of 24-48 hours prior to installation.
Longer periods will deliver better results as the wood has time to
reach equilibrium.
5. The planks are unfinished and require sanding and coating prior to or
after installation to maintain the desired look over a long period of time.
6. Check all the material for defects in profile, color, and overall quality
prior to installation.
7. While the product acclimates you may choose to layout your desired
pattern on the floor to ensure satisfactory results on the wall.
1. Wood accent wall planks are designed to be installed over flat,
smooth surfaces, typically drywall. Ensure the wall is free of any loose
debris, holes or major damage; repair these areas before installing. If
the wall has a glossy finish it should be sanded to dull the surface and
create a good bonding surface for the adhesive, if you choose to use
adhesive.
2. It is recommended to paint the wall behind a dark color or a color to
match the finished product. During Installation and moisture changes
you may encounter slight gaps as the product expands and contracts.
3. Depending on the pattern and installation method, you may need to
install battens, or furring strips, to give a solid nailing surface to nail into.
Prior to installation
Surface Preparation
Tools and items needed
3. Cut using a high quality, fine tooth carbide tipped blade, often referred
to as a trim blade. The best tools for this are a powered miter saw or
a table saw. Other cutting tools can be used but cut quality may be
impacted. On a powered miter saw, cut into the face of the board first
to ensure a clean finish cut.
4. As part of the “rustic” kit there are 4 precut tiles that are designed
for starting or ending a course of planks to help stagger the joints
between tiles.
Cutting (continued)
Installation
© 2017 Universal Forest Products, Inc.
All rights reserved.
9074 2/17
www.ufpedge.com
• Chop Saw/Miter Box
• Tape Measure
• Nail Gun & Trim nails
• Hammer
• Rubber mallet
• Jig Saw
• Construction adhesive
(optional)
• Pencil
• Caulk Gun (optional)
• Carbide tipped fine
tooth (trim Style Blade)
• Nail Set
• Level
• Square
• Stud Finder
• Chalk Line
• Safety Glasses
The diagrams and instructions in this brochure are for illustration purposes only and are not meant to replace a licensed professional.
Any construction or use of the product must be in accordance with all local zoning and /or building codes. The consumer assumes
all risks and liability associated with the construction or use of this product. The consumer or contractor should take all necessary steps
to ensure the safety of everyone involved in the project, including, but not limited to, wearing the appropriate safety equipment. Except as
contained in the written limited warranty, the warrantor does not provide any other warranty, either express or implied, and shall not be
liable for any damages, including consequential damages.
Tongue
Trim nailer
Figure 2
Exposed
Side
Trim nail
Direction of
installation
Wall stud
Direction of
installation
Figure 1
1. Remember, measure twice cut once!
2. On a wall to wall installation, work across the wall moving towards the
corner so any cut ends are in the corner; or on the most inconspicuous
end of the wall. Working from the center out will result in additional
and unnecessary cutting. Proper planning and layout will ensure
satisfactory results.
Cutting