
Guide


19
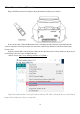
3.The 2nd UART
Sometimes the 2
nd
UART is important for our project, for example you want another Arduino to
communicate with uArm.
During the design, we have had it in mind. There is the 2
nd
UART in the 30P base extension.
All the pins of extension board are connected with the Arduino MEGA 2560 directly so it’s TTL level.
And voltage above 5V might burn the IO out.
So wiring the UART with the jump wire and also the GND. Then the hardware set up is finished. Then
we have to change the main communication port from USB to the 2
nd
UART port, since the code only
supports one port to deal with the command.
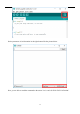
Sending “#0 M2500” command over USB cable to switch the port, and there are several point you
should know:
1. The port will be switched immediately (both ports receive the reply “ok”), and the USB port cannot
be used as the communication port any more, only 2
nd
UART port would work for sending Gcode.
2. There is no way to switch port any more, the only way to use USB port is reset the system by power
button.
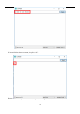
If it’s not convenient for your project, please try to modify the source code following the steps below:
1. Download the Arduino source file in Github.
2. Find the file named uArmSerial.cpp and modify the code in line 16 from _serial=&serial; to
_serial=&serial2;
3. Find the file named uArmService.cpp and modify the code in line 693 from
commSerial.setSerialPort(&Serial); to commSerial.setSerialPort(&Serial2);
4. Rebuild the files and download the code to uArm.
4.Arduino
The main code is written by Arduino IDE. Please check the link below:
https://github.com/uArm-Developer/SwiftProForArduino