
Install Instructions
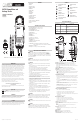

Auto On/Auto power off (APO)
• Press any button to power on meter.
• Press and hold AC/DC Volts/Power button to power off meter.
• Auto power off (Apo) after 10 minutes of inactivity.
(5 minutes in resistance mode)
• Press and hold the AHold button when meter is in Hold mode to disable Auto
power off mode. Press and hold again to enable Auto power off mode.
CAT IV
600V
V
Ω
DL220
600V CAT IV 200A
A-HOLD
LRA INRUSH
Resistance: <2000Ω
Features:
A-HOLD
LRA INRUSH
WARNING
• Do not measure resistance on a live circuit.
Resistance
Ranges Resolution Accuracy Overload Protection
200Ω to 2000Ω 0.1Ω to 1Ω ±(0.8% + 4 dgts) 600V
Max displayed value: 2200Ω
Overload protection: 600V AC RMS or 600V DC
• Default =
• Press x1 =
• Press x2 =
• Default =
• Press x1 =
• Press x2 =
CAT IV
600V
V
Ω
DL220
600V CAT IV 200A
A-HOLD
LRA INRUSH
CAT IV
600V
V
Ω
DL220
600V CAT IV 200A
A-HOLD
LRA INRUSH
AC/DC Voltage: <600V AC/DC
WARNING
• Do not attempt to measure more than 600V AC/DC.
• Keep hands below line when measuring high current levels.
• Do not exceed 600V DC or AC-RMS on either the common or
multifunction test leads as measured from earth ground.
Select AC or DC Voltage.
Features:
A-HOLD
LRA INRUSH
AC Volts
Ranges Resolution Accuracy Overload Protection
1V to 199.9V 0.1V
±(1.5% + 5 dgts) 600V
200V to 600V 1V
DC Volts
Ranges Resolution Accuracy Overload Protection
1V to 19.9V 0.01V
±(1.5% + 3 dgts) 600V20V to 199.9V 0.1V
200V to 600V 1V
Minimum measurement AC mV: 500mV/DC mV:40mV
Response time (input; AC 100V): 1 sec
Max displayed value: 660V AC/DC
High warning symbol input voltage > AC30V/ > DC30V
Meter beeps input voltage > AC 601V/ > DC 601V
Input impedance: 10MΩ
Frequency Range: sine wave: 45Hz to 400Hz
Overload protection: 600V AC RMS or 600V DC
Continuity
• Buzzer sounds at less than 40Ω.
WARNING
• Do not measure resistance on a live circuit.
Features:
A-HOLD
LRA INRUSH
Continuity
Audible threshold Response time Overload Protection
Approx : < 40Ω 50ms 600V
CAT IV
600V
V
Ω
DL220
600V CAT IV 200A
A-HOLD
LRA INRUSH
AC Amps: <200A
• Center wire in conductor alignment marks for best accuracy.
• Opposing currents cancel (use line-splitter when necessary).
WARNING
• Keep hands below guard when measuring high current levels.
• Do not attempt to measure more than 200A AC.
Features:
A-HOLD
LRA INRUSH
AC Amps
Ranges Resolution Accuracy Overload Protection
1A to 200A 0.1A ±(2.0% + 5 dgts) 600V
Frequency Range: sine wave: 45Hz to 400Hz
Maximum Displayed value: AC220A
Minimum Displayed value: AC 500mA
Battery Replacement
• When the batteries are too low for safe operation, the Low Battery
indicator will display.
• Rotate latches until Unlock symbols are aligned with arrows. Remove
battery cover.
• Replace the old batteries with 2 new (AAA) batteries.
• Replace the battery cover
• Rotate latches until the lock symbols are aligned with arrows.
S/N:
CATIV
600V
CATIV
600V
OPEN
LOCK
OPEN
LOCK
OPEN
LOCK
OPEN
LOCK
CAT IV
600V
V
Ω
DL220
600V CAT IV 200A
CAT IV
600V
V
Ω
DL220
600V CAT IV 200A
A-HOLD
LRA INRUSH
Single
Conductor
Only
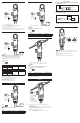
LRA Inrush
• The meter must be in AC Amps mode first to be placed into LRA
measurement mode.
• The UEi LRA Inrush is programmed to properly capture the starting current
for compressor motors.
• Press and hold A-Hold/LRA Inrush button – INRUSH will now be shown on
the display.
• Activate compressor and read value on display.
• Press and hold A-Hold/LRA Inrush button to return to live readings.
• Press x1 = A-HOLD
• Press again to power
off A-Hold
• Press and hold =
LRA INRUSH
• Press and hold again
to power off LRA Inrush
A-HOLD
LRA INRUSH
CAT IV
600V
V
Ω
DL220
600V CAT IV 200A
CAT IV
600V
V
Ω
DL220
600V CAT IV 200A
A-HOLD
LRA INRUSH
Single
Conductor
Only
Test Lead Notes
CatIV 600V Measurement Locations
• Ensure the test lead shield is pressed firmly in place. Failure to use the
CATIV shield increases arc-flash risk.
CATII 1000V Measurement Locations
• CATIV shields may be removed for CATII locations. This will allow testing on
recessed conductors such as standard wall outlets. Take care not to lose
the shields
4mm
CATIV
600V
CATIV
600V
CATII
1000V
18mm
4mm
CATIV
600V
CATIV
600V
CATII
1000V
18mm
• Default =
• Press x1 =
• Press x2 =
• Default =
• Press x1 =
• Press x2 =