
User Manual


12
GENERAL MAINTENANCE
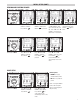
PRE TEST CHECKLIST
SETTING INLET TEMPERATURE
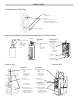
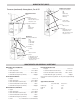
ANALYZER CONNECTIONS
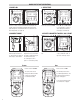
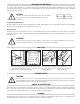
EMPTYING & CLEANING THE IN-LINE WATER TRAP
CHANGING THE PARTICLE FILTER
• Re-certify your instrument annually to ensure it meets original performance specifications
• Keep your instrument dry. If it gets wet, wipe dry immediately. Liquids can degrade electronic circuits
• Whenever practical, keep the instrument away from dust and dirt that can cause premature wear
• Although your instrument is built to withstand the rigors of daily use, it can be damaged by severe impacts. Use reasonable caution
when using and storing the meter
• Turn on and zero the analyzer with out the flue probe connected to use ambient temperature
• Connect flue probe thermocouple to T1 during zero countdown to store probe tip temperature as inlet (ducted system)
The in-line water trap should be checked and emptied on a regular basis. Water vapor will condense in
the probe line, which may cause the water trap to fill suddenly if the probe is moved. Care should be
taken at all times.
Carefully remove the rubber plug from the bottom of the water-trap housing. Dispose of the condensate
in a suitable drain, care must be taken as it could be acidic. If condensate spills onto the skin or clothing,
clean off immediately using fresh water, seek medical advice if problems occur. Ensure plug is replaced
before performing combustion tests. Note: O2 reading will be high if the Water Trap Plug is not in place.
This is a very important part of the analyzer and should be changed regularly. It prevents dust and dirt
particles from entering the pump and sensors that will cause damage. The filter MUST be changed when
it appears discolored on the inner surface.
Remove water-trap assembly from the analyzer as shown above. Remove the filter and plastic holder
from the housing. Discard the filter element but keep the holder to fit to the new filter. Clean the inside
of the filter housing with a suitable soft cloth. Fit the holder onto the new filter element and then insert
into the housing. Refit the housing onto the analyzer.
• Clean particle filter
• Water trap and probe line are empty of water
• Power on and zero
• All hose and thermocouple connections are properly secured
• Flue gas probe is sampling ambient FRESH air
• Water trap is fitted correctly to the instrument
• Flue temperature plug is connected
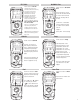
WARNING!
Turning the pump off while the probe is in the flue will leave toxic gases inside
the analyzer. Once data has been printed or copied it is advisable to purge the
unit with fresh air as soon as possible. To do this remove the probe from the flue
and turn ON the pump. Always allow the readings to return to zero (20.9 for O2)
prior to shutting the unit off. The meter will not switch off until the CO reading
is below 20 ppm.
WARNING!
The probe will be hot from flue gases. Remove the probe from the flue and allow
it to cool naturally. Do not immerse the probe in water, as this will be drawn into
the analyzer and damage the pump and sensors. Once the probe is removed from
the flue and the readings have returned to ambient levels hold down “On/Off”
and switch off the analyzer. The instrument will count down from 30 to switch
off. If you pressed “On/Off“ by mistake, pressing “Send“ will return you to normal
operation.
NOTE: Take care when inserting
the temperature probes as the
pins are polarized. Insert with the
smaller pin (+) to the right.
NOTE: Do not insert anything
into programming port.