
User Guide


C
o
m
b
u
s
t
i
o
n
A
n
a
l
y
z
e
r
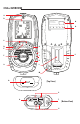
C165+
C
O
C
O
2
T
E
M
P
P
R
S
Status
LINK
v3
Aux
O2/Eff
CO/CO2
Temp
Exch Test
ROOM CO
C
o
m
b
u
s
t
i
o
n
A
n
a
l
y
z
e
r
C165+
C
O
C
O
2
T
E
M
P
P
R
S
Status
LINK
v3
Aux
O2/Eff
CO/CO2
Temp
Exch Test
ROOM CO
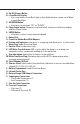
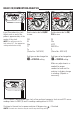
BASIC CO/COMBUSTION ANALYSIS
Insert Flue probe into stack.
Adjust cone so end of the
probe is approximately at the
center of the stack.
NOTE: You will have to drill a
hole at least 3/8”. Use appropriate
sealing method after testing.
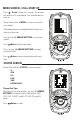
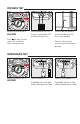
Rotate selector dial to O2/Eff
to view:
CO2
O2
Efgc
T1
Ta
(Status Bar - NAT GAS)
Fuel type can be changed via
or STATUS setting
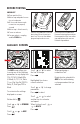
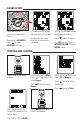
Rotate selector dial to CO/
CO2 to view:
CO
COa
LOSS
XAIR O2++
P
(Status Bar - NAT GAS)
Fuel type can be changed via
or STATUS setting.
Make any adjustments as
needed for proper
combustion and wait for
analyzer to display change
in readings. (Repeat as
necessary).
T2
T1
P2
P1
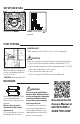
Once complete, remove probe from stack, allow analyzer to purge in fresh air until CO sensor
readings return to ZERO (0) and O2 readings reading return to 20.9%.
Continue to the next test or power analyzer off by pressing , if finished.
NOTE: Print and store functions may be used at any time during testing.
T2
T1
P2
P1