4 4 4 BEFORE USING REGISTER YOUR ANALYZER Register within 30 Days of Purchase to Get 10% Off Your First Year Calibration Keep up on the latest Accessories, Upgrades and Videos Scan Now for Easy Online Registration or Visit www.ueitest.
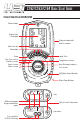
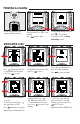
C162/C163/C164 Quick Start Guide C162/C163/C164 OVERVIEW Power button Display lines 1 through 6 Protective boot with built-in magnets Status bar line Navigation Temperature Screen Te s t Temp Prs ch AU Log & Print Ex E1 X STA TUS PRS Heat Exchange Integrity Test Screen O2 TE MP Status screen Menu screen FLU Flue Test screens Auxiliary screen FLUE 2 Pump C163 Com busti o n An CO C LED Water Trap Indication er alyz Water Trap Window T2 T1 (C162) USB charging port K-type tempera
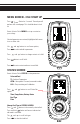
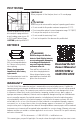
MENU SCREEN - C163 START UP Press ”Power” Button for 2 seconds. The analyzer will perform a 60 second purge. This should be done in fresh air. Rotate Selector Dial to MENU to set up or customize your settings. AAUU XX E1 FLU and buttons to scroll menu options, to select and edit a parameter. FLUE 2 Use Press Te TEmp Prs MP Ex Te ch st Selected parameter are centered, highlighted with arrow icons on either side. SSTA TATT UUSS buttons to change contents of a field.
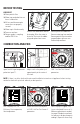
BEFORE TESTING CHECKLIST o Clean particle filter o Water trap and probe line are free of condensate o All hose and thermocouple connections are properly secured o Water trap is fitted correctly o Power on and zero o Flue gas probe is sampling ambient FRESH air Remove the rubber boot and red drain plug. Allow the water to drain out. Re-insert the rubber plug and replace boot cover. Remove protective rubber boot. Remove water trap from analyzer.
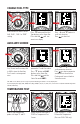
E FLU FLUE 2 TEM P CHANGE FUEL TYPE 1 AU X CO 2 TE MP STA TUS CO r X Press and buttons to scroll fuel selections. Press to select fuel. 1 1 AU AU X STA TUS o n A n al 2 CO C161 Com busti r yze o n A n al r yze TEM E1 FLU FLUE 2 P AUXILIARY SCREEN AU CO C163 Com busti CO CO 2 TE MP STA TUS E FLU E FLU Press button until the Fuel Type displays on the Status Bar. Press and Hold until two arrow icons display.
yze X 2 CO CO o n A n al TEM P TEM TE MP 2 CO C161 Com busti AU STA TUS TE MP P TEM TE MP 2 CO r To Log: During testing, Press and Hold to log a report. To view these Logs, see View Saved Logs section. E1 yze X FLU CO o n A n al AU STA TUS FLUE 2 C160 Com busti During testing, Press to start printing. Press again to abort. E1 X FLU 1 AU STA TUS FLUE 2 FLUE FLUE 2 To Print: Align printer (sold separately) above Analyzer.
POST TESTING POWERING OFF When you power off the Analyzer, there is a 10 second purge. CAUTION Make sure you do not exceed the analyzer’s operating specifications. • Do not exceed the flue probes maximum temperature (1112˚F) • Do not exceed the analyzer’s internal temperature range 112°F (50°C) Remove the probe from the flue and • Do not put the analyzer on a hot surface allow analyzer to purge with fresh air until readings return to zero.
READ BEFORE USE ANNUAL RECERTIFICATION UEi annual recertification process is straight forward and up front; no surprises! Pay a flat rate for standard Recertification service. • Calibration or Sensor Replacement • 30-Point Inspection • Firmware and Software Updates • Certificate of Calibration • Return Freight Paid* • 12-Month warranty 2-Day turn-around on all standard recertification services with pre-approved payment.