
User's Manual


Before attempting to install the Tablet Keyboard on your computer, please check that the
System Requirements are all met, and that all items listed in Tablet Keyboard Packing
List are present.
You attach the Tablet Keyboard to the computer by connecting the RS-232C Connector
to an available COM (serial) port and connecting the Keyboard Connector to the
Keyboard Socket on your computer. The procedure is described below.
1. Shut down Windows and turn off the power of your PC.
2. Remove the original keyboard, if any, from your PC, and note where the
Keyboard Socket is.
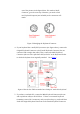
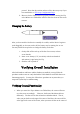
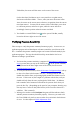
3. Examine the parts of the Tablet Keyboard, as shown in Figure below.
Figure 8 Attaching the Tablet Keyboard to the PC
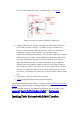
4. Connect the Keyboard Connector to the Keyboard Socket. You will need to
find an adaptor (not included) if the size of the Keyboard Connector does not
fit that of the Keyboard Socket, similar to what is shown in Figure 5.
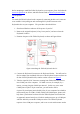
5. Take the 9-pin RS-232C Connector running from Tablet Plate and insert it
into COM1 port of the computer. If COM1 is in use, for example, by a
mouse, you may plug into COM2 port instead. In this case, since most
COM2 ports require a 25-pin connector, you will need to find a
9-pin-to-25-pin adaptor (not included). Also, if your computer has a built-in
modem using one of COM1, COM2, COM3, and COM4 ports, please seek
help from a professional to ensure that the Tablet Keyboard can indeed use
an apparently unused serial port. A built-in modem may use up a COM port
which is shared by an outside COM port socket. The Tablet Keyboard
requires a free COM port to operate, and it can co-exist with a mouse and/or