
User's Manual
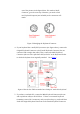

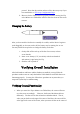

(the one with a single data cable). See figure below. Go to Step 6.
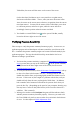
Figure 7 How the Pen Tablet is attached to a notebook PC
6. Take the 9-pin RS-232C Connector running from Tablet Plate and insert it
into COM1 port of the computer. If COM1 is in use, for example, by a
mouse, you may plug into COM2 port instead. In this case, since many
COM2 ports require a 25-pin connector, you will need to find a
9-pin-to-25-pin adaptor (not included). Also, if your computer has a built-in
modem using one of COM1, COM2, COM3, and COM4 ports, please seek
help from a professional to ensure that the Pen Tablet can indeed use an
apparently unused serial port. A built-in modem may use up a COM port
which is shared by an outside COM port socket. The Pen Tablet requires a
free COM port to operate, and it can co-exist with a mouse and/or a modem
connected to a different COM port not in conflict with the port used by the
Pen Tablet. If the mouse uses a PS/2 port, it will not conflict with any COM
port.
7. Turn power on and wait for Windows to start up.
8. Ver ify that the Pen Tablet hardware functions properly.
The hardware installation is now complete. Please proceed to install the Driver and Pen
Utilities that provides pointing device function and Pressure Sensitivity (through a
Wintab-compatible interface), plus additional pen functions with Pen Utilities such as
Annotate All
,
Annotate for Word
,
PenSigner
,
PenMail
, and
PenCommander.
Installing Tablet Keyboard with RS232C Interface