
User's Manual


Innovator CU0TD-1/CU0RD-1 – CU4TD/CU4RD ATSC Web Ethernet
Transmitter/Regenerative Translator Interface Description
Instruction Manual, Rev. 2 104
Configure Page
The user can access the Configure page by selecting the 'Configure' button on the CX
Ethernet Controller main control/monitoring page.
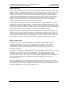
Figure 58: Configure Page
NOTE: The Innovator CX Ethernet controller does not use DHCP addresses – TCP/IP
settings must be fixed and entered manually. A crossover cable may be needed if
connecting directly from a computer to the Innovator CX drawer.
Note: If the transmitter system is pre-wired at the factory and includes a
router and Remote Interface Panel, CX drawers connected to the router have
been configured with a static IP address. The operator can access the CX
drawers though the router, but the IP addresses must not be changed.
Changing the static IP addresses of the CX drawers could prevent the drawers
from communicating with other devices in the system and render the
transmitter inoperative.
When entering a site ID, be sure to not use special characters except underscores,
dashes, and forward slashes.
The page above displays SNMP parameters and allows an operator to send a test trap.
If this system did not have SNMP enabled, then fields would not be populated and the
'Send Test Trap' button would not be present. New event log entries including an
activated test trap are automatically forwarded to SNMP agents specified to receive trap
messages. Trap messages do not need to be acknowledged by an agent.
Changes to the transmitter's output power are available to administrators when the
transmitter is operating. Once changed, the menu defaults back to the main display
page and the systems forward power is noted as changing.
To manage user accounts, administrators may click the ‘Manage Accounts’ button near
the top of the configure page.