
User's Manual


© 2010 - 2015 Persistent Systems, LLC – All Rights Reserved72
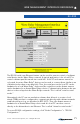
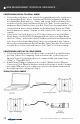
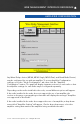
CONFIGURING SERIAL-TO-SERIAL MODE
1. Connect the serial device to be controlled (e.g. pan/tilt unit) to the serial port on
the distant Wave Relay
®
device. Configure the RS-232 Configuration Mode on
the distant Wave Relay device to “Server” and set the Serial-over-Ethernet Port
as desired. Set the Serial-over-Ethernet Protocol to “Raw.” Set the serial port
parameters (Baud, Data Bits, Parity, Stop Bits, Flow Control) to match those of the
connected serial device (factory defaults for the Wave Relay
®
device are 57600
baud, 8 data bits, no parity, 1 stop bit, no flow control). Click “Save” to store the
settings.
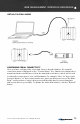
2. Connect the local serial device (e.g. PC) to the serial port on the local Wave
Relay
®
device. Set the RS-232 Configuration Mode on the local Wave Relay
®
device to “Client,” and set the Server IP Address and Serial-over-Ethernet Port
to be those of the distant Wave Relay
®
device as configured in Step 1 above.
Also set the serial parameters (Baud, Data Bits, Parity, Stop Bits, Flow Control)
to match those of your local serial device. Click “Save” to store the settings.
CONFIGURING VIRTUAL-TO-SERIAL MODE
1. Connect and configure the serial device to be controlled (e.g. pan/tilt unit) as
per Step 1 above for Configuring Serial-to-Serial mode. Set the Serial-over-
Ethernet Protocol to whichever protocol is supported by your virtual client
(“Raw” or “Telnet RFC 2217”).
2. Install Virtual COM port software on the local PC (Eltima Serial to Ethernet
Connector v5.0 for Windows has been tested and is known to work). Configure
the virtual COM port in your software to connect to the distant serial port via
the address/port as configured in Step 1.
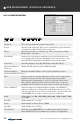
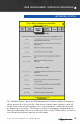
WEB MANAGEMENT INTERFACE REFERENCE
SERIAL-TO-SERIAL MODE