
User's Manual


© 2010 - 2015 Persistent Systems, LLC – All Rights Reserved34
STEP 3: VERIFY NODES ARE COMMUNICATING
After nodes have been configured, the connectivity of the nodes should be checked.
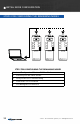
1. Ensure that all nodes are turned on, that at least one radio on each node has an
antenna and is set to the same channel as the other nodes, and that each node
has the same key.
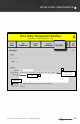
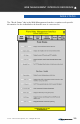
2. Access one of the nodes and verify connectivity to all the nodes. Click “Node
Status” > “Neighbor Status.” The figure below displays the Node Neighbor Status,
which shows which of the node’s radios are communicating with other radios. This
figure shows that Radio 1 is communicating with one other radio in a neighbor
node.
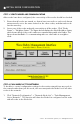
STEP 4: PUSH NODE LIST TO NETWORK
To be able to control configuration settings for the entire network from any node in
the network rather than just this node, the user must push the Node List to all other
nodes in the network.
1. Click “Network Configuration” > “Network Node List” > “Push Management
List to Network.” This function will share the Node List configured on this node
with all nodes in the Node List.
INITIAL NODE CONFIGURATION