Enterprise WiFi System Model: UAP-Mini
UniFi™ AP-Mini User Guide Table of Contents Table of Contents Chapter 1: Product Overview. . . . . . . . . . . . . . . . . . . . . . . . . . . . . . . . . . . . . . . 1 Package Contents. . . . . . . . . . . . . . . . . . . . . . . . . . . . . . . . . . . . . . . . . . . . . . . . . . . . . . . . . . . . . . . . 1 System Requirements . . . . . . . . . . . . . . . . . . . . . . . . . . . . . . . . . . . . . . . . . . . . . . . . . . . . . . . . . . . . 1 Network Topology Requirements. . . . . . . . . . .
UniFi™ AP-Mini User Guide Table of Contents Chapter 11: User/Guest Details. . . . . . . . . . . . . . . . . . . . . . . . . . . . . . . . . . . . 34 Details . . . . . . . . . . . . . . . . . . . . . . . . . . . . . . . . . . . . . . . . . . . . . . . . . . . . . . . . . . . . . . . . . . . . . . . . . . 34 Statistics . . . . . . . . . . . . . . . . . . . . . . . . . . . . . . . . . . . . . . . . . . . . . . . . . . . . . . . . . . . . . . . . . . . . . . . . 34 History. . . . . . . . . . . . . . . . . .
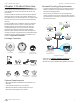
UniFi™ AP-Mini User Guide Chapter 1: Product Overview Chapter 1: Product Overview Thank you for purchasing the Ubiquiti UniFi AP-Mini. The UniFi AP-Mini also works with the UniFi AP, AP-LR, and AP‑Outdoor. The UniFi AP-Mini includes the UniFi Controller software that allows you to manage your wireless network using your Web browser. This User Guide is for use with the UniFi AP-Mini and version 2.0 or above of the UniFi Controller software.
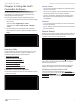
UniFi™ AP-Mini User Guide Front Chapter 1: Product Overview Back Ethernet Port Connects to the 5V PoE Adapter to provide power to the unit. Reset Button The reset button serves two functions: • Restart It will restart the device when you press and release it quickly. • Restore Factory Defaults When you press and hold it for more then 5 seconds, it will restore the device to the factory default settings. LED Indicates the status of the device. See the table below for details.
UniFi™ AP-Mini User Guide Chapter 2: Installation Hardware Installation The UniFi AP-Mini is powered by the included PoE (Power over Ethernet) adapter. To install the AP, perform the following steps: 1. Connect an Ethernet cable to the Ethernet port on the UniFi AP-Mini. Chapter 2: Installation Mounting the Access Point The UniFi AP-Mini can be wall mounted or mounted on a ceiling. Perform the following steps for the appropriate installation: Wall-Mount 1.
UniFi™ AP-Mini User Guide 7. Turn the AP clockwise until it locks into place. Chapter 2: Installation 6. Secure the Mounting Bracket to the ceiling tile by feeding the three flathead screws through the ceiling tile. Support the Mounting Bracket with the washers and Keps nuts on the top side of the ceiling tile. 8. Rotate the center logo to the desired position. Ceiling-Mount 7. Feed the Ethernet cable through the hole in the Mounting Bracket and ceiling tile. 1. Remove the ceiling tile. 2.
UniFi™ AP-Mini User Guide Note: The UniFi AP-Mini supports Passive PoE, which works with the included PoE adapter. If you want to power the UniFi AP-Mini from an 802.3af compliant switch, Ubiquiti Networks offers the optional Instant 802.3af Adapter to instantly transform any PoE device into a fully 48V 802.3af compliant product. Product details are available on our website at http://ubnt.com/8023af Chapter 2: Installation PC Users 1. Launch UniFi-installer.exe. 2. Click Install. 8.
UniFi™ AP-Mini User Guide Configuring the UniFi Controller Software 1. The UniFi Controller software startup will begin. Click Launch a Browser to Manage Wireless Network. Chapter 2: Installation c. To enable guest access, select Enable Guest Access and enter a guest network name in the Guest SSID field. d. Click Next. 5. Enter an admin name in the Admin Name field and password in the Password field to use when accessing the management interface. Confirm your password in the Confirm field. Click Next. 2.
UniFi™ AP-Mini User Guide Chapter 3: Using the UniFi Controller Software The UniFi Controller software that comes with your UniFi AP-Mini has a browser-based interface for easy configuration and management. To access the interface, perform the following steps: 1. Launch the UniFi Controller application if hasn’t already been started. • Mac users: Go > Applications > UniFi • Windows users: Start > All Programs > Ubiquiti UniFi. 2. The UniFi login screen will appear.
UniFi™ AP-Mini User Guide Alerts Chapter 3: Using the UniFi Controller Software Settings > System Important events are displayed in the alerts window. The date and time of the event and the message are displayed. System Configuration System Name Editable field with the system name. Search Allows you to enter text you want to search for. Simply begin typing; there is no need to press Enter. Show Archived Show all of the alert messages that have been archived.
UniFi™ AP-Mini User Guide Mail Server When enabled, UniFi will send email alerts when triggered (Pending Access Points and Disconnected Access Points) to the administrator email address specified under Settings > Admin Settings > Admin Preferences > Email Alert. SMTP Server Enable by selecting the checkbox and entering the outgoing (SMTP) mail server name. Optionally, you may enable Secure Sockets Layer (SSL) to provide communication security over the Internet.
UniFi™ AP-Mini User Guide • Expiration (Option only visible when using No authentication or Simple Password authentication) Allows the specification of guest login expiration after a designated period of time. Options include: 8 hours, 24 hours, 2 days, 3 days, 4 days, 7 days, and User-defined. User-defined can be designated in minutes, hours, and days. Chapter 3: Using the UniFi Controller Software Vouchers, and Operator Accounts. See “Hotspot Manager” on page 36. • Apply Click Apply to save changes.
UniFi™ AP-Mini User Guide Access Control Chapter 3: Using the UniFi Controller Software Wireless Configuration Restricted Subnets Enter any subnets that you don’t want guests to be able to access. Apply Click Apply to save changes. Settings > Admin Settings Admin Name Displays the current admin name used to log in. To change the admin name, simply enter a new name and click Apply. • Name/SSID Allows you to edit the wireless network name (SSID).
UniFi™ AP-Mini User Guide Chapter 3: Using the UniFi Controller Software Advanced • VLAN To use a VLAN, select Use VLAN ID and enter the port number. • Hide SSID Select this option if you don’t want the SSID to be broadcast. • WPA Defines supported WPA and encryption methods. • User Group Allows assignment of wireless users to a specific user group. Click Apply to save any changes that you have made. Click Cancel to discard changes. Edit Click to change the name or bandwidth settings of the user group.
UniFi™ AP-Mini User Guide Chapter 4: Map Tab The UniFi Controller software allows you to upload custom map images of your location(s) or use Google Maps™ for a visual representation of your wireless network. When you initially launch the UniFi Controller application, a default map is displayed. Chapter 4: Map Tab Once you’ve created the map, you can upload it to the UniFi Controller software by performing the following steps: 1. Click Configure Maps.
UniFi™ AP-Mini User Guide 2. Click Add a Map. Chapter 4: Map Tab 4. Click Close. Add a Map 3. Enter a map name in the Description field and click Upload my own. Click the Browse button to locate the file to use as a map (valid file formats are .jpg, .gif, and .png). Click Continue. Adding a Google Map To add a Google Map to the UniFi Controller software Map view: 1. Click Configure Maps. Configure Maps button Ubiquiti Networks, Inc.
UniFi™ AP-Mini User Guide 2. Click Add a Map. Add a Map Chapter 4: Map Tab 5. Click or copy and paste the Web link from the window into a new Web browser window. Do not close the UniFi window. http://code.google.com/apis/maps/signup.html 3. Enter a map name in the Description field and click Use Google Maps. Click Continue. 6. You need to be signed in with a Google account to obtain a Google Maps API key. 7.
UniFi™ AP-Mini User Guide 11. A new window will open, displaying your key. Highlight and copy the Google Maps API key. Google Maps API Key Chapter 4: Map Tab 14. Select Specify Address to enter an address. Type in the address and then click Go. You also have the Specify Coordinates option to enter the latitude and longitude of a specific location. 15. The specified location should appear. Click Save. 12. Navigate back to the UniFi window and paste the API Key into the API Key field. Click continue. 13.
UniFi™ AP-Mini User Guide Placing Access Points on the Map 1. Drag the Access Point icon(s) from the Unplaced APs list on the left to the appropriate location(s) on the map. Chapter 4: Map Tab Details Brings up the Details window. This allows you to view Access Point settings and connected users. You can also edit the radio channel, transmit power, uplink, and device alias. In the Details window, there are four tabs: Details, Users, Guests, and Configuration.
UniFi™ AP-Mini User Guide Show: You can click each of the following options to display Access Point labels, details, wireless coverage, and topology on the map. Chapter 4: Map Tab • Coverage Displays a visual representation of the wireless range covered by the Access Point. • Labels Displays the name applied to the Access Point. Refer to Alias under “Configuration” on page 28 to change a name applied to an Access Point. If no custom label is applied, the Access Point’s MAC address will be displayed.
UniFi™ AP-Mini User Guide Configure Maps Use this option to add maps or edit the current map(s). Zoom Slider Use to zoom the map detail in and out. Chapter 4: Map Tab 3. Enter the distance that the line represents in the Distance: field. The distance is specified in meters by default but you can switch to feet using the drop-down selection menu on the right. Click Next. Set Map Scale Use this option to define the scale of the map. You will draw a line and define the distance that the line represents.
UniFi™ AP-Mini User Guide Chapter 5: Statistics Tab Chapter 5: Statistics Tab Quick Look The Statistics tab provides a visual representation of the network traffic connected to your managed APs. Charts representing the number of clients and network traffic are displayed. An hour by hour chart of the usage over the last 24 hours is also displayed on this screen.
UniFi™ AP-Mini User Guide Chapter 5: Statistics Tab Current Usage - Top Access Points # of Clients Displays a visual pie chart representation of the client distribution on the most active Access Points. Place the mouse cursor over the chart for percentage details. Traffic Displays a visual pie chart representation of traffic on the most active Access Points. Place the mouse cursor over the chart for percentage details.