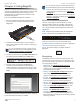
Operating System for Ubiquiti EdgeRouters Release Version: 1.
EdgeOS™ User Guide Table of Contents Table of Contents Chapter 1: Overview. . . . . . . . . . . . . . . . . . . . . . . . . . . . . . . . . . . . . . . . . . . . . . . . 1 Introduction. . . . . . . . . . . . . . . . . . . . . . . . . . . . . . . . . . . . . . . . . . . . . . . . . . . . . . . . . . . . . . . . . . . . . . 1 Configuration Interface System Requirements. . . . . . . . . . . . . . . . . . . . . . . . . . . . . . . . . . . . . 1 Hardware Overview and Installation . . . . . . . . . . . . . . .
EdgeOS™ User Guide Table of Contents Chapter 9: Toolbox. . . . . . . . . . . . . . . . . . . . . . . . . . . . . . . . . . . . . . . . . . . . . . . . 42 Ping. . . . . . . . . . . . . . . . . . . . . . . . . . . . . . . . . . . . . . . . . . . . . . . . . . . . . . . . . . . . . . . . . . . . . . . . . . . . . 42 Trace. . . . . . . . . . . . . . . . . . . . . . . . . . . . . . . . . . . . . . . . . . . . . . . . . . . . . . . . . . . . . . . . . . . . . . . . . . . . 43 Discover. . . . . . . . . . . . .
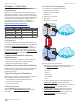
EdgeOS™ User Guide Chapter 1: Overview Chapter 1: Overview Service Provider Deployment Introduction 1. OSPF Area 0 to OSPF Area 1 EdgeOS is a powerful, sophisticated operating system from Ubiquiti Networks™.. It allows you to manage your EdgeRouter and networks. This User Guide is designed for use with version 1.3 or above of the EdgeOS Configuration Interface and all of the EdgeRouter models, which this User Guide will collectively refer to as EdgeRouter.
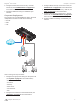
EdgeOS™ User Guide Chapter 1: Overview 6. Configure firewall rules on the Security > Firewall Policies tab; see ”Firewall Policies” on page 20 for more information. 7. Configure additional settings as needed for your network. Corporate Deployment This scenario uses a single EdgeRouter device. The three independent interfaces connect to the following: • Internet 3. Configure DHCP server(s) on the Services tab; see ”DHCP Server” on page 30 for more information. 4.
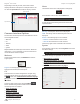
EdgeOS™ User Guide Chapter 2: Using EdgeOS Chapter 2: Using EdgeOS Note: To enhance security, we recommend that you change the default login using one of the following: EdgeOS is a powerful, sophisticated operating system that manages your EdgeRouter. It offers both a browser‑based interface (EdgeOS Configuration Interface) for easy configuration and a Command Line Interface (CLI) for advanced configuration. • Set up a new user account on the Users > Local tab (preferred option).
EdgeOS™ User Guide Chapter 2: Using EdgeOS Depending on the tab you click, some of the screens display information and options in multiple sections. You can click the open/close tab to hide or display a section. Alerts The number of new alerts is displayed in a red popup. Open/Close Tab At the bottom of the screen, click the Alerts tab.
EdgeOS™ User Guide Basic Settings Chapter 2: Using EdgeOS Domain Name Host Name System host name Enter a name for the EdgeRouter. The host name identifies the EdgeRouter as a specific device. For example, a .com URL typically uses this format: .domain_name.com Time Zone System domain name Enter the domain name of your EdgeRouter. The domain name identifies the EdgeRouter’s network on the Internet. For example, a .com URL typically uses this format: host_name..
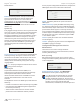
EdgeOS™ User Guide Telnet Server Enable Disabled by default. This option allows Telnet access to the EdgeRouter for remote configuration by command line. Telnet is not a secure form of communication, so we recommend SSH. See “Command Line Interface” on page 45 for more information. Port Specify the TCP/IP port of the Telnet server. The default is 23. System Log Every logged message contains at least a system time and host name.
EdgeOS™ User Guide Restore Config Chapter 2: Using EdgeOS Restart & Shut Down Router Restart Router Upload config file Click Upload a file to locate the configuration file previously created by the Back Up Config option. Select the file and click Choose. We recommend that you back up your current system configuration before uploading the new configuration. Restart To turn the EdgeRouter off and back on again, click this option.
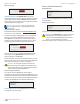
EdgeOS™ User Guide Chapter 3: Dashboard Tab Chapter 3: Dashboard Tab Routes The Dashboard tab displays status information about services and interfaces. You can also configure interfaces and Virtual Local Area Networks (VLANs). Any setting marked with a blue asterisk * is required. • Connected The following route types are listed: • Static • RIP (Routing Information Protocol) Services • OSPF (Open Shortest Path First) Status information is displayed.
EdgeOS™ User Guide Chapter 3: Dashboard Tab DHCP The DHCP server status and numbers of active and inactive servers are displayed. Click DHCP to display the Services tab. Go to “DHCP Server” on page 30 for more information. Place your mouse over a bar to view the Current Rate and Total Amount of traffic for the selected interfaces. Interfaces Distribution Click Hide Distribution to hide the Interfaces > Distribution section.
EdgeOS™ User Guide All/Ethernet/VLAN Click the appropriate tab to filter the interfaces as needed. • All All interfaces are displayed by default. Chapter 3: Dashboard Tab Configure the Interface After you click Config, the Interface Configuration screen appears. • Ethernet All of the Ethernet interfaces are displayed. • VLAN All VLANs are displayed. A table displays the following information about each interface. Click a column heading to sort by that heading.
EdgeOS™ User Guide • Speed/Duplex The default is Auto negotiation. The EdgeRouter automatically negotiates transmission parameters, such as speed and duplex, with its counterpart. In this process, the networked devices first share their capabilities and then choose the fastest transmission mode they both support. To manually specify the transmission link speed and duplex mode, select one of the following options: 100/full, 100/half, 10/full, or 10/half.
EdgeOS™ User Guide Chapter 3: Dashboard Tab Configure the Switch Configure the PoE Settings (Available for the EdgeRouter PoE only.) After you click Config, the Interface Configuration screen appears. Note: Before enabling PoE, check the specifications of your airMAX, airVision, mFi, UniFi, legacy, or third‑party devices to ensure they support passive PoE and require the available amount of voltage. (Available for the EdgeRouter PoE only.
EdgeOS™ User Guide Chapter 3: Dashboard Tab • Enable Watchdog Enable the use of PoE Watchdog. ‑ IP Address To Ping Specify the IP address of the target host to be monitored by PoE Watchdog. -- Ping Interval Specify the time interval (in seconds) between the ICMP echo requests that are sent by PoE Watchdog. The default value is 300 seconds. -- Startup Delay Specify the initial time delay (in seconds) until the first ICMP echo requests are sent by PoE Watchdog. The default value is 300 seconds.
EdgeOS™ User Guide Chapter 4: Routing Tab The Routing tab displays status information about a variety of connected, static, RIP, and OSPF routes. You can also configure static routes and OSPF options. Any setting marked with a blue asterisk * is required. You have two sub-tabs: Routes View route information and create static routes. OSPF Configure OSPF options. IPv6 Routing IPv6 (Internet Protocol version 6) is gaining popularity and is bound to grow as IP addressing demands increase.
EdgeOS™ User Guide Routes Chapter 4: Routing Tab -- Interface Define a route using a next hop interface. A route determines how traffic travels to its destination network. If more than one route is suitable, the EdgeRouter uses administrative distance as a metric to compare all available routes, including directly connected routes, manually configured static routes, dynamic routes, and the default route. The EdgeRouter uses the route with the lowest administrative distance.
EdgeOS™ User Guide All/Static/Connected/RIP/OSPF Click the appropriate tab to filter the routes as needed. • All All routes are displayed by default. Chapter 4: Routing Tab Configure the Static Route After you click Config, the Static Route Configuration screen appears. • Static All static routes that you have configured are displayed. • Connected All routes that are directly connected to the EdgeRouter are displayed. • RIP All RIP (Routing Information Protocol) routes are displayed.
EdgeOS™ User Guide Black Hole Chapter 4: Routing Tab Redistribution A single router can use multiple routing protocols, such as OSPF and RIP, which use incompatible metrics. It must reconcile information from multiple protocols to determine which route to use for a specific destination network. You can change the metrics of the distributed protocol to create protocol compatibility. • Route type The black hole route drops unwanted traffic.
EdgeOS™ User Guide Areas To enhance scalability, an OSPF network is comprised of smaller sections called areas. At the minimum, there is the backbone area, called Area 0. Chapter 4: Routing Tab Area ID The identification number of the area is displayed. Area Type The type of area is displayed. Auth Type The authentication type of the area is displayed. Network The network address of the area is displayed.
EdgeOS™ User Guide • Network Enter the IP address and subnet mask using slash notation: / (example: 192.0.2.0/24). Chapter 4: Routing Tab Actions Click the Actions button to access the following options: • Config To configure the OSPF Interface, click Config. Go to the Configure the OSPF Interface section. Click Add New to enter more network addresses. • Delete Delete the OSPF Interface. Click Save to apply your changes.
EdgeOS™ User Guide Chapter 5: Security Tab The Security tab displays status information about firewall policies, firewall groups, (Network Address Translation) rules, and PPTP VPN options. You can also configure these policies, groups, rules, and options. Any setting marked with a blue asterisk * is required. Chapter 5: Security Tab 3. Configure the details of the firewall policy. See “Configure the Firewall Policy” on page 21 for more information.
EdgeOS™ User Guide • Default Log Check this box to log packets that trigger the default action. Click Save to apply your changes. Chapter 5: Security Tab Configure the Firewall Policy The Ruleset Configuration for _ screen appears. Search Allows you to search for specific text. Begin typing; there is no need to press enter. The results are filtered in real time as soon as you type two or more characters. All/Drop/Reject/Accept Click the appropriate tab to filter the policies by default action.
EdgeOS™ User Guide • Copy Rule To create a duplicate, click Copy Rule. The duplicate rule appears at the bottom of the list. • Delete Rule Remove the rule. Add or Configure a Rule Chapter 5: Security Tab -- Enter a protocol number Enter the port number of the protocol. Match packets of this protocol. • Match all protocols except for this Match packets of all protocols except for the selected protocol. The Rule Configuration for _ screen appears.
EdgeOS™ User Guide • P2P Match P2P (Peer-to-Peer) applications. Chapter 5: Security Tab Destination -- None Do not match P2P connections. -- All Match all P2P connections. -- Choose P2P app(s) by name Match packets of the selected P2P application(s). Check the box of any P2P application on this list to select it. • Address Enter the IP address of the destination. Click Save to apply your changes, or click Cancel. Source • Port Enter the port number of the destination.
EdgeOS™ User Guide • Week Days Enter the days of the week when the rule should be applied. Enter Sun, Mon, Tue, Wed, Thu, Fri, or Sat. If you enter more than one day, use commas to separate the days (example: Mon, Tue, Wed). -- Match all week days except for these Match all days of the week except for the selected days. • Start Date Enter the date the rule should start being applied. Use the YYYY-MM-DD (year-month-day) format. • Start Time Enter the time the rule should start being applied.
EdgeOS™ User Guide Chapter 5: Security Tab Source NAT Rules Add or Configure a Source NAT Rule Source NAT Rules change the source address of packets; a typical scenario is that a private source needs to communicate with a public destination. A Source NAT Rule goes from the private network to the public network and is applied after routing, just before packets leave the EdgeRouter. After you click Config, the Source NAT Rule Configuration screen appears.
EdgeOS™ User Guide • Enable Logging Check this box to log instances when the rule is matched. • Protocol Select one of the following: -- All protocols Match packets of all protocols. -- TCP Match TCP packets. -- UDP Match UDP packets. -- Both TCP and UDP Match TCP and UDP packets. -- Choose a protocol by name Select the protocol from the drop-down list. Match packets of this protocol. • Match all protocols except for this Match packets of all protocols except for the selected protocol.
EdgeOS™ User Guide A table displays the following information about each rule. Click a column heading to sort by that heading. Chapter 5: Security Tab • Inbound Interface Select the interface through which the incoming packets enter the EdgeRouter. • Translations Complete the following: -- Address Enter the IP address that will replace the destination IP address of the incoming packet. Order The rules are applied in the order specified. The number of the rule in this order is displayed.
EdgeOS™ User Guide • Src Address Group or Interface Addr. Select the appropriate address group or interface address. If you select Other as the interface address, then enter the interface name in the field provided. The NAT rule will match the IP address of the selected interface. Chapter 5: Security Tab All/Address/Network/Port Add Group To create a new group, click Add Group. The Create New Group screen appears. • Src Network Group Select the appropriate network group.
EdgeOS™ User Guide Chapter 5: Security Tab Configure the Firewall/NAT Group VPN After you click Config, the Edit Firewall Group screen appears. Follow the instructions for your group type: A common type of VPN uses PPTP (Point-to-Point Tunneling Protocol). The EdgeRouter can function as a PPTP VPN server so a remote VPN client can access the LAN using a PPTP VPN tunnel over the Internet. • Address Group Make changes as needed. PPTP Server -- Name The name of this group is displayed.
EdgeOS™ User Guide Chapter 6: Services Tab Chapter 6: Services Tab The Create DHCP Server screen appears. The Services tab displays status information about DHCP servers, DNS forwarding, and the PPPoE server. Any setting marked with a blue asterisk * is required. You have three sub-tabs: DHCP Server Configure DHCP servers to implement different subnets on the independent interfaces.
EdgeOS™ User Guide • UniFi Controller Enter the IP address of the UniFi® Controller. The DHCP server will return the UniFi Controller’s IP address to its DHCP clients, so if a client is a UniFi AP, it will know how to contact the UniFi Controller. Chapter 6: Services Tab Configure the DHCP Server The DHCP Server - screen appears. You have three tabs available. Leases • Enable Check the box to enable this DHCP server. Click Save to apply your changes, or click Cancel.
EdgeOS™ User Guide A table displays the following information about each DHCP client. Click a column heading to sort by that heading. Chapter 6: Services Tab • Range Start The starting IP address of the range is displayed. • Range End The last IP address of the range is displayed. • Router The default route of the DHCP clients is displayed. The DHCP clients route all packets to this IP address, which is the EdgeRouter’s own IP address in most cases. • DNS The IP address of the DNS server is displayed.
EdgeOS™ User Guide Configure Static MAC/IP Mapping The Static MAC/IP Mapping screen appears. Chapter 6: Services Tab The rest of the Details tab displays the following: • DHCP Name The name of the DHCP server is displayed. • Subnet The IP address and subnet mask of the DHCP server are displayed in slash notation. Make changes as needed to the following options: • Range Start Enter the starting IP address of the range. • Range Stop Enter the last IP address of the range. Make changes as needed.
EdgeOS™ User Guide Chapter 6: Services Tab DNS PPPoE The EdgeRouter receives all LAN DNS requests and forwards them to the service provider’s DNS server. The EdgeRouter receives responses from the DNS server and forwards them to the LAN clients. The EdgeRouter can function as a PPPoE (Point-to-Point Protocol over Ethernet) server so a remote PPPoE client can establish a tunnel to the EdgeRouter for network access.
EdgeOS™ User Guide Chapter 7: Users Tab Chapter 7: Users Tab Complete the following: The Users tab displays account information about users. You can also configure these user accounts. Any setting marked with a blue asterisk * is required. • Full Name Enter the actual name of the user. You have two sub-tabs: Local Displays configurable user accounts. Remote Displays statistics about the users who remotely access the EdgeRouter. • Username Enter a unique account name for the user.
EdgeOS™ User Guide Actions Click the Actions button to access the following options: • Config To configure the user, click Config. Go to the Configure the User section below. Chapter 7: Users Tab Remote Remote access of the EdgeRouter is logged on this tab. • Delete Delete the user account; its configuration will be removed. Configure the User After you click Config, the Username screen appears. Make changes as needed. • Username The unique account name is displayed.
EdgeOS™ User Guide Chapter 8: Wizards Tab Chapter 8: Wizards Tab You can reset the EdgeRouter to its factory defaults using the EdgeOS Configuration Interface: The Wizards tab allows you to access any available wizards: System Tab Refer to “Reset Config to Default” on page 7 for instructions. • Setup Wizards • WAN+2LAN (see the next column) • Feature Wizards Wizards Tab Click the WAN+2LAN setup wizard in the column on the left. The following window will appear.
EdgeOS™ User Guide ERLite-3, ER-8, ERPro-8 LAN port (eth0) Connect eth0 to your local network, such as a switch. Chapter 8: Wizards Tab • PPPoE Select this option if your ISP uses PPPoE. -- Account Name Enter the name of your PPPoE account. -- Password Enter the password of your PPPoE account. Address The IP address is displayed in the first field, and the subnet mask or prefix length is displayed in the second field. DHCP Select this checkbox to have the EdgeRouter assign IP addresses.
EdgeOS™ User Guide Chapter 8: Wizards Tab ERPoe-5 Optional Secondary LAN port (eth0) Click configure this section if you connect eth0 to your secondary local network. • PPPoE Select this option if your ISP uses PPPoE. Address The IP address is displayed in the first field, and the subnet mask or prefix length is displayed in the second field. DHCP Select this checkbox to have the EdgeRouter assign IP addresses. -- Account Name Enter the name of your PPPoE account.
EdgeOS™ User Guide Chapter 8: Wizards Tab Feature Wizards Each wizard will guide you through configuration of the corresponding feature: port forwarding, TCP MSS clamping, or UPnP. Port Forwarding Typically you configure a port forwarding rule so a host on the external network can access a server on the internal network by using the public IP address (or hostname) of the EdgeRouter. Click the Port Forwarding feature wizard to begin configuration.
EdgeOS™ User Guide Chapter 8: Wizards Tab TCP MSS Clamping UPnP TCP MSS (Maximum Segment Size) clamping is typically used when Path MTU Discovery is not working properly. Instead of manually configuring port forwarding rules, you can use UPnP for automatic port forwarding when you have hardware that supports UPnP. Using ICMP messages, Path MTU Discovery determines the highest allowable MTU (Maximum Transmission Unit) of traffic traveling between two hosts to avoid fragmentation.
EdgeOS™ User Guide Chapter 9: Toolbox Each tab of the EdgeOS interface contains network administration and monitoring tools. At the top right of the screen, click the Toolbox button. The Toolbox drop-down menu appears. Chapter 9: Toolbox Ping You can ping other devices on the network directly from the EdgeRouter. The Ping tool uses ICMP packets to check the preliminary link quality and packet latency estimation between two network devices.
EdgeOS™ User Guide Trace The Trace tool traces the hops from the EdgeRouter to a specified outgoing IP address. Use this tool to find the route taken by ICMP packets across the network to the destination host. Chapter 9: Toolbox For more information, click the arrow to view the following: • Firmware Version The version number of the device’s firmware is displayed. • Uptime The duration of the device’s activity is displayed. • Addresses The addresses of the device’s interface are displayed.
EdgeOS™ User Guide Chapter 9: Toolbox Start Click this button to start the capture. (If a Packet Limit is not specified, then this button becomes a Stop button during the capture.) Capture results are displayed with Time and Packet descriptions. Log Monitor The Log Monitor is a log displaying live updates. Click the pause button to stop the live updates. Click the play button to resume the live updates. The System log messages table displays the following information about each log.
EdgeOS™ User Guide Appendix A: Command Line Interface Appendix A: Command Line Interface 2. Follow the appropriate set of instructions: • terminal emulator Go to the following section, Access Using a Terminal Emulator. • SSH Go to “Access Using SSH” on page 46. Overview • Telnet Go to “Access Using Telnet” on page 46. The Command Line Interface (CLI) is available if you need to configure and monitor advanced features on the EdgeRouter or prefer configuration by command line.
EdgeOS™ User Guide Appendix A: Command Line Interface Access Using SSH Access Using Telnet SSH is enabled by default. Telnet is disabled by default. To use Telnet, enable it on the System tab (see “Telnet Server” on page 6). 1. Open the SSH client on your computer. 2. At the login prompt, enter: ssh @ The defaults are ubnt for the username and 192.168.1.1 for the hostname. You can also enter a domain name instead of an IP address for the hostname.
EdgeOS™ User Guide Appendix A: Command Line Interface Access Using the EdgeOS Configuration Interface Each tab of the EdgeOS interface contains CLI access. 1. At the top right of the screen, click the CLI button. 2. The CLI window appears. At the login prompt, enter the username (the default is ubnt). CLI Modes Operational Mode When you first log in, the CLI is in operational mode. Press the ? key to view the available commands. ubnt@ubnt:~$ Note: The question mark does not display onscreen.
EdgeOS™ User Guide Appendix A: Command Line Interface Configuration Mode To configure an interface, use the set command. To switch to configuration mode, use the configure command. ubnt@ubnt:~$ configure [edit] ubnt@ubnt# For the show, set, and delete commands, you can press the ? key for help. • set ? View the available commands. • show ? View the settings that you have configured. (Because configurations vary, the list you see will differ from the sample list displayed below.
EdgeOS™ User Guide Appendix A: Command Line Interface Remove the Default User Account Create a Firewall Rule To remove the default user account, do the following: To create a firewall rule, use the set or edit commands (both methods are described below). In addition, use the compare, discard, up, top, copy, and rename commands.
EdgeOS™ User Guide Appendix A: Command Line Interface Press the ? or tab key to display options for the specified edit level.
EdgeOS™ User Guide Appendix A: Command Line Interface To create a new firewall rule from an existing firewall rule, use the copy command. To change the name of the new firewall rule, use the rename command.
EdgeOS™ User Guide Appendix A: Command Line Interface Manage the Configuration File Typically, you use the save command to save the active configuration to disk (‘config/config.boot’); however, you can also save the active configuration to a different file or remote server. Enter save and press the ? key.
EdgeOS™ User Guide Appendix A: Command Line Interface Note: The following commands require that the configuration option, commit-revisions, be set first. After you verify that the changes should be saved, use the confirm command. show system commit diff show system commit file show system commit commit comment ubnt@RTR# confirm [edit] commit-confirm confirm rollback For details on the commit-revisions option, go to “Manage the Configuration File” on page 52.
EdgeOS™ User Guide Appendix B: Contact Information Appendix B: Contact Information Ubiquiti Networks Support Ubiquiti Support Engineers are located around the world and are dedicated to helping customers resolve software, hardware compatibility, or field issues as quickly as possible. We strive to respond to support inquiries within a 24-hour period. Online Resources Support: support.ubnt.com Community: community.ubnt.com Downloads: downloads.ubnt.com 2580 Orchard Parkway San Jose, CA 95131 www.ubnt.