2 GHz High-Performance Integrated InnerFeed™ Antenna Model: AG-HP-2G16
Introduction Thank you for purchasing the Ubiquiti Networks™ airGrid® 2 GHz High-Performance Integrated InnerFeed™ Antenna. This Quick Start Guide is designed to guide you through the installation, and show you how to access the airOS® Configuration Interface. This Quick Start Guide also includes the warranty terms and is for use with the airGridM2 HP, model AG-HP-2G16. Package Contents Antenna Feed L-Bracket Grid Reflector Pole Clamp M6 U-Bolt Rear Housing M6 Washers (Qty.
Installation Requirements • 10 mm or 3/8" wrench • Shielded Category 5 (or above) cabling should be used for all wired Ethernet connections and should be grounded through the AC ground of the PoE. We recommend that you protect your networks from the most brutal environments and devastating ESD attacks with industrial‑grade shielded Ethernet cable from Ubiquiti Networks. For more details, visit www.ubnt.
LEDs Signal In airOS, you can modify the wireless signal strength threshold values for each LED on the Advanced tab under Signal LED Thresholds. The default values are shown below: LED will light green when the wireless signal strength is above -65 dBm. LED will light green when the wireless signal strength is above -73 dBm. LED will light amber when the wireless signal strength is above -80 dBm. LED will light red when the wireless signal strength is above -94 dBm.
Hardware Installation Assemble the airGrid according to your chosen polarization. 1. Attach the L-Bracket to the Grid Reflector by sliding the tabs into the slots. Vertical Polarization Horizontal Polarization WARNING: The polarization of the airGrid must match the polarization of its corresponding device (horizontal to horizontal, vertical to vertical). 2. On the front of the airGrid, ensure the polarization indicator, V or H, properly matches your desired polarization.
3. Attach the Rear Housing: a. Ensure the four alignment holes on the Grid Reflector and L-Bracket are lined up. b. Orient the Rear Housing with the locking tab of the cable feed door facing up. c. Insert the alignments pins of the Rear Housing into the alignment holes, and push until the Rear Housing locks into place with a click. Vertical Polarization Horizontal Polarization 4. Lift the locking tab of the cable feed door and detach the door from the Rear Housing.
5. Route an Ethernet cable through the Rear Housing. Connect the cable to the Ethernet port on the back of the Antenna Feed. 6. Attach the Antenna Feed: a. Rotate the Antenna Feed to match the signal polarization. b. Insert the Antenna Feed into the Rear Housing, and push until it locks into place with a click.
7. Lightly pull the Antenna Feed to ensure that the Release Button is fully engaged and locked into place. Release Button Bottom View Note: If you need to remove the Antenna Feed, you must depress the Release Button first. 8. The Release Button indicates the Antenna Feed polarization. Confirm that the polarization indicator, V or H, on the Antenna Feed matches the indicator on the Grid Reflector. WARNING: The polarization indicators must match.
. Re-attach the cable feed door to the Rear Housing. Ensure the locking tab securely latches to the Rear Housing. 10. Insert the M6 U-Bolt into the Pole Clamp and L-Bracket. Secure each end of the M6 U-Bolt with a M6 Washer and M6 Flange Nut. 9 N-m (80 lb-in) Note: The mounting assembly can accommodate a Ø 1.25" - 2.2" pole.
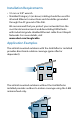
Connecting Power over Ethernet 1. Connect the other end of the Ethernet cable from the airGrid to the Ethernet port labeled POE on the PoE Adapter. 2. Connect an Ethernet cable from your LAN to the Ethernet port labeled LAN on the PoE Adapter. 3. Connect the Power Cord to the power port on the PoE Adapter. Connect the other end of the Power Cord to a power outlet.
airOS Configuration Verify connectivity in the airOS Configuration Interface and select the airGrid antenna size. 1. Make sure that your host machine is connected via Ethernet to the airGrid. 2. Configure the Ethernet adapter on your host system with a static IP address on the 192.168.1.x subnet. 3. Launch your web browser and type https://192.168.1.20 in the address field. Press enter (PC) or return (Mac). 4. The login screen will appear. Enter ubnt in the Username and Password fields.
5. Select the airGrid antenna size: a. Click the Wireless tab. b. From the Antenna drop-down list, select the appropriate option. c. Click Change to save. d. Click OK to confirm. Customize additional settings as needed to complete the installation. Please review the Installer Compliance Responsibility section on the following page. For additional details on the airOS Configuration Interface, refer to the User Guide available at documentation.ubnt.
Installer Compliance Responsibility Devices must be professionally installed and it is the professional installer's responsibility to make sure the device is operated within local country regulatory requirements. Since Ubiquiti Networks equipment can be paired with a variety of antennas and cables, the Antenna and Output Power fields are provided to the professional installer to assist in meeting regulatory requirements.
Specifications AG-HP-2G16 Dimensions Weight Networking Interface Enclosure Frequency Gain Output Power Max. Power Consumption Power Supply Power Method Max. VSWR Wind Survivability Wind Loading 370 x 270 x 270 mm (Mount Included) 1478 g (Mount Included) (1) 10/100 Ethernet Port Outdoor UV Stabilized Plastic 2412 - 2462 MHz 16 dBi 28 dBm 3.0 W 24V, 0.5A PoE Adapter (Included) Passive Power over Ethernet (Pairs 4, 5+; 7, 8 Return) 1.5:1 125 mph 7.
Safety Notices 1. Read, follow, and keep these instructions. 2. Heed all warnings. 3. Only use attachments/accessories specified by the manufacturer. WARNING: Do not use this product in location that can be submerged by water. WARNING: Avoid using this product during an electrical storm. There may be a remote risk of electric shock from lightning. Electrical Safety Information 1.
Limited Warranty UBIQUITI NETWORKS, Inc (“UBIQUITI NETWORKS”) warrants that the product(s) furnished hereunder (the “Product(s)”) shall be free from defects in material and workmanship for a period of one (1) year from the date of shipment by UBIQUITI NETWORKS under normal use and operation.
Disclaimer EXCEPT FOR ANY EXPRESS WARRANTIES PROVIDED HEREIN, UBIQUITI NETWORKS, ITS AFFILIATES, AND ITS AND THEIR THIRD PARTY DATA, SERVICE, SOFTWARE AND HARDWARE PROVIDERS HEREBY DISCLAIM AND MAKE NO OTHER REPRESENTATION OR WARRANTY OF ANY KIND, EXPRESS, IMPLIED OR STATUTORY, INCLUDING, BUT NOT LIMITED TO, REPRESENTATIONS, GUARANTEES, OR WARRANTIES OF MERCHANTABILITY, ACCURACY, QUALITY OF SERVICE OR RESULTS, AVAILABILITY, SATISFACTORY QUALITY, LACK OF VIRUSES, QUIET ENJOYMENT, FITNESS FOR A PARTICULAR PUR
Note Some countries, states and provinces do not allow exclusions of implied warranties or conditions, so the above exclusion may not apply to you. You may have other rights that vary from country to country, state to state, or province to province. Some countries, states and provinces do not allow the exclusion or limitation of liability for incidental or consequential damages, so the above limitation may not apply to you.
Industry Canada This Class A digital apparatus complies with Canadian ICES-003. To reduce potential radio interference to other users, the antenna type and its gain should be so chosen that the equivalent isotropically radiated power (e.i.r.p.) is not more than that permitted for successful communication. This device complies with Industry Canada licence-exempt RSS standard(s). Operation is subject to the following two conditions: 1. This device may not cause interference, and 2.
RoHS/WEEE Compliance Statement English European Directive 2002/96/EC requires that the equipment bearing this symbol on the product and/or its packaging must not be disposed of with unsorted municipal waste. The symbol indicates that this product should be disposed of separately from regular household waste streams. It is your responsibility to dispose of this and other electric and electronic equipment via designated collection facilities appointed by the government or local authorities.
Español La Directiva 2002/96/CE de la UE exige que los equipos que lleven este símbolo en el propio aparato y/o en su embalaje no deben eliminarse junto con otros residuos urbanos no seleccionados. El símbolo indica que el producto en cuestión debe separarse de los residuos domésticos convencionales con vistas a su eliminación.
Declaration of Conformity Česky [Czech] UBIQUITI NETWORKS tímto prohla uje, e tento UBIQUITI NETWORKS device, je ve shod se základními po adavky a dal ími p íslu n mi ustanoveními sm rnice 1999/5/ES. Dansk [Danish] Undertegnede UBIQUITI NETWORKS erklærer herved, at følgende udstyr UBIQUITI NETWORKS device, overholder de væsentlige krav og øvrige relevante krav i direktiv 1999/5/EF.
Italiano [Italian] Con la presente UBIQUITI NETWORKS dichiara che questo UBIQUITI NETWORKS device, è conforme ai requisiti essenziali ed alle altre disposizioni pertinenti stabilite dalla direttiva 1999/5/CE. Latviski [Latvian] Ar o UBIQUITI NETWORKS deklar , ka UBIQUITI NETWORKS device, atbilst Direkt vas 1999/5/EK b tiskaj m pras b m un citiem ar to saist tajiem noteikumiem.
www.ubnt.com ©2013 Ubiquiti Networks, Inc. All rights reserved. airGrid®, airMAX®, airOS®, InnerFeed™, TOUGHCable™, Ubiquiti Networks™, and the Ubiquiti logo® are trademarks or registered trademarks of Ubiquiti Networks, Inc. in the United States and in other countries.