
User's Manual

5
Chapter 2: InstallationairFiber X User Guide
Ubiquiti Networks, Inc.
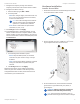
7. Configure the Frequency Settings. The selected
Frequency must be the same on both airFiberX radios.
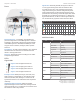
8. Configure the Wireless Security:
a. Select the AES Key Type, HEX or ASCII.
b. For the Key field:
- HEX Enter 16 bytes (eight, 16-bit HEX values: 0-9,
A-F, or a-f ). You can omit zeroes and use colons,
similar to the IPv6 format.
Note: The airFiber Configuration Interface
supports IPv6 formats excluding dotted
quad and “::” (double-colon) notation.
- ASCII Enter a combination of alphanumeric
characters (0-9, A-Z, or a-z).
9. Click Change and then click Apply.
10. In-Band Management is enabled by default, so each
airFiberX radio must have a unique IP Address. (If the
airFiberX radios use the same IP Address, you may lose
access to the airFiberX radios via the DATA ports.) Click
the Network tab.
a. For the Management IP Address option:
- DHCP Keep the default, DHCP, to use DHCP
reservation on your router to assign a unique
IPAddress.
- Static Change the IP Address, Netmask, and other
settings to make them compatible with your
network.
b. Click Change and then click Apply.
Repeat the instructions in the airFiber Configuration
section on your other airFiberX radio. After you have
configured the airFiberX radios, disconnect them and
move them to your installation site.
Hardware Installation
Install a Ground Wire
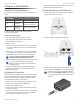
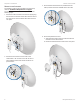
1. Remove the nut from the Ground Bonding Point located
on the back of the airFiberX radio.
Ground
Bonding
Point
2. Attach a ground wire (min. 10 AWG or 5 mm
2
) to the
lug and replace the nut to secure the wire.
3. At the installation site, secure the other end of the
ground wire to a grounded mast, pole, tower, or
grounding bar.
WARNING: Failure to properly ground your
airFiberX radio will void your warranty.
Note: The ground wire should be as short as
possible and no longer than one meter in length.