
User's Manual


4
Chapter 2: Installation airFiber X User Guide
Ubiquiti Networks, Inc.
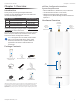
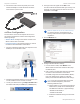
4. Connect the Power Cord to the power port on the
airFiber PoE Adapter. Connect the other end of the
Power Cord to a powersource.
airFiber Configuration
The instructions in this section explain how to access
the airFiber Configuration Interface and configure the
following settings:
• Wireless Mode Configure one airFiberX radio as the
Master and the other as the Slave.
• Frequency Setting The operating Frequency must be
the same on both the Master and the Slave.
1. Connect an Ethernet cable from your computer to the
MGMT port on the airFiberX radio.
2. Configure the Ethernet adapter on your computer with
a static IP address on the 192.168.1.x subnet.
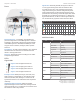
3. Launch your web browser. Type http://192.168.1.20 in
the address field and press enter (PC) or return (Mac).
4. The login screen will appear. Enter ubnt in the
Username and Password fields. Select your Country and
Language. You must agree to the Terms of Use to use
the product. Click Login.
Note for models AF-2X, AF-3X, and AF-5X only:
U.S. product versions are locked to the U.S.
Country Code to ensure compliance with FCC
regulations.
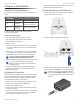
5. Click the Wireless tab.
6. Configure the Basic Wireless Settings:
a. For one airFiberX radio, select Master as the
Wireless Mode. For the other airFiberX radio, keep
the default,Slave.
b. Enter a name in the Link Name field. This should be
the same on both the Master and the Slave.
c. If needed, change the Channel Bandwidth, (Master)
Duty Cycle, Output Power, Cable Loss (see Note
below), and/or Maximum Modulation Rate settings.
Note: If you are using the airFiber AF-5X radio
with an airFiber Multiplexer, perform the
following additional steps:
d. Set the CableLoss to a value that includes the
additional loss (in dB) due to the Multiplexer.
The additional cable loss is (approximately):
• 4 dB for the AF-MPx4, or
• 7 dB for the AF-MPx8
e. Enable the NxN Radio setting on each end of
the link.