
Specifications

Chapter 3— Designing Bar Code Labels
IPL Programmer’s Reference Manual 37
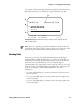
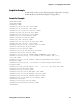
When you apply a magnification factor of 3 to human-readable field H0,
the font now prints the image below:
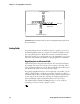
Increasing the width of a text field to 2 makes each letter in the field twice
as wide. If you did this to the example above, with field height h2, the
final field would print 158 dots wide by 18 dots high.
When you magnify a bitmap font, the edges of the characters become
jagged. If you want to print large text characters (greater than 1 inch or
2.54 cm), use an outline font such as c25 (Swiss Mono 721 standard
outline font).
Magnifying Bar Code Fields
You can also use height and width commands to modify bar code fields,
but the commands do not behave the same as with human-readable fields.
For bar code fields, the height magnification is the actual dot height of the
bar code. If you choose a height magnification of h20, the height of the
bar code field will be 20 dots.
Printing narrow bar codes conserves space on each label as well as media;
however, if you plan to scan bar codes from a distance, you may need to
magnify the bar code widths.
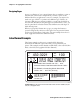
The width magnification factor for bar code fields refers to the width of
the narrowest element of the bar code. When you specify a narrow element
width of w3, the width of the narrowest element in the symbology is 3
dots wide. The spaces and large element widths grow according to preset
ratios for each symbology.
Note: You can only print a bar width of 1 if you are printing in drag mode
(bars perpendicular to the print head). If you select a width of 1 in picket
mode (bars parallel to the print head), the printer defaults to 2.
The default height for bar code fields is 50 dots, and the default width for
narrow elements is 1 dot.
Note: If you are using the POSTNET symbology, follow the rules for
magnifying fonts.