
Specifications


Chapter 3— Designing Bar Code Labels
IPL Programmer’s Reference Manual 25
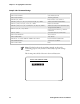
4 Combine the command strings you defined into one file and add the
following commands bracketed by <STX> and <ETX>:
Command Description
<ESC>C
Selects Advanced mode
<ESC>P
Enters Program mode
E4;F4;
Erases what was in format 4 and creates a new format 4
R
Saves the format and exits to Print mode
<ESC>E4
Accesses format 4
<ETB>
Prints the format
5 Create the data lines for the human-readable field and the bar code
field. Do this by completing the following tasks:
a Type the information that you want to appear in the human-readable
field and the bar code field in two separate lines.
b Separate the information with a <CR> at the end of the first text
string.
The <CR> tells the printer to enter the text into different fields. The
first line will be the text for the human-readable field and so on.
c Preface the data lines with the <CAN> command. It erases all data in
the current format.
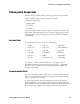
Your command strings should look like this:
Command String Definition
<CAN>
Erases all data in current format
THIS IS THE SAMPLE LABEL<CR>
Text for the human-readable field
SAMPLE
Text for the bar code field
d Bracket the command strings between <STX> and <ETX>.
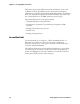
6 Combine all of the command strings into one format and it should look
like the following example.
Note: The difference between the lowercase letter “l” and the numeral
“1” is not very noticeable in the Courier font. Make sure that you enter
the correct command.