
Specifications
Appendix C— Creating User-Defined Bitmap Graphics and Fonts
224 IPL Programmer’s Reference Manual
Creating Six Bits Per Byte User-Defined Graphics
The six bits per byte format is more compact than one bit per byte. When
you use six bits per byte, you can download large graphics more quickly.
The printer must be in Advanced mode (2.5 mil or 5.0 mil) to use the six
bits per byte format. The only difference between 2.5 mil and 5.0 mil
mode is the size of the image when it prints.
The arrangement of the bits is very important in this format. Eight bits (0
through 7) compose every byte, but the printer only uses bits 0 through 5
to map the image.
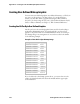
You must always set bit 6 (the seventh bit) to 1 so you can download data
to the printer. 7-bit hosts reserve bit 7 (the eighth bit) for parity and
compatibility, so the range of characters for any given UDC is 40 hex (@)
to 127 hex ( delete character).
You can download graphics like the previous one bit per byte (diamond)
bitmap example in a six bits per byte format by following the procedure
below. Please refer to “Creating Six Bits Per Byte User-Defined Fonts”
later in this appendix for an illustrated example of creating a six bits per
byte format.
To download a six bits per byte graphic
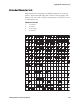
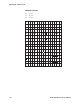
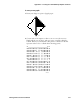
1 Draw the graphic on graph paper.
2 Change the graph paper drawing into a pattern of ones (square is filled
in) and zeros (square is empty).
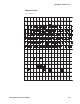
3 Starting from the top row, divide each vertical column into groups of six
digits. (If the bottom group has less than six digits, add zeros to this
group until it also has six.) The six digits in each group are the six bits
that you download in a byte of data. The top digit of each group is bit
0, the bottom digit is bit 5.
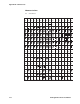
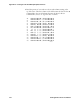
4 Add a 1 in the bit 6 position, and then add a 0 in the bit 7 position so
that each group now has eight digits. (Eight digits complete the byte.)
5 Starting with the first group of 8 bits in the first column, reverse the
order of each group so that bit 0 is now last and bit 7 is first. Work
from the top of each column to the bottom. Each eight-digit group is
now a binary representation of an ASCII character.
6 Translate each eight-digit group into an ASCII character according to
the full ASCII table in Appendix A.
7 Make sure the printer is in Advanced mode and not in 86XX Emulation
mode. For help, see the 86XX or Advanced Mode on Power-up
command in Chapter 7, “IPL Command Reference.”
8 Download the graphic so that each column is represented by a
command string.