
Specifications

Appendix C— Creating User-Defined Bitmap Graphics and Fonts
IPL Programmer’s Reference Manual 223
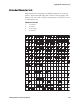
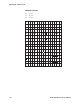
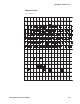
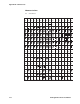
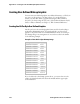
4 Ensure that the printer is in 86XX Emulation mode, and then add the
protocol characters and define the bitmap as a user-defined graphic. The
following example gives the graphic the number 3, the name
“diamond,” the dimensions 15 rows by 15 columns, and adds the
ASCII characters necessary for the printer to understand the graphic.
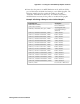
Example of Defining a Bitmap as a User-Defined Graphic
Command Line Description
<STX><ESC>c<ETX>
Selects 86XX mode
<STX><ESC>P<ETX>
Enter Program mode
<STX>G3,diamond;x15;y15;<ETX>
Create UDC bitmap 3
(diamond)
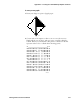
<STX>u0,000000010000000;<ETX>
Define column 0
<STX>u1,000000101000000;<ETX>
Define column 1
<STX>u2,000001000100000;<ETX>
Define column 2
<STX>u3,000010000010000;<ETX>
Define column 3
<STX>u4,000100000001000;<ETX>
Define column 4
<STX>u5,001000000000100;<ETX>
Define column 5
<STX>u6,010000000000010;<ETX>
Define column 6
<STX>u7,111111111111111;<ETX>
Define column 7
<STX>u8,011111110000010;<ETX>
Define column 8
<STX>u9,001111110000100;<ETX>
Define column 9
<STX>u10,000111110001000;<ETX>
Define column 10
<STX>u11,000011110010000;<ETX>
Define column 11
<STX>u12,000001110100000;<ETX>
Define column 12
<STX>u13,000000111000000;<ETX>
Define column 13
<STX>u14,000000010000000;<ETX>
Define column 14
<STX>R;<ETX>
Save and exit to Print mode