
Instruction Manual
‧ 10 ‧
‧ 11 ‧
rod again to empty that chamer. Continue this process until all chambers are empty.
You must operate the ejector rod its full length in each chamber to ensure complete
cartridge ejection. Once each chamber has been unloaded, slowly rotate the cylinder
one more complete revolution, take care to ensure each of the six chambers is now
completely empty. Then, and only then, should you close the loading gate.
CLEANING AND MAINTENANCE
Before beginning any cleaning or maintenance procedures, MAKE SURE the revolver
is unloaded. (WARNING: Failure to follow this step could lead to SERIOUS INJURY
OR DEATH.) To do this, move the hammer rearward to the half cock (loading) position
and open the loading gate. Then, slowly rotate the cylinder one complete revolution,
take care to ensure each of the six chambers is empty. Then, and only then, should
you begin cleaning your revolver.
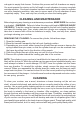
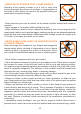
REMOVING THE CYLINDER: To remove the cylinder, follow these steps:
1. Open the loading gate.
2. Move the hammer rearward to the half cock (loading) position.
3. Depending on your model, either loosen the cylinder base pin screw or depress the
spring-loaded base pin screw, so that the cylinder base pin can be removed from
the frame by pulling it out in the direction of the muzzle.
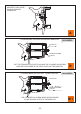
4. Slide the cylinder base pin all the way out until it is free of the frame.
5. Remove the cylinder toward the loading gate side of the revolver.
NOTE: The cylinder in your revolver is hand-tted to its frame with precision, so there
likely will be a close t. While the cylinder can be removed and reinstalled easily, care
must always be taken to avoid damage. DO NOT force the cylinder into the frame
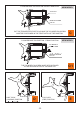
from any direction. To reinstall the cylinder, simply reverse the steps used during
removal. When you reassemble the cylinder base pin, make sure the base pin catch
snaps back into place. You can test to see if it is in the correct position by checking for
free movement of the plunger – it should move free when depressed and return under
its own spring pressure.
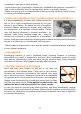
CLEANING
To clean your revolver, use a wood, aluminum or brass cleaning rod (do not use
steel), a brass bristle brush, and patches that are correctly sized to the caliber of your
revolver. Use a good quality cleaning solution to scrub each cylinder bore and barrel
bore. Always brush all the way through the bore; never try to reverse directions while
the brush is actually in the barrel or chamber. After scrubbing, run clean patches
through the bore and chambers until they come out clean. Thereafter, completely, but
lightly, oil the entire revolver. You will nd that the oil will nicely color the one piece grip
of your revolver over the years and it will develop and retain a soft patina glow. Use a
good quality brass polish on the back strap and trigger guard. These high-quality solid
brass parts will tarnish, but it is easily removed with any good quality brass polish.