
Installation Guide

© Copyright 2014 US Sunlight 8914CM C01 ver 1
8914CM Curb Mount Adapter
If there is a problem with your U.S. Sunlight product call us at 1-877-50-USSUN
Spare parts, installation advice, or recommendations for professional installers in your area are only a phone call away: 877-50-USSUN
This product requires the additional purchase of a U.S. Sunlight Solar Attic Fan. Call 1-877-50-USSUN to order.
Tel: 877-50-USSUN
www.ussunlight.com
support@ussunlight.com
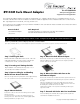
Parts Included:
The Curb Mount Adapter (CMA) is intended to be installed with U.S. Sunlight solar attic fans. It is compatible with any our roof
mounted Solar Attic Fans with 14” fan blades. The CMA is suitable for application where installation above the roof deck is desir-
able. Typical applications include at, low slope, and tile roofs.
These instructions are in addition to those provided for installation of the solar attic fan. Please read both sets of instructions before
proceeding with the installation.
(1) Curb Mount Adapter
(12) Screws
Tools Required:
Screwdriver and any tools required for Solar Attic Fan Installation
*See Solar Attic Fan instructions for list of required tools
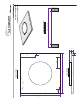
Step 1: Building the Curb
Build a curb with outside dimensions of 24” x 24” x 6”
with treated lumber. If you are unsure of the proper
construction of a curb, consult a professional.
Step 2: Locating and Cutting the Hole
Begin installation of the CMA by following Steps 1 – 5 of
the Solar Attic Fan installation instructions.
Step 3: Remove Shingles and Roong
Material from Around the Hole
Remove Shingles and roong material in an area approximately
27” x 27” to allow for room to install and ash the curb.
Step 4: Mount the Curb
Position the curb over the vent hole making sure it is square
with the roof tiles.
Securely mount the roof curb to the framing structure or
decking of the roof. Flash in the roof curb using appropriate
ashing materials for your type of roof.
Step 5: Mount the Curb Mount Adapter
Run a bead of weather proof sealant around the top edge of the curb.
Place the CMA on top of the curb and secure using the provided
screws – three (3) on each side.
Step 6: Mount the Solar Attic Fan on the
Curb Mount Adapter
Run a bead of weather proof sealant around the upturned circle in the
center of the CMA and another bead along the top of the CMA near
the edge.
Place the Solar Attic Fan on top of the CMA and secure with the
screws provided with the solar attic fan. Make sure the holes in the
fan ashing line up with the holes in the CMA.
Caulk all screw heads on the top of the fan ashing and along the
edge of the CMA.
Step 7: Proceed with Solar Attic Fan Installation
Proceed installing the Solar Attic Fan, beginning with Step 9 in the
Solar Attic Fan installation instructions
Step 1
Step 4
Step 5a
Step 6
Step 5b