
Manual
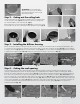
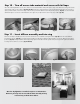

Step 5 - Measure and cut the excess
ex tube
From inside the attic, measure the distance from the top of the roof
opening to 6” below the opening in the ceiling. (g. 20) Remove the
ashing and dome assembly from the box but keep it in the cardboard
insert. With the unit upside down, pull up the ex tube to its most
extended position and mark the same distance as in the attic space.
(g. 21)
Begin cutting the excess material rst with a sharp utility knife (g. 22)
then when you get to the end of the cut use the wire cutters or tin snips
to cut through the wire. (g. 23)
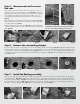
Drop the ex tube into the roof opening (g. 24) then set the ashing as-
sembly into position and make a note of the outer footprint or mark with
chalk. (g. 25)
g. 20
g. 21
g. 22 g. 23
g. 24
g. 25
Drop flex
tube into
opening
Step 6 - Remove the surrounding shingles
Once you know the outline of the ashing, remove the surrounding shingles with a pry bar. (g. 26) Composition asphalt shingles
can be installed in various sizes depending on your roof conguration so it is recommended that you remove the entire piece as
you nd it in the footprint of the SkylightTube ashing (g. 27) Make sure you remove enough shingles to allow the upper 2/3rds
of the ashing to make direct contact with the sheathing and roof underlayment (g. 28) Save all of the pieces you remove for
re-installation later.
g. 26 g. 27
g. 28
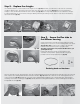
g. 29
Step 7 - Install the ashing assembly
When you are ready to install the ashing assembly, rst apply a bead of waterproof caulk or roong adhesive to the underside
of the ashing base. (g. 29) Re-install the ex tube into the roof opening and carefully place the top of the ashing underneath
the top-most row of shingles. (g. 30) Line up the bottom of the ashing with the shingle line and drive Screw A into the center
hole on the bottom as shown in (g. 31) This will allow you to ne tune the angle if necessary. Use standard 1.5” roong nails or
screws to secure the ashing in place (g. 32) There are 7 positions as shown in (g. 33)
g. 30 g. 31
g. 32
g. 33
7 positions
ATTENTION: It is important to cut enough extra length of
tube to clear the ceiling opening by at least 6 inches.