
Manual

g. 4
g. 5
15”
7.5”
g. 6 g. 7
g. 8 g. 9 g. 10 g. 11
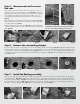
Step 3 - Installing the diffuser housing
Before inserting the diffuser housing through the cut hole on ceiling, the 4 hold-down tabs should be turned inward in order
to clear the hole. Then bring them out before using a power drill or screw driver to tighten the tabs (g. 10) Insert the diffuser
housing as shown in (g. 8) and press it ush with the ceiling. (g. 9) Use a power drill with a phillips head bit or a screwdriver
to tighten the 4 hold down tabs (g. 10) making sure that they press rmly to the sheetrock (g. 11)
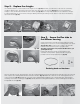
Step 4 - Cutting the roof opening
From inside the attic, locate the desired position for the ashing and dome opening. Generally, directly above the ceiling
opening is optimal but this position can vary depending on your particular attic conditions. Start by measuring the distance
between the 2 rafters and mark the center location. (g. 12) You should have a minimum distance between them to allow for
a 15” hole to be cut. Drive the 2” deck screw through so that it shows on the outside roof surface. (g. 13 and 14) From on
the roof, measure 7.5” out and mark from both sides of the exposed screw, (g. 15) repeat this at 90 and 45 degree angles to
achieve a circular pattern. Then draw in the pattern with chalk. (g. 16) Using a 1/2” drill bit, drill a pilot hole on the edge of the
circle to t the saw blade for cutting. (g. 17) Start cutting the circle with a reciprocating saw, as you reach the end of the cut
secure the material by holding onto the exposed screw so it won’t fall into the attic space (g. 18) Remove the disk of
material and discard (g. 19)
g. 12
g. 13
g. 14
g. 15
g. 16
g. 17
g. 18
g. 19
Find Center
7.5”
7.5”
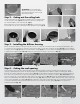
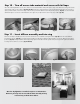
Step 2 - Cutting out the ceiling hole
Using a string make a loop around the protruding wire or nail and measure
out 7.5” from the center. (g. 4) Hold a pencil or pen to the string at the
7.5” mark and draw a circle measuring 15” (g. 5)
Begin cutting the circle with a drywall saw (g. 6) as you get to the end of
the cut hold on to the wire or nail to brace the material for removal. (g. 5)
ATTENTION: Prior to installing the
diffuser housing, remove the diffuser
assembly by pulling up on the 2 mylar
tabs and set it aside.