
Instruction manual

14
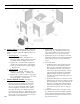
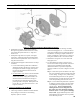
Figure 6: Knockdown Boiler Jacket Assembly
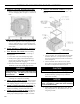
H. INSTALL TRIM. The following steam or water trim
will be concealed or inaccessible after boiler jacket is
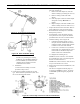
installed, see Figure 5 for boiler tapping locations and
usage.
1. STEAM BOILER — Top tappings:
a. Tapping "L" — Install 2" NPT plug in rear
section top supply tapping on boiler sizes V8H3
thru V8H5, if only one supply riser is used.
b. Tapping “M” — Install ¾” NPT coupling and
¾” NPT x 8” long nipple into ¾” NPT tapping
located next to front section top supply tapping
— all boiler sizes.
2. WATER BOILER — Top tappings:
a. Tapping “L” — Install 2” NPT plug in rear
section top supply tapping — all boiler sizes.
b. Tapping “M” —Install ¾” NPT x 8” long nipple
into ¾” NPT tapping located next to front section
top supply tapping — all boiler sizes.
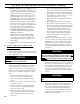
I. INSTALL BOILER JACKET. (See Figure 6).
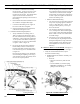
1. Remove burner swing door and hinge assembly.
Remove one (1) 5/16"-18 ange nut and washer
from right side latching stud and one (1) 5/16"-
18 x 3½" cap screw on left side used for securing
burner swing door to the boiler section. Swing
door open and remove 5/16" hairpin cotter from
rear hinge pin (see Figure 7). While holding swing
door remove hinge pin and set door aside. Remove
two (2) 5/16"-18 x ¾" long cap screws securing the
hinge bracket to the boiler section.
2. Install jacket rear panel support bracket. (See
Figure 6, Item 2A). Align bracket with two (2)
5/16"-18 tapped holes in rear section and secure
with two (2) 5/16"-18 x 1/2" long cap screws.
3. Install jacket rear panel. (See Figure 6, Item 2B).
Align holes in jacket rear panel and support bracket.
Secure with two (2) #8 x 1/2" long sheet metal
screws.
4. Jacket Front Panel
a. Install black plastic collar extension to jacket
front panels for 7-13/16" diameter tankless
heater opening. (See Figure 6, Items 2C and
2D). Engage two (2) of the collar retaining
tabs over raw edge of jacket opening. Provide
support behind the panel with one hand while
applying pressure on collar to snap each tab
over edge of opening until all eight (8) tabs are
securing collar.
b. Install jacket front panel. Locate two (2) 11/32"
diameter holes, one round, one obround, on front
panel approximately 16” up from the bottom of
the panel. Align these holes with the similarly
located 5/16"-18 tappings on the front section.
Secure with two (2) 5/16"-18 x 1/2" long cap
screws.
5. Install jacket left side panel. (See Figure 6, Item
2E). Fold panel at perforation keeping insulation
inward. Align left side panel mounting holes with
the front and rear panel holes. Secure with #8 x ½”
long sheet metal screws.
SECTION III: KNOCKDOWN BOILER ASSEMBLY (continued)