USER GUIDE & SERVICE MANUAL 1 Class ● UHRF124 ● 24” Refrigerator Freezer
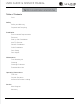
USER GUIDE & SERVICE MANUAL Table of Contents Intro Safety Safety and Warning Disposal And Recycling Installation Environmental Requirements Electrical Side by Side Installation Anti-Tip Bracket General Installation Grille Installation Door Swing Door Adjust Maintenance Free Standing Kit Cleaning Cleaning Condenser Extended Non-Use Operating Instructions First Use Control Operation Airflow and Product Loading Service Wire Diagram Warranty u-line.
USER GUIDE u-line.com WELCOME TO U-LINE Congratulations on your U-Line purchase. Your product comes from a company with over five decades of premium modular ice making, refrigeration, and wine preservation experience. U-Line creates products focused on functionality, style, and inspired innovations — paying close attention to even the smallest details. Applications include residential, outdoor, ADA height compliant, marine, and commercial.
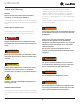
USER GUIDE u-line.com Safety and Warning This appliance is not intended for use by persons NOTICE mental capabilities, or lack of experience or knowledge, Please read all instructions before installing, operating, or servicing the appliance.
USER GUIDE u-line.com ! WARNING DO NOT use medical devices or other means to accelerate the defrosting process other than those recommended by the manufacturer. DO NOT use an ice pick or other sharp instrument to help speed up defrosting. These instruments can puncture the inner lining or damage the cooling unit. DO NOT use any type of heater to defrost. Using a heater to speed up defrosting can cause personal injury and damage to the inner lining. NOTICE Do not lift unit by door handle.
USER GUIDE u-line.com Disposal and Recycling ! DANGER RISK OF CHILD ENTRAPMENT. Before you throw away your old refrigerator or freezer, take off the doors and leave shelves in place so children may not easily climb inside. If the unit is being removed from service for disposal, check and obey all federal, state, and local regulations regarding the disposal and recycling of refrigeration appliances, and follow these steps completely: 1. Remove all consumable contents from the unit. 2.
USER GUIDE u-line.com Environmental Requirements This model is intended for indoor/interior applications only and is not to be used in installations that are open/ exposed to natural elements. This unit is designed to operate between 50°F (10°C) and 100°F (38°C). Higher ambient temperatures may reduce the unit’s ability to reach low temperatures and/or reduce ice production on applicable models. For best performance, keep the unit out of direct sunlight and away from heat generating equipment.
USER GUIDE u-line.com Electrical ! WARNING SHOCK HAZARD — Electrical Grounding Required. Never attempt to repair or perform maintenance on the unit until the electricity has been disconnected. Never remove the round grounding prong from the plug and never use a two-prong grounding adapter. Altering, cutting or removing power cord, removing power plug, or direct wiring can cause serious injury, fire, loss of property and/or life, and will void the warranty.
USER GUIDE Side-by-Side Installation u-line.com 3. Place bracket over holes and attach to unit with two screws removed in step 2 using a T-25 Torx driver. Two units may be installed side-by-side. Cutout width for a side-by-side installation is the cutout Tighten screws fully. 4. Gently push units into position. Be careful not to dimension of a single unit times two. No trim kit is required. However, 1/4" (6 mm) of space entangle the electrical cord or water line, if applicable. 5.
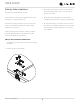
USER GUIDE u-line.com Anti-Tip Bracket 1. Slide unit out so screws on top of unit are easily accessible. 2. Remove the two screws from the opposite side of the hinge assembly using a T-25 Torx driver (see below). 3. Place bracket over holes and attach to unit with two screws removed in step 2 using a T-25 Torx driver. Tighten screws fully. 4. Gently push unit into position. Be careful not to entangle the electrical cord or water line, if applicable. 5.
USER GUIDE u-line.com General Installation INSTALLATION LEVELING INFORMATION 1. Use a level to 1. Plug in the power/electrical cord. 2. Gently push the unit into position. Be careful not to entangle the cord or water and drain lines, if confirm the unit is applicable. level. Level should 3. be placed along top Re-check the leveling, from front to back and side to edge and side edge side. Make any necessary adjustments. The unit’s top as shown.
USER GUIDE u-line.com Grille Installation REMOVING AND INSTALLING GRILLE ! WARNING Disconnect electric power to the unit before removing the grille. When using the unit, the grille must be installed. ! WARNING DO NOT touch the condenser fins. The condenser fins are SHARP and can be easily damaged. Removing the grille 1. Disconnect power to the unit. 2. Loosen the two screws (1). 3. Remove grille (2) from unit. Installing the grille 1.
USER GUIDE u-line.com Door Swing Wall 2-1/8" Min. (54 mm) 90° Door Swing Units have a zero clearance for the door to open 90°, when installed adjacent to cabinets. Stainless Steel models require 2-1/8" (54 mm) door clearance to accommodate the handle if installed next to a wall.
USER GUIDE u-line.com Door Adjustments REVERSING THE DOOR Location of the unit may make it desirable to mount the HINGE COVER door on the opposite side of the cabinet. Hinge cover included with the literature bag is optional. The hinge hardware will be removed and reinstalled on the opposite side of the cabinet. TO REVERSE THE DOOR To install hinge cover: 1. Press hinge cover squarely over hinge. Hinge Cover Remove grille: Remove the grille (see GRILLE INSTALLATION section of this guide).
USER GUIDE 3. u-line.com Remove door by tilting forward and lifting door off Prepare door for reinstallation: bottom hinge. Retain shoulder washers; they will be reused. USER GUIDE 4. Insert arrow clips into holes. 1. magnet assembly. 2. 4. Remove door by tilting forward and lifting door off bottom hinge. Retain shoulder washers; they will be reused. 5. Remove three screws from hinge holes on the opposite side. Reinstall into holes where the hinge was 3.
USER GUIDE u-line.com Free Standing Kit Te free standing kit is an optional accessory (ULAFREESTANDS), used when unit is freestanding - not built into a cabinet. Available at u-line.com. To install the kit: 1. Remove grille (see GRILLE INSTALLATION section). 3. Align front hole wit hole in shell accessory, hole in base, and hole in grille. Tighten screw. 2. Place shell accessory over front and back of cabinet base, aligning holes of shell accessory with the holes on the base.
USER GUIDE u-line.com First Use Initial startup requires no adjustments. When plugged in, the unit will begin operating under the factory default settings. If the unit was turned off during installation, simply press and the unit will immediately switch on. To turn the unit off, press . NOTICE Temperature displayed reflects actual temperature inside unit. If the temperature displayed is different than selected, the unit is progressing towards the selected temperature.
USER GUIDE u-line.
USER GUIDE u-line.com Airflow and Product Loading NOTICE Restricting airflow may result in poor product AIRFLOW performance, product failure, and uneven internal External temperatures and may freeze contents.
USER GUIDE Cleaning u-line.com To clean integrated panels, use household cleaner per the cabinet manufacturer’s recommendation. Stainless Models Stainless door panels and handles can discolor when exposed to chlorine gas, pool chemicals, saltwater or cleaners with bleach. Keep your stainless unit looking new by cleaning with a good quality all-in-one stainless steel cleaner and polish monthly. For best results use Claire® Stainless Steel INTERIOR CLEANING Disconnect power to the unit.
USER GUIDE u-line.com NOTICE The drain pan was not designed to capture the water created when manually defrosting. To prevent water from overflowing the drain pan and possibly damaging water sensitive flooring, the unit must be removed from cabinetry. To defrost: 1. Disconnect power to the unit. 2. Remove all products from the interior. 3. Prop the door in an open position (2 in. [50 mm] minimum). 4. Allow the frost to melt naturally. 5.
USER GUIDE USER GUIDE u-line.com u-line.com SAFETY • INSTALLATION & INTEGRATION • OPERATING INSTRUCTIONS • MAINTENANCE • SERVICE Cleaning Condenser INTERVAL - EVERY SIX MONTHS To maintain operational efficiency, keep the front grille free of dust and lint, and clean the condenser when necessary. Depending on environmental conditions, more or less frequent cleaning may be necessary. ! WARNING Disconnect electric power to the unit before cleaning the condenser. ! WARNING DO NOT touch the condenser fins.
USER GUIDE u-line.com Extended Non-Use VACATION/HOLIDAY, PROLONGED SHUTDOWN The following steps are recommended for periods of extended non-use: 1. Remove all consumable content from the unit. 2. Disconnect the power cord from its outlet/socket and leave it disconnected until the unit is returned to service. 3. If ice is on the evaporator, allow ice to thaw naturally. 4. Clean and dry the interior of the unit. Ensure all water has been removed from the unit. 5.
g bu De FUSE WHITE ORANGE PURPLE RED BLACK/YELLOW LIGHT BLUE BLACK 5 lay sp Di 10 1 PAN HEATER TO COMPRESSOR WHITE 6 5 4 3 2 1 3 1 6 4 BLACK (HOT) (GROUND) GREEN W/ YELLOW WHITE (NEUTRAL) GREEN W/YELLOW WHITE PURPLE WHITE LIGHT BLUE WHITE WATER VALVE RED BLACK/YELLOW 6 5 4 3 2 1 GREEN W/YELLOW WHITE BROWN RED BLACK CAM C BIN SW LIMIT SWITCH MOLD HEATER 115 VOLT PLUG BLACK BLACK (If Applicable) POWER CORD ASSEMBLY BLACK WATER SW C NC NO PLUG 220-
U-Line Corporation (U-Line) Limited Warranty One Year Limited Warranty For one year from the date of original purchase, this warranty covers all parts and labor to repair or replace any part of the product that proves to be defective in materials or workmanship. For products installed and used for normal residential use, material cosmetic defects are included in this warranty, with coverage limited to 60 days from the date of original purchase.