
Quick Start Guide


QUICK START GUIDE
u-line.com
10
Integrated Models
USER GUIDE
u-line.com
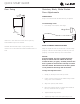
Door Adjustments
3. Remove door by tilting forward and lifting door o
bottom hinge. Retain shoulder washers; they will be
reused.
4. Insert arrow clips into holes.
Remove bottom hinge:
1. Remove bottom hinge from cabinet using a T-25 TORX
screw driver to remove three screws.
2. Remove corresponding screws on opposite side of
cabinet. On some models there may be a nut behind
one or both screws on either side.
Install bottom hinge:
Install two or three screws, depending on model. Replace
nuts if used.
Prepare door for reinstallation:
1.
Remove gasket. This will reveal mounting holes for the
magnet assembly.
2. Remove magnet assembly from door with T-10 TORX
driver. Be sure to only remove the two screws holding
the assembly to the door. Reinstall on the opposite
end of the door.
3. Rotate gasket 180°, aligning notch with magnet
assembly and pressing rmly into the gasket channel
starting at the corners.
4. Rotate door 180° to reverse.
USER GUIDE
u-line.com
Door Adjustments
4. Remove door by tilting forward and lifting door o
bottom hinge. Retain shoulder washers; they will be
reused.
5. Remove three screws from hinge holes on the
opposite side. Reinstall into holes where the hinge was
removed. Take care not to scratch cabinet.
Remove bottom hinge:
1. Remove bottom hinge from cabinet using a 1/4”
socket.
2. Remove corresponding screws on opposite side of
cabinet. On some models there may be a nut behind
one or both screws on either side.
Install bottom hinge:
Install two or three screws, depending on model. Replace
nuts if used.
Prepare door for reinstallation:
1. Remove outside gasket.
2. Rotate gasket 180
º and press firmly into the gasket
channel starting at the corners.
3. Reposition inside gasket.
a.
b.
c. Using a flat tool, such as a putty knife, gently pry
off inside gasket.
d. Rotate door 180
º
and
line up top edge of gasket to
marks on door and rmly press gasket into place.
(If the original adhesive no longer holds the gasket
in place, it may be necessary to apply a strip of
two-sided tape.)
Install top hinge and door:
1. Remove pivot screw from hinge, ip hinge over, and
install the pivot screw in the same hole from the
opposite surface.
2. Lift the door onto the bottom hinge.
3. Align edge of the hinge with the outer edge of the unit.
4. Tighten three screws and replace hinge cover.
Align and adjust the door:
Align and adjust the door (see DOOR ALIGNMENT AND
ADJUSTMENT)
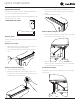
Install grille
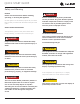
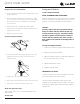
Before rotating door,
measure distance from
top of outside gasket to
top of inside gasket.
Measure the same
distance up from the
outside edge of the
gasket and place a light
mark on each side of
door.
Place a mark
on each side
Top of Door
a
b
Top Hinge
Right Side
Top Hinge
Left Side
Pivot
Screw
USER GUIDE
u-line.com
Door Adjustments
USER GUIDE
Door Adjustments 1
u-line.com
SAFETY • INSTALLATION & INTEGRATION • OPERATING INSTRUCTIONS • MAINTENANCE • SERVICE
Door Adjustments
DOOR ALIGNMENT AND ADJUSTMENT
Align and adjust the door if it is not level or is not sealing
properly. If the door is not sealed, the unit may not cool
properly, or excessive frost may form in the interior.
NOTICE
Properly aligned, the door’s gasket should be
firmly in contact with the cabinet all the way
around the door (no gaps). Carefully examine
the door’s gasket to ensure that it is firmly in
contact with the cabinet. Also make sure the
door gasket is not pinched on the hinge side of
the door.
To align and adjust the door:
1. Loosen (do not remove) top and bottom hinge screws.
2. Align door squarely with cabinet.
3. Make sure gasket is firmly in contact with cabinet all
the way around the door (no gaps).
4. Tighten bottom hinge screws.
5. Tighten top hinge screws.
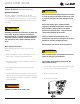
REVERSING THE DOOR
Location of the unit may make it desirable to mount the
door on the opposite side of the cabinet.
The lower hinge and hardware will be removed and
installed on the opposite side of the cabinet. The upper
hinge will be replaced with the alternate hinge supplied
with the unit.
TO REVERSE THE DOOR
Remove grille:
Remove the grille (see GRILLE INSTALLATION section
of this guide).
Remove top hinge and door:
1. Hold door to keep it from falling.
2. Remove top hinge from cabinet by removing three
screws. Set aside and save for possible future use.
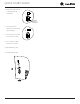
TO REVERSE THE DOOR
Remove arrow clips:
1. With a puddy knife or other at tool, gently pry each
arrow clip from hinge mounting holes.
2. Set aside arrow clips to be reused on the opposite
side.
Remove top hinge and door:
1. Hold door to keep it from falling.
2. Remove top hinge from cabinet using a Torx T-25
screwdriver to remove three screws.