QUICK START GUIDE 1 Class ● 115V ● 24” Refrigerator Ice / Refrigerator Freezer 30675 Rev_B
QUICK START GUIDE USER GUIDE u-line.com WELCOME TO U-LINE Congratulations on your U-Line purchase. Your product comes from a company with over five decades of premium modular ice making, refrigeration, and wine preservation experience. U-Line creates products focused on functionality, style, and inspired innovations — paying close attention to even the smallest details. Applications include residential, outdoor, ADA height compliant, marine, and commercial.
QUICK START GUIDE u-line.com This Quick Start Guide covers the basics of installation and general use of your product.
QUICK START GUIDE u-line.com Safety and Warning NOTICE ! DANGER Please read all instructions before installing, operating, or servicing the appliance. Service must be done by factory authorized service personnel. Any parts shall be replaced Use this appliance for its intended purpose only and follow with like components. Failure to comply could these general precautions with those listed throughout this increase the risk of possible ignition due to guide: incorrect parts or improper service.
USER GUIDE QUICK START GUIDE USER GUIDE Environmental Requirements Electrical This model is intended for indoor/interior applications only u-line.com u-line.com ! WARNING and is not to be used in installations that are open/ exposed to natural elements. SHOCK HAZARD — Electrical Grounding Required. Never attempt to repair or perform This unit is designed to operate between 50°F (10°C) and maintenance on the unit until the electricity has 100°F (38°C).
USER GUIDE QUICK START GUIDE Water Hookup u-line.com u-line.com (Ice maker models only) ! CAUTION PREPARE PLUMBING Do not use any plastic water supply line. The line The water valve uses a standard 1/4" (6.35 mm) is under pressure at all times. Plastic may crack compression fitting. U-Line recommends using accessory or rupture with age and cause damage to your water hook up kit – part # 80-54674-00. The kit includes a home. 10' (3 m) braided flexible water supply line and a brass hose fitting.
USER GUIDE QUICK START GUIDE u-line.com u-line.com 4. Break away filler feature in bushing with flat screwdriver. Remove ZLWK ɠDW screwdriver 5. Thread water line through back panel hole (with bushing). 6. Locate water valve inlet and connect to valve. 7. Turn on water supply and check for leaks. 8. Reinstall back panel. 9. Install retaining clip.
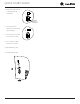
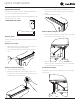
USER GUIDE QUICK START GUIDE u-line.com u-line.com USER GUIDE Door Swing Stainless, Black, White Models Door Adjustments Wall 2-1/8" Min. (54 mm) HINGE COVER Hinge cover included with the literature bag is optional. To install hinge cover: 1. Press hinge cover squarely over hinge. Hinge Cover 90° Door Swing Units have a zero clearance for the door to open 90°, when installed adjacent to cabinets.
QUICK START GUIDE USER GUIDE u-line.com 3. REVERSING THE DOOR u-line.com Remove door by tilting forward and lifting door off bottom hinge. Retain shoulder washers; they will be Location of the unit may make it desirable to mount the reused. USER GUIDE 4. Insert arrow clips into holes. door on the opposite side of the cabinet. The hinge hardware will be removed and reinstalled on the opposite side of the cabinet. 4.
QUICK START GUIDE USER GUIDE USER GUIDE u-line.com SAFETY • INSTALLATION & INTEGRATION • OPERAT Prepare door for reinstallation: Integrated Models 1. Door Adjustments Remove gasket. This will reveal mounting holes for the magnet assembly. 2. 3. 4. u-line.com u-line.com DOOR ALIGNMENT AND ADJUSTMENT Remove magnet assembly from door with T-10 TORX c. Using flat tool, such as a putty knife, gently pry driver. Beasure to only remove the two screws holding off inside gasket.
QUICK START GUIDE USER GUIDE GUIDE u-line.com Remove bottom hinge: u-line.com 1. Remove bottom hinge from cabinet. OPERATING INSTRUCTIONS • MAINTENANCE • SERVICE 3. TO REVERSE THE DOOR u-line.com 4. Remove door by tilting forward and lifting door off Ins bottom hinge. Retain shoulder washers; they will be 1. reused. 4. 2. Remove corresponding screws on opposite side of Remove bottom hinge: cabinet. On some models there may be a nut behind Remove arrow clips: 1.
e ORX d ce starting at the corners. QUICK START GUIDE 4. Rotate door 180° to reverse. 2. If the unit is not level, adjust the legs on the corners of the unit as necessary. u-line.com u-line.com u-line.com Install top top hinge andand door: Install hinge door: 1. Use alternate hinge supplied with unit and reinstall the 1. Install hinge with longer straight edge aligned to screws. Do not tighten. outside edge of cabinet. Do not tighten. Turn to Adjust 3.
QUICK START GUIDE USER GUIDE QUICK START GUIDE USER GUIDE Anti-Tip Bracket Integrated Panel Installation 1. (Amended) u-line.com u-line.com SAFETY • INSTALLATION & INTEGRATION • OPERATIN D 1. Fully open door/drawer. Slide unit out so screws on top of unit are easily s accessible. fl 2. Starting at corner, pull 2. N Remove the two screws from the opposite side of the gasket away from door/ hinge assembly using a T-25 Torx driver (see below). drawer. 3.
ed) QUICK START GUIDE USER GUIDE USER GUIDE u-line.com u-line.com OPERATING INSTRUCTIONS • MAINTENANCE • SERVICE u-line.com SAFETY • INSTALLATION & INTEGRATION • OPERATI NOTICE 12.Using a Phillips screwdriver, place one screw into each Due to differences in floor construction or of the 6 pilot holes and screw down. Do not overtighten surrounding cabinetry, the panel may not sit screws. flush with the top of the door/drawer. 13.Be sure the screws force their way past the opening on Panel 9.
QUICK START GUIDE USER GUIDE u-line.
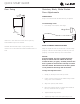
QUICK START GUIDE USER GUIDE u-line.com u-line.com Airflow and Product Loading NOTICE Restricting airflow may result in poor product AIRFLOW performance, product failure, and uneven internal External temperatures and may freeze contents.
QUICK START GUIDE USER GUIDE Ice u-line.com u-line.com (Ice maker models only) ! CAUTION ICE MAKER OPERATION NEVER use an ice pick, knife or other sharp When the ice bucket is full, the ice making mechanism will instrument to separate cubes. Shake the ice shut off. However, the refrigeration system will continue bucket instead. to cool and maintain the ice supply. During periods of limited use or high ambient NOTICE temperatures, it is common for cubes to fuse together.
QUICKGUIDE START GUIDE USER u-line.com u-line.com ICE MAKER ADJUSTMENT 3. Turn the adjusting screw toward the minus (-) sign (clockwise) for smaller cubes or toward the plus (+) Ice Cube Thickness Adjustment sign (counterclockwise) for larger cubes. Interval - As Required 4. Install the ice maker assembly cover. On ice maker equipped models, adjust the cube size by changing water amount injected into the ice maker assembly as follows: ADJUSTING ICE HARVEST 1.
QUICK START GUIDE USER GUIDE u-line.com u-line.com Cleaning To clean integrated panels, use household cleaner per the cabinet manufacturer’s recommendation. Stainless Models Stainless door panels and handles can discolor when INTERIOR CLEANING exposed to chlorine gas, pool chemicals, saltwater or Disconnect power to the unit. cleaners with bleach.
USER QUICKGUIDE START GUIDE u-line.com u-line.com NOTICE The drain pan was not designed to capture the water created when manually defrosting. To prevent water from overflowing the drain pan and possibly damaging water sensitive flooring, the unit must be removed from cabinetry. To defrost: 1. Disconnect power to the unit. 2. Remove all products from the interior. 3. Prop the door in an open position (2 in. [50 mm] minimum). 4. Allow the frost to melt naturally. 5.
U-Line Corporation (U-Line) Limited Warranty One Year Limited Warranty For one year from the date of original purchase, this warranty covers all parts and labor to repair or replace any part of the product that proves to be defective in materials or workmanship. For products installed and used for normal residential use, material cosmetic defects are included in this warranty, with coverage limited to 60 days from the date of original purchase.